Review, vet, and protocol
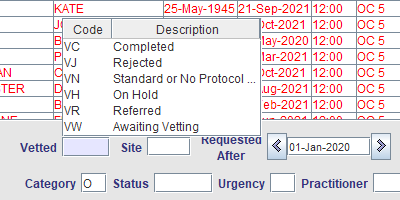
Vetting, as performed by a qualified clinician, is the process of reviewing a request for imaging and deciding if and how it will be performed.
This marks the event as vetted, and records your choice of pre-set protocol and specific instructions as to how it will be performed.
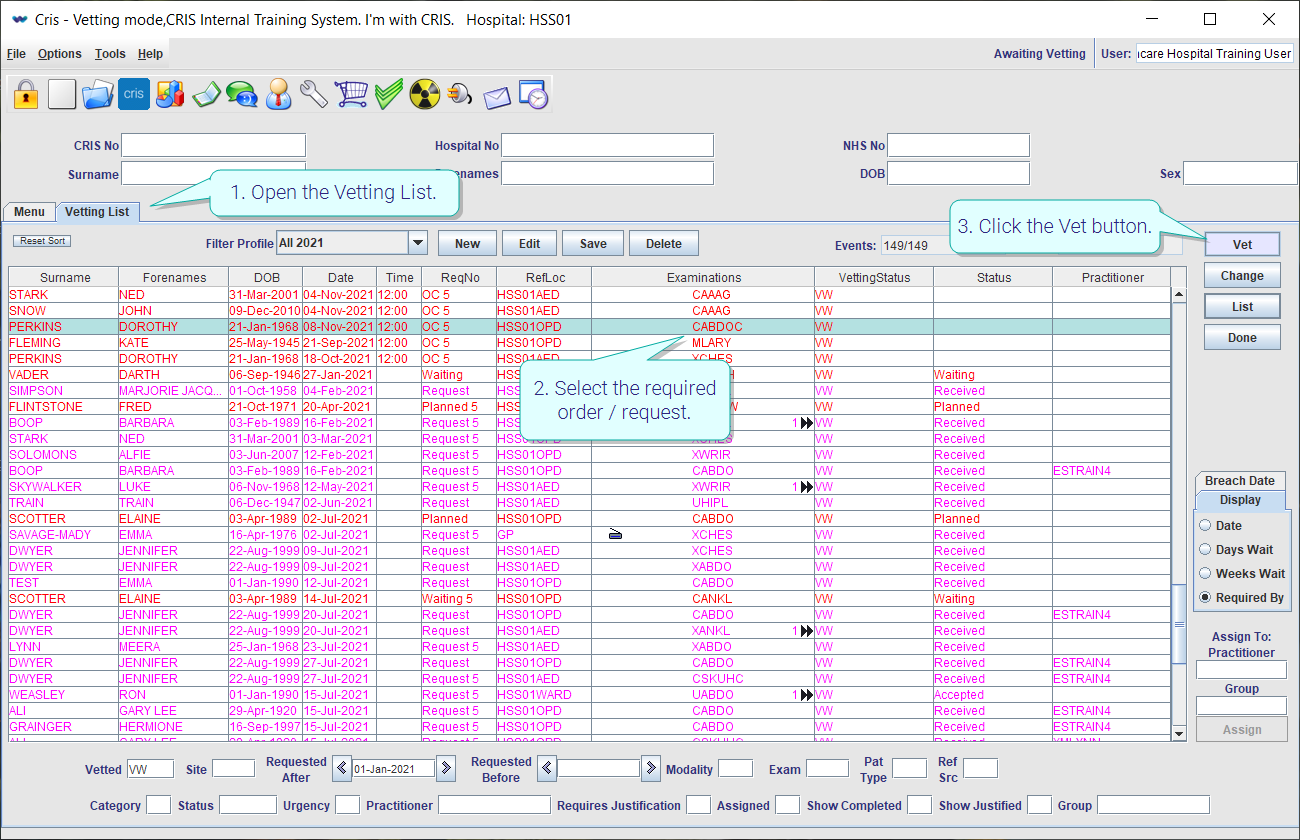
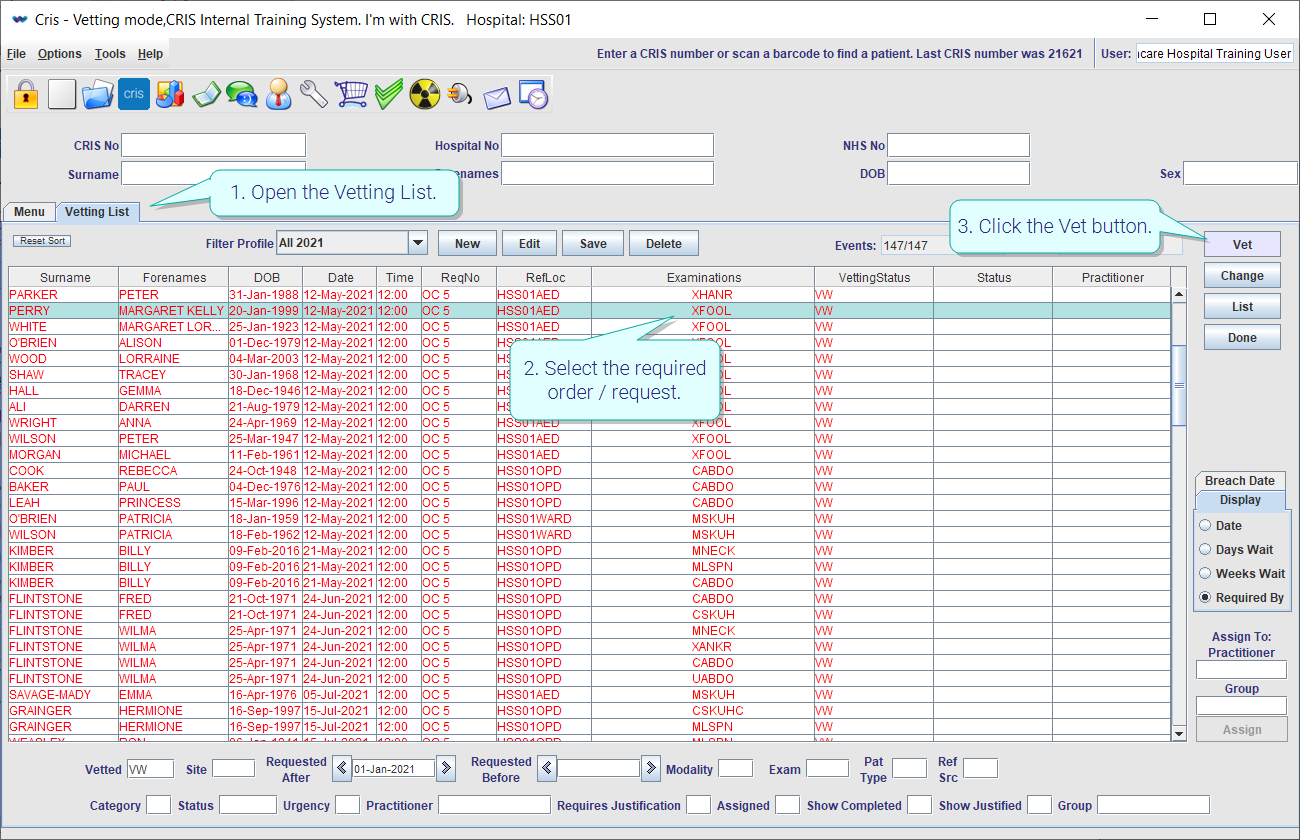
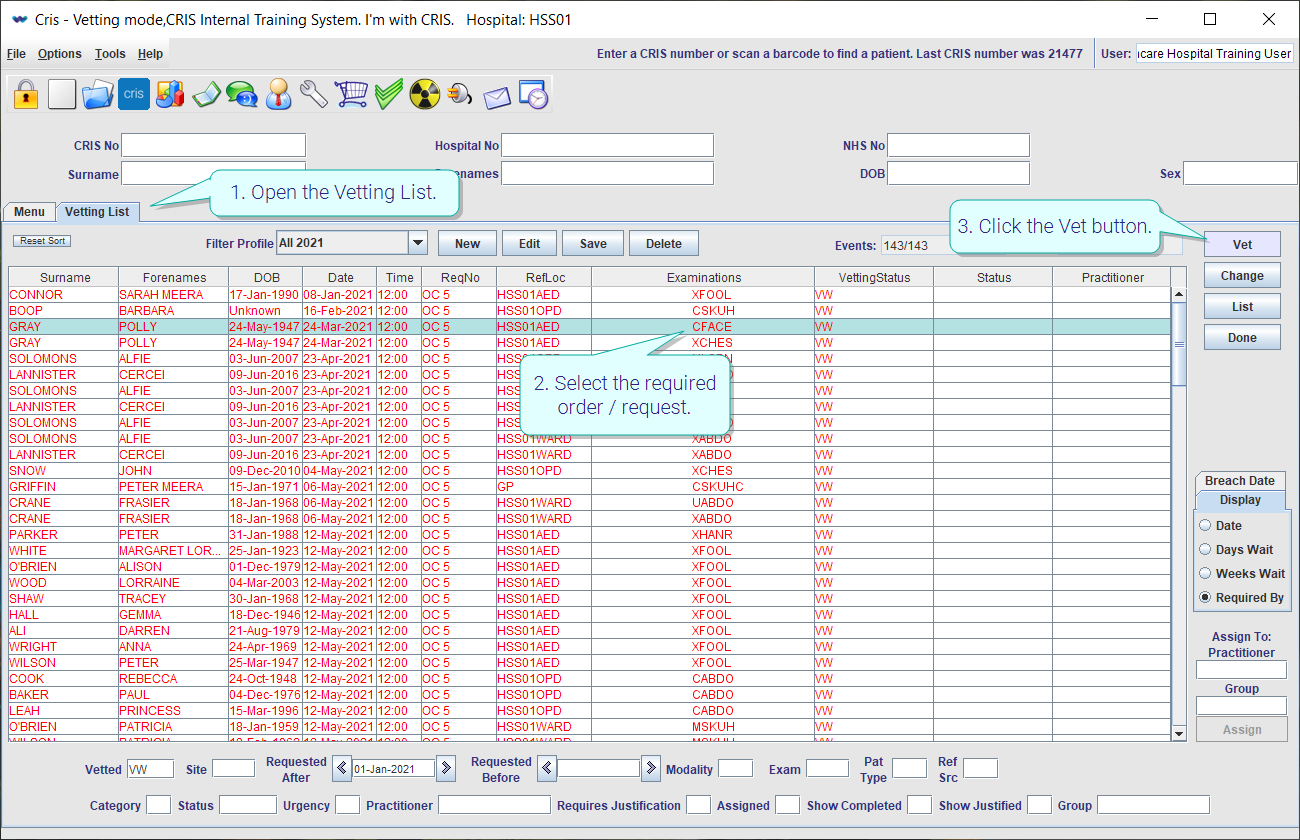
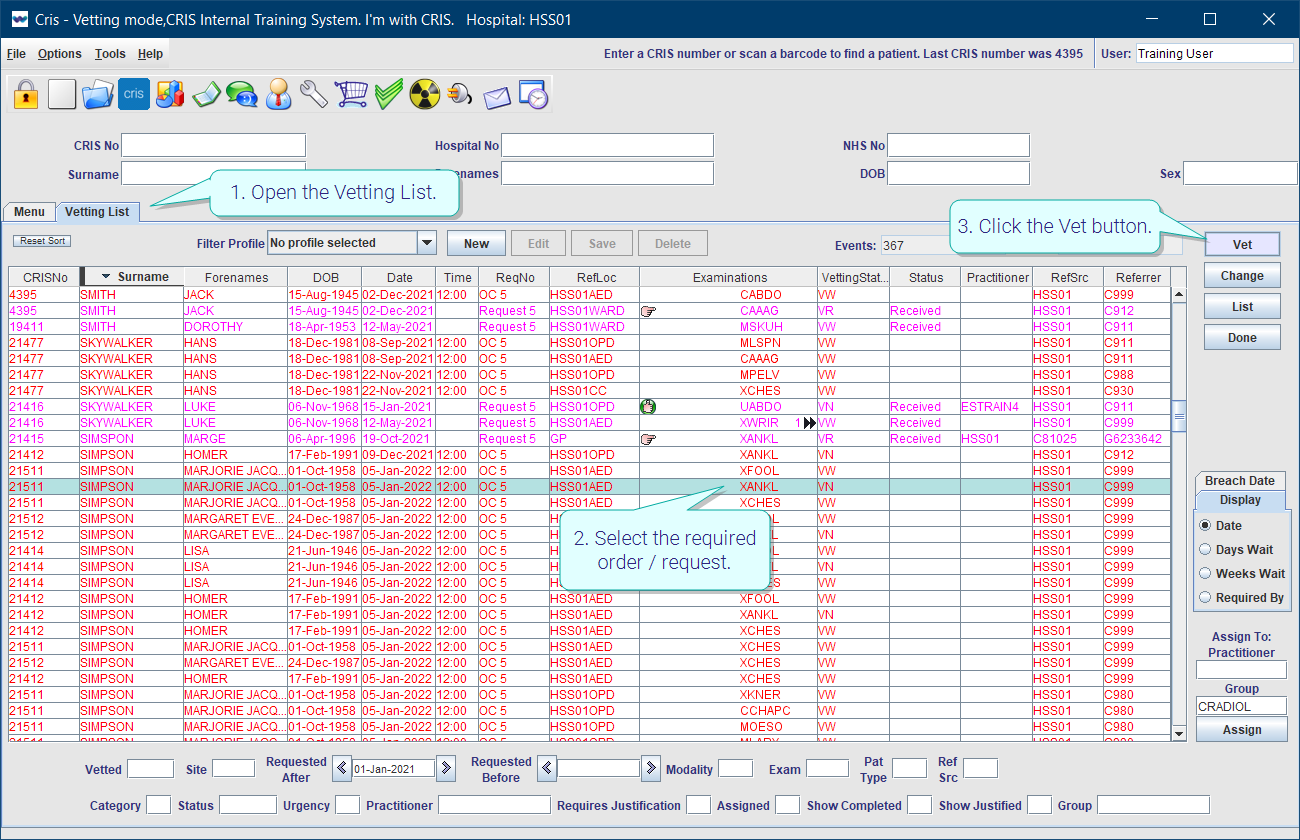
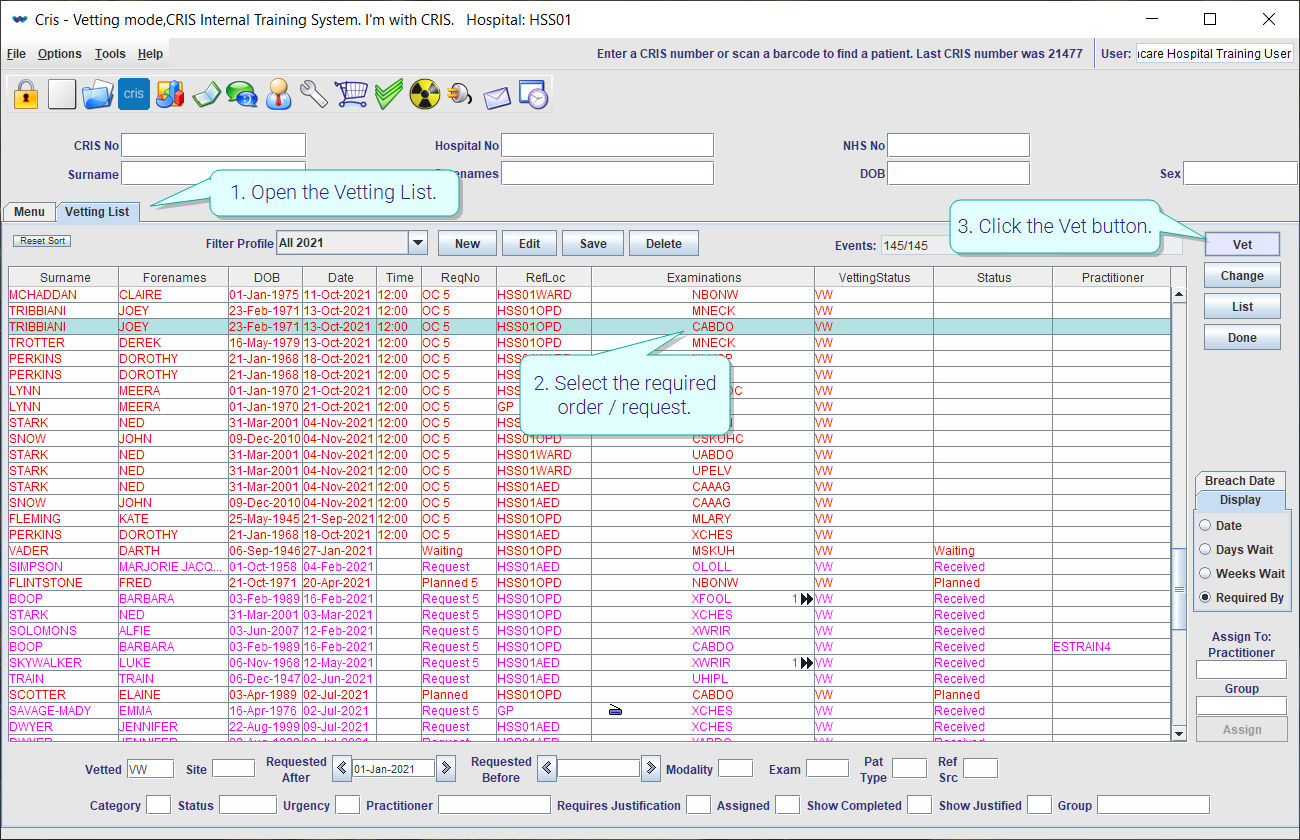
- Open the Vetting List.
- Select the required order / request.
- Click the Vet button.
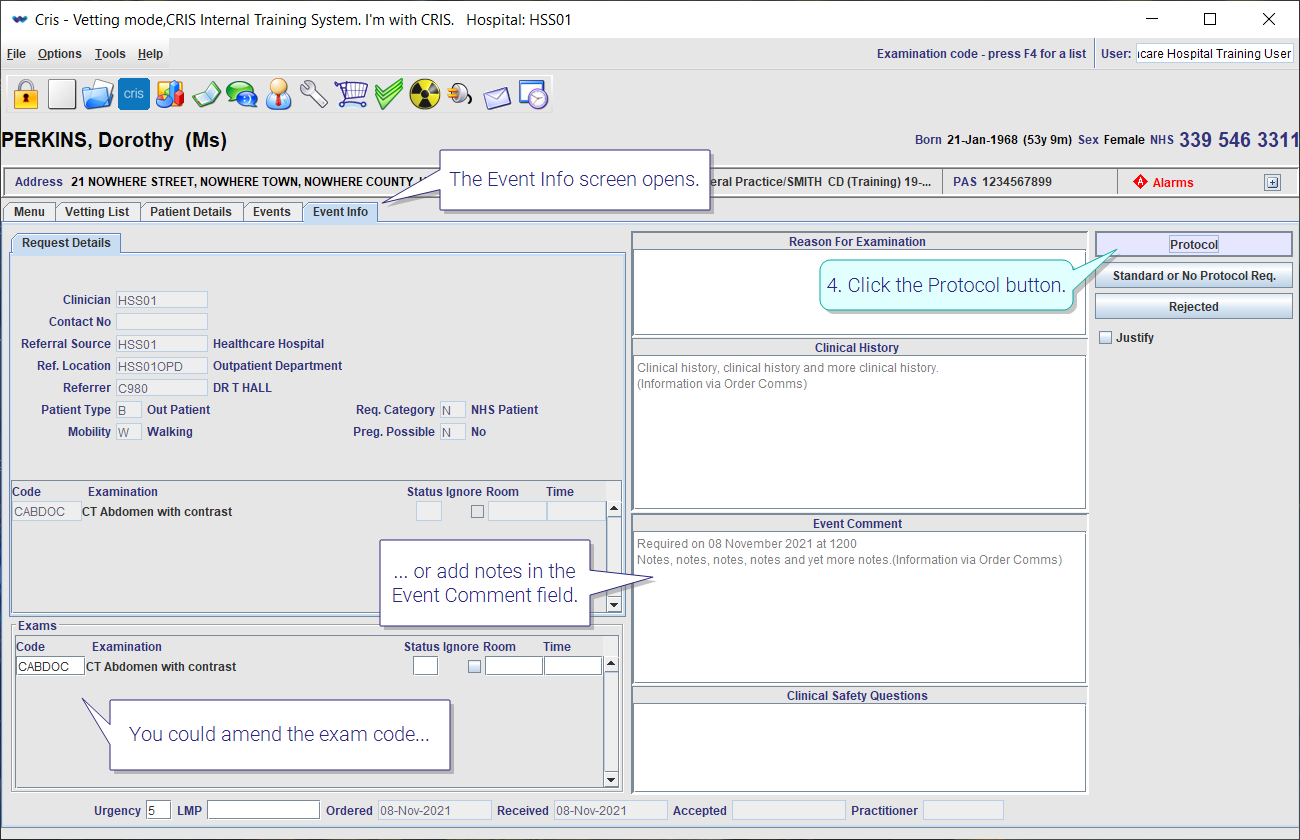
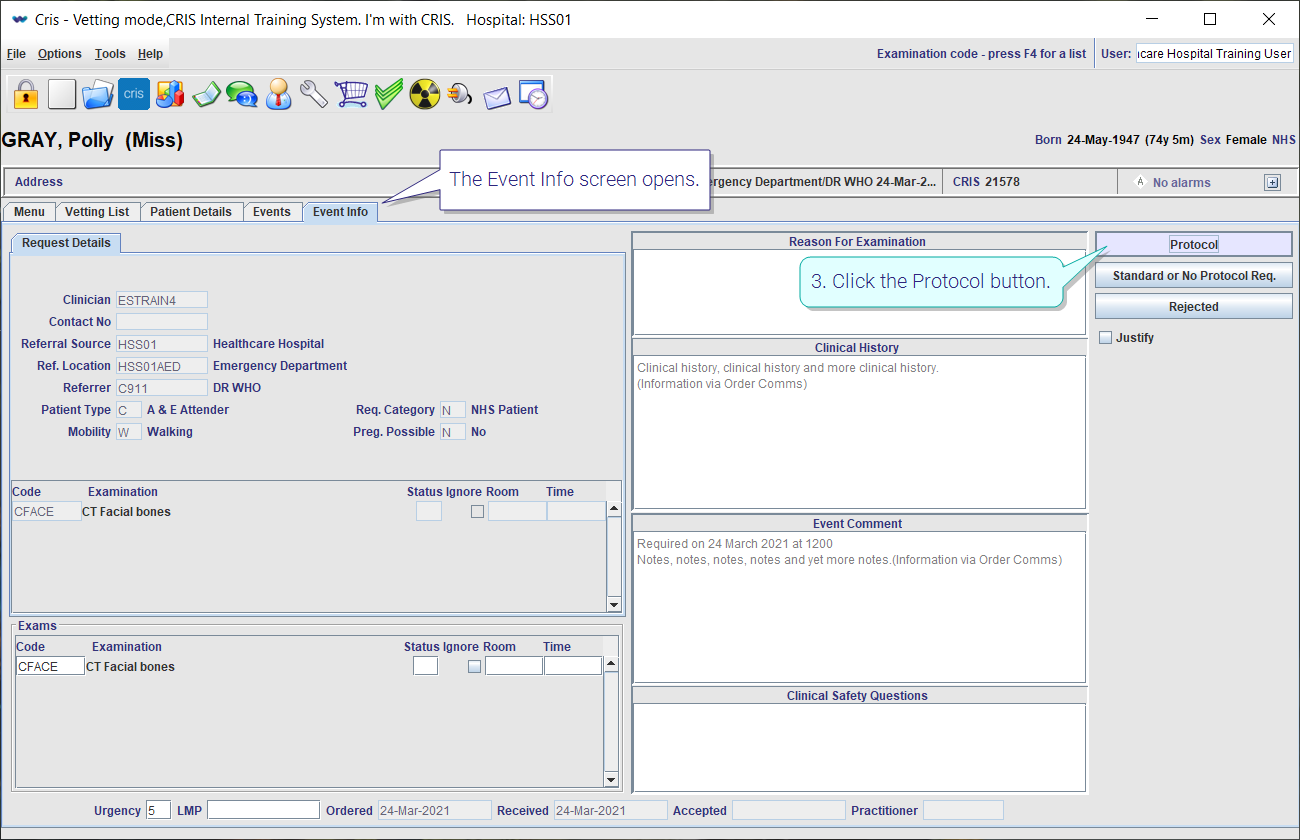
- Click the Protocol button.
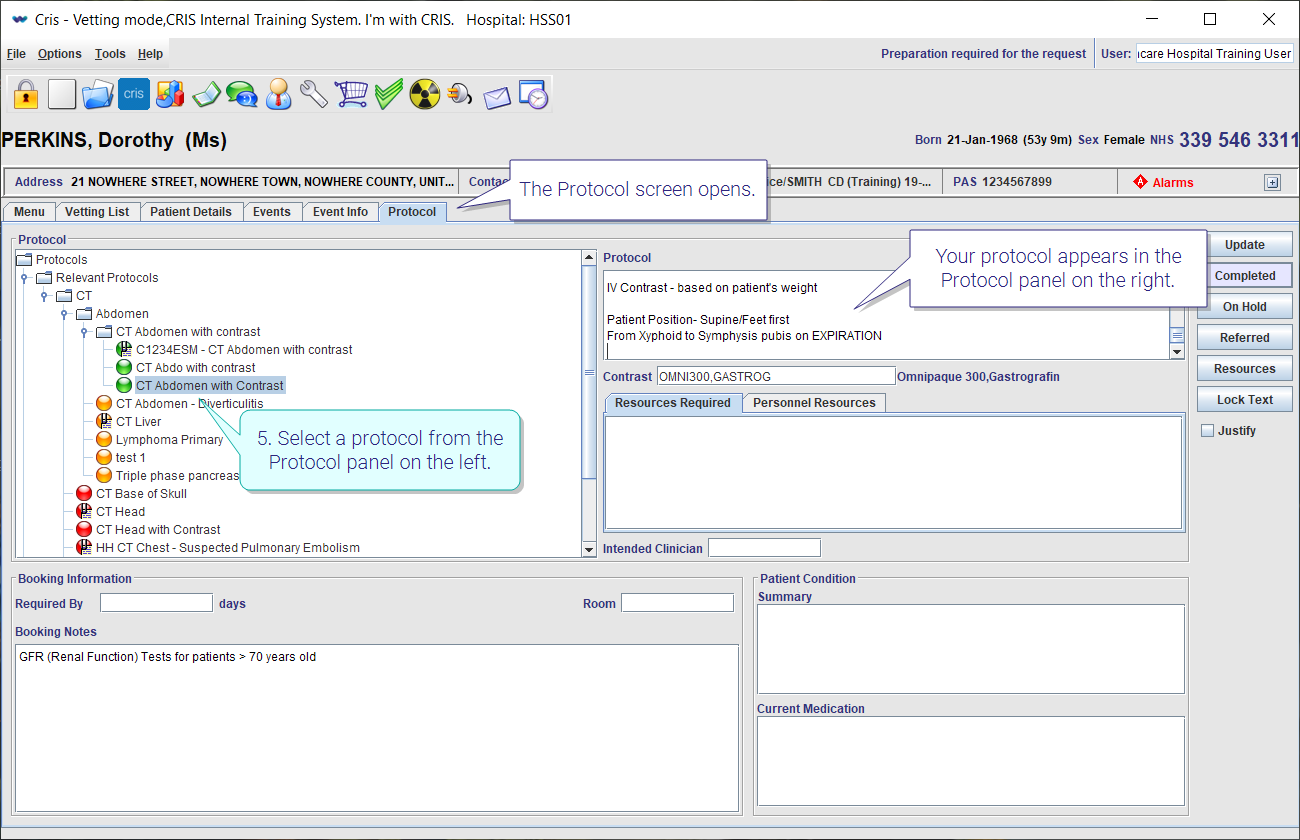
- Select a protocol from the Protocol panel on the left.
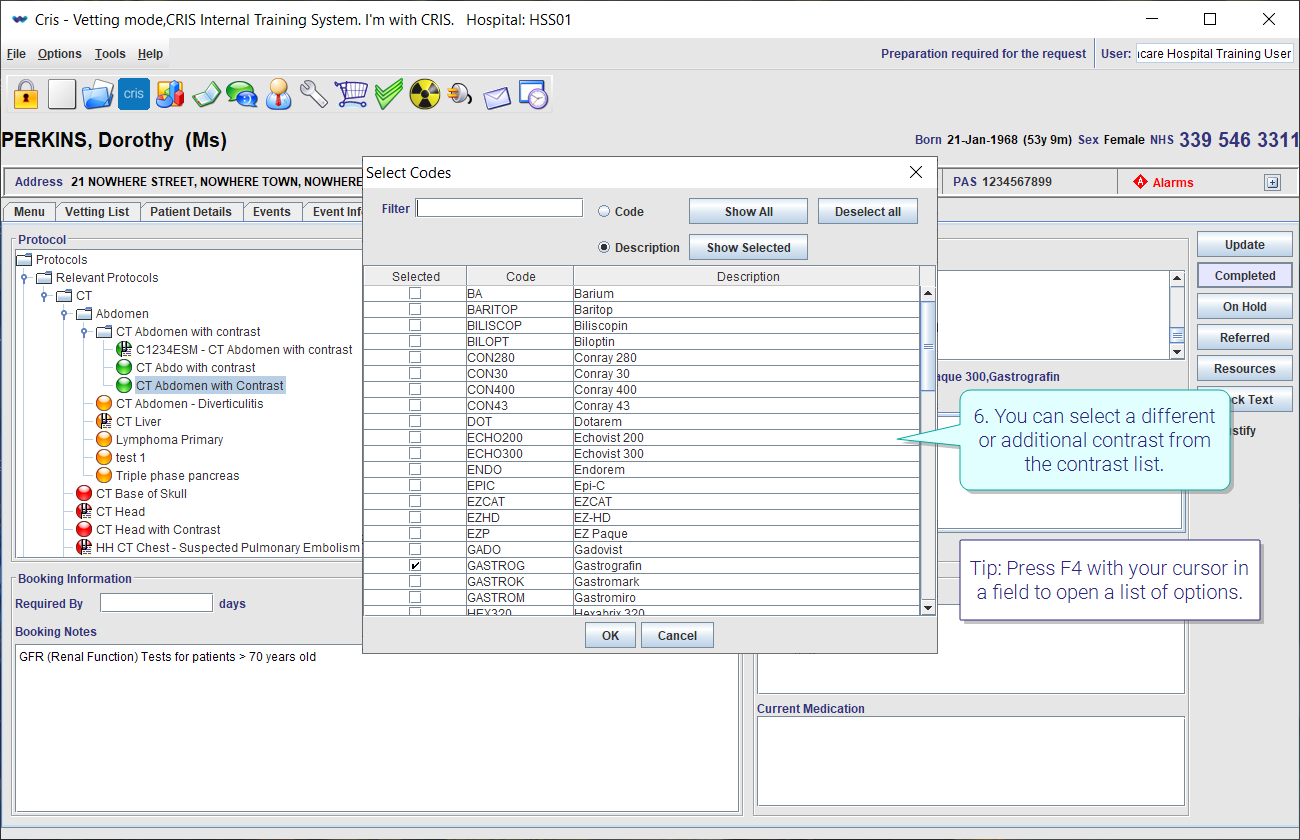
- You can select a different or additional contrast from the contrast list.
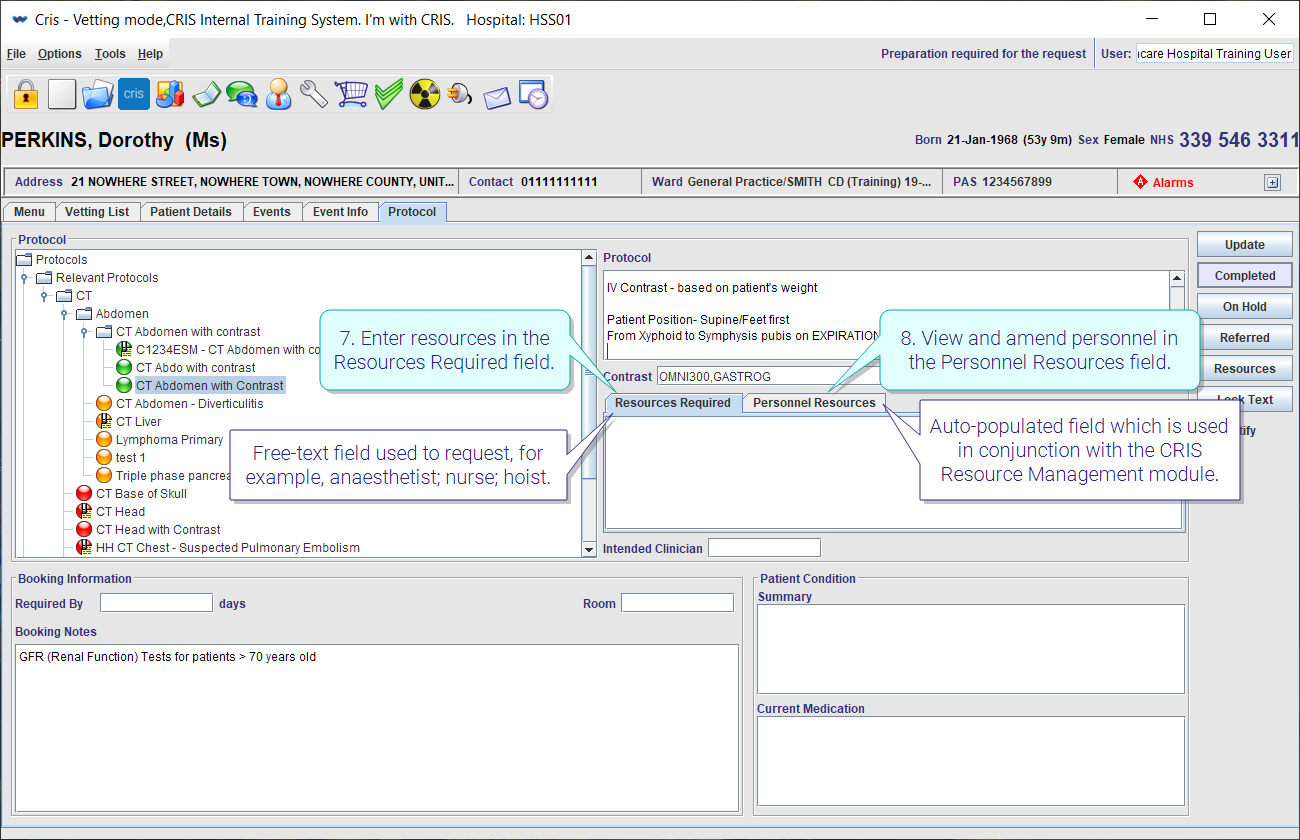
- Enter resources in the Resources Required field.
- View and amend personnel in the Personnel Resources field.
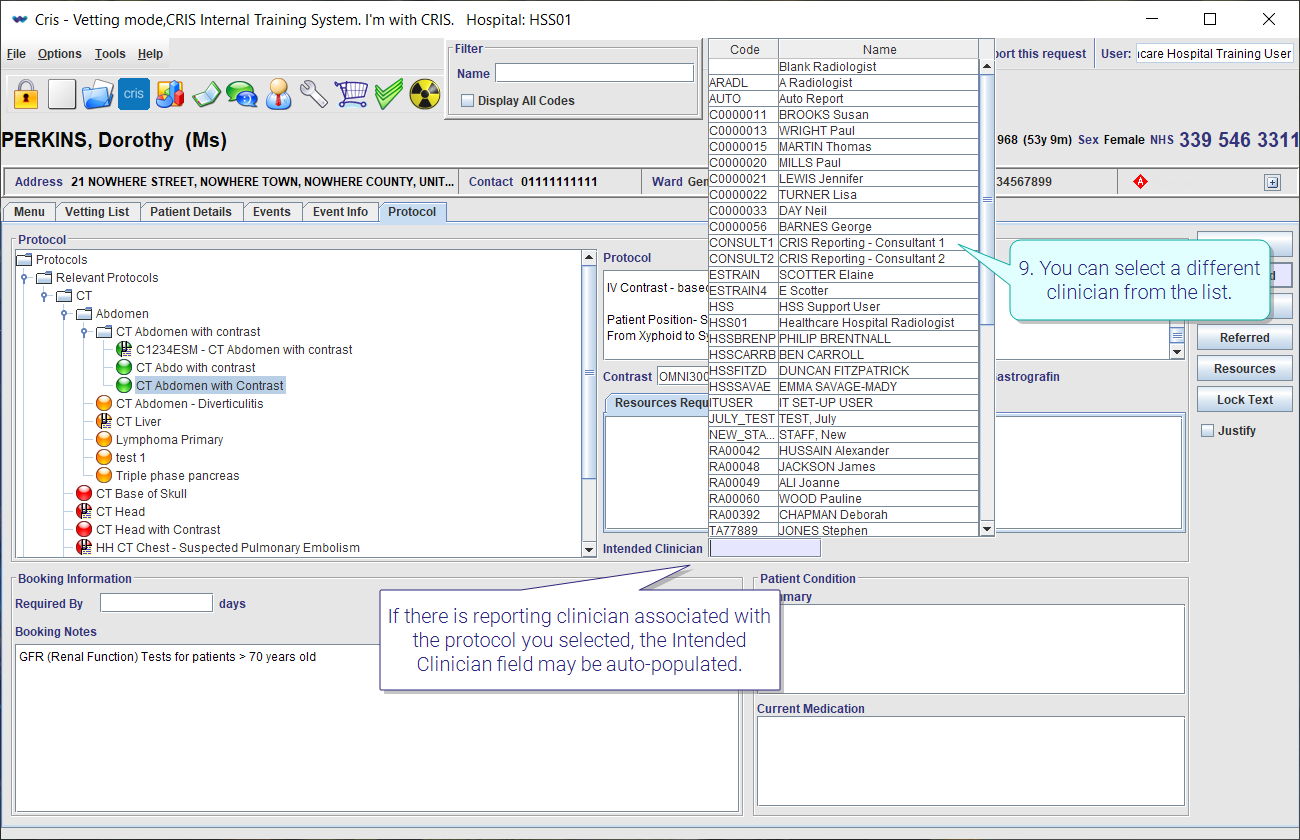
- You can select a different clinician from the list.
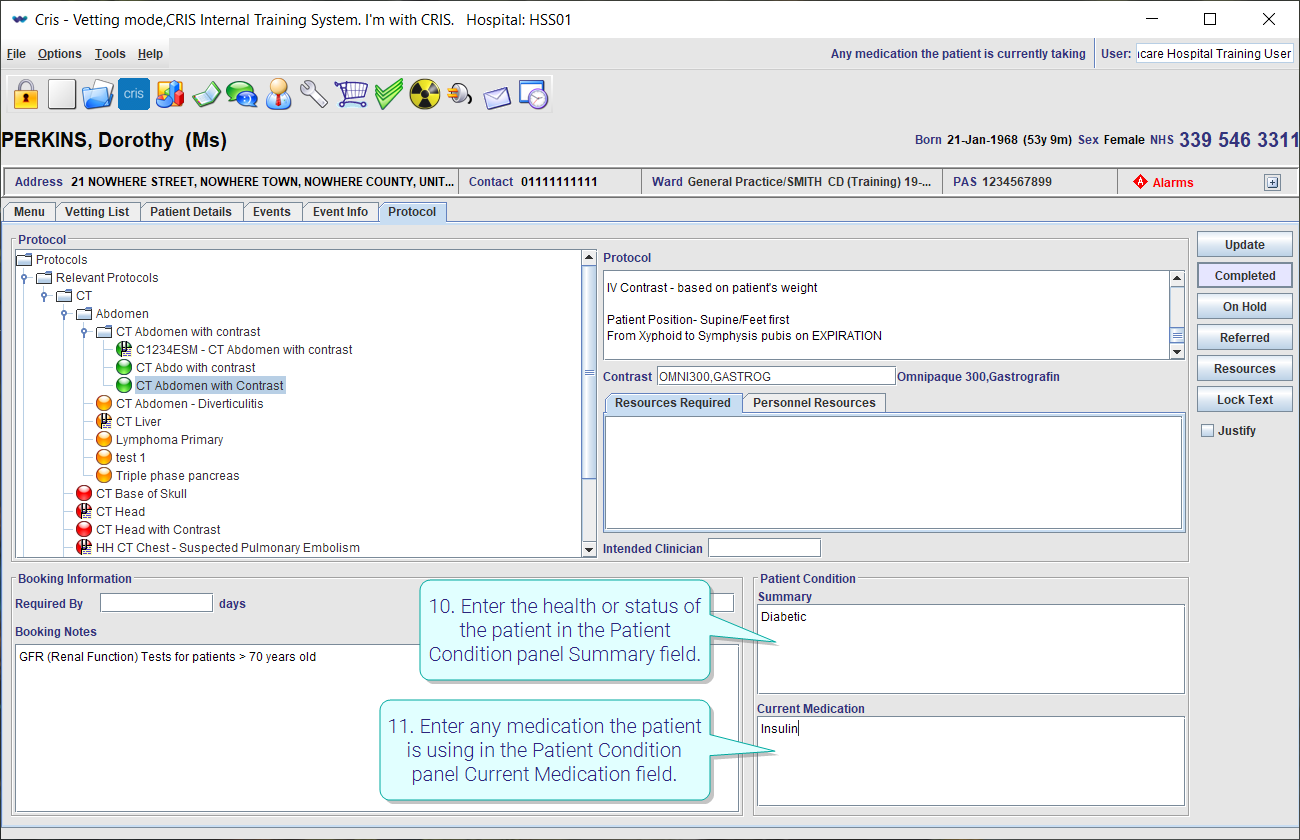
- Enter the health or status of the patient in the Patient Condition panel Summary field.
- Enter any medication the patient is using in the Patient Condition panel Current Medication field.
-
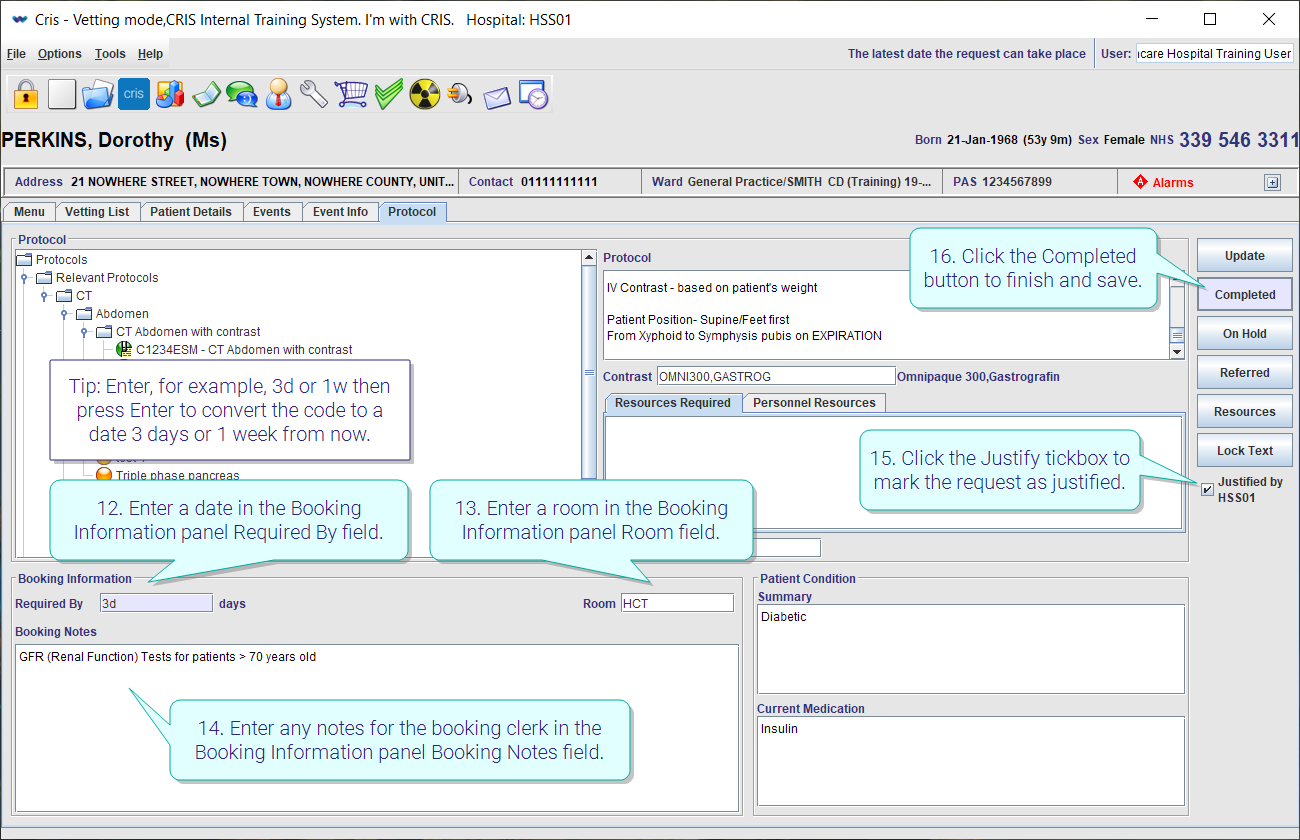
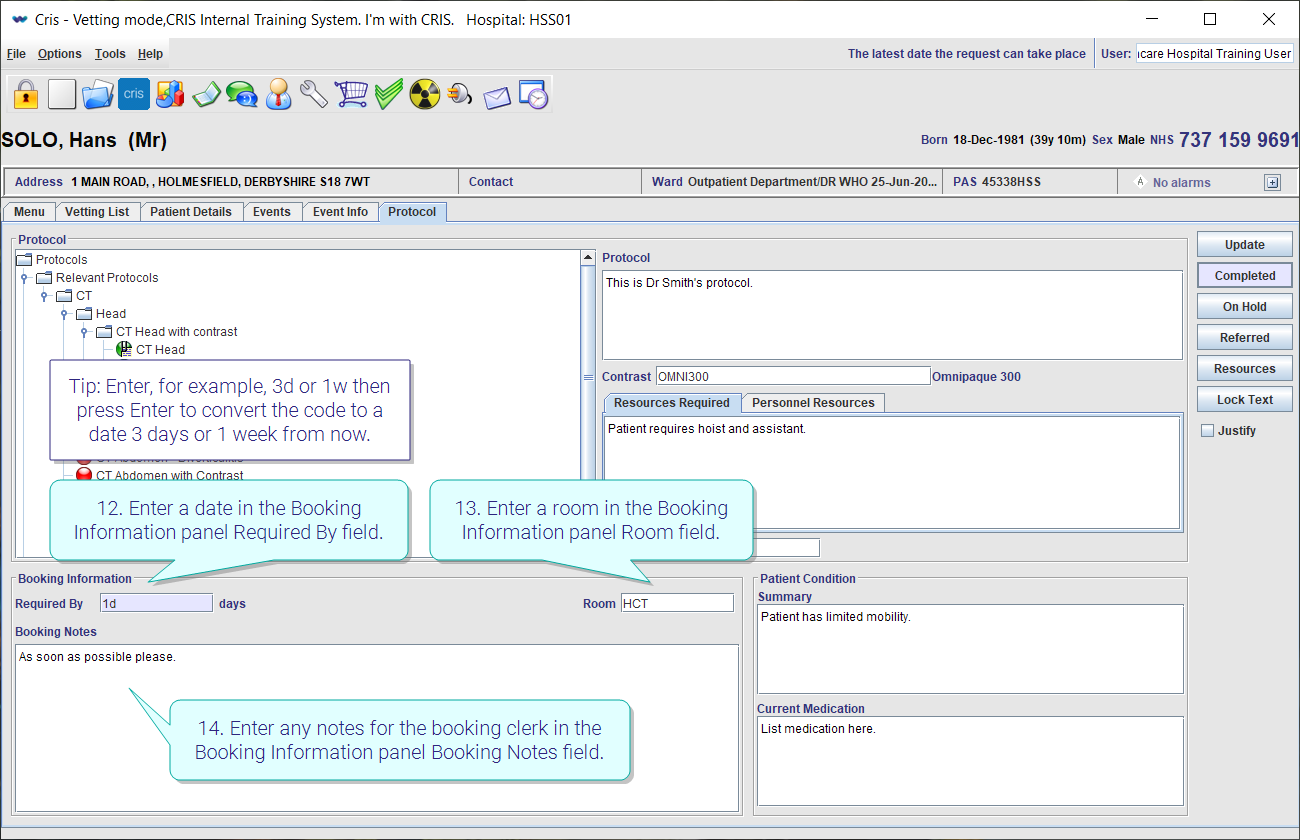
Enter a date in the Booking Information panel Required By field.
-
Enter a room in the Booking Information panel Room field.
- Enter any notes for the booking clerk in the Booking Information panel Booking Notes field.
- Click the Justify tickbox to mark the request as justified (if required according to IRMER regulations).
- Click the Completed button to finish and save.
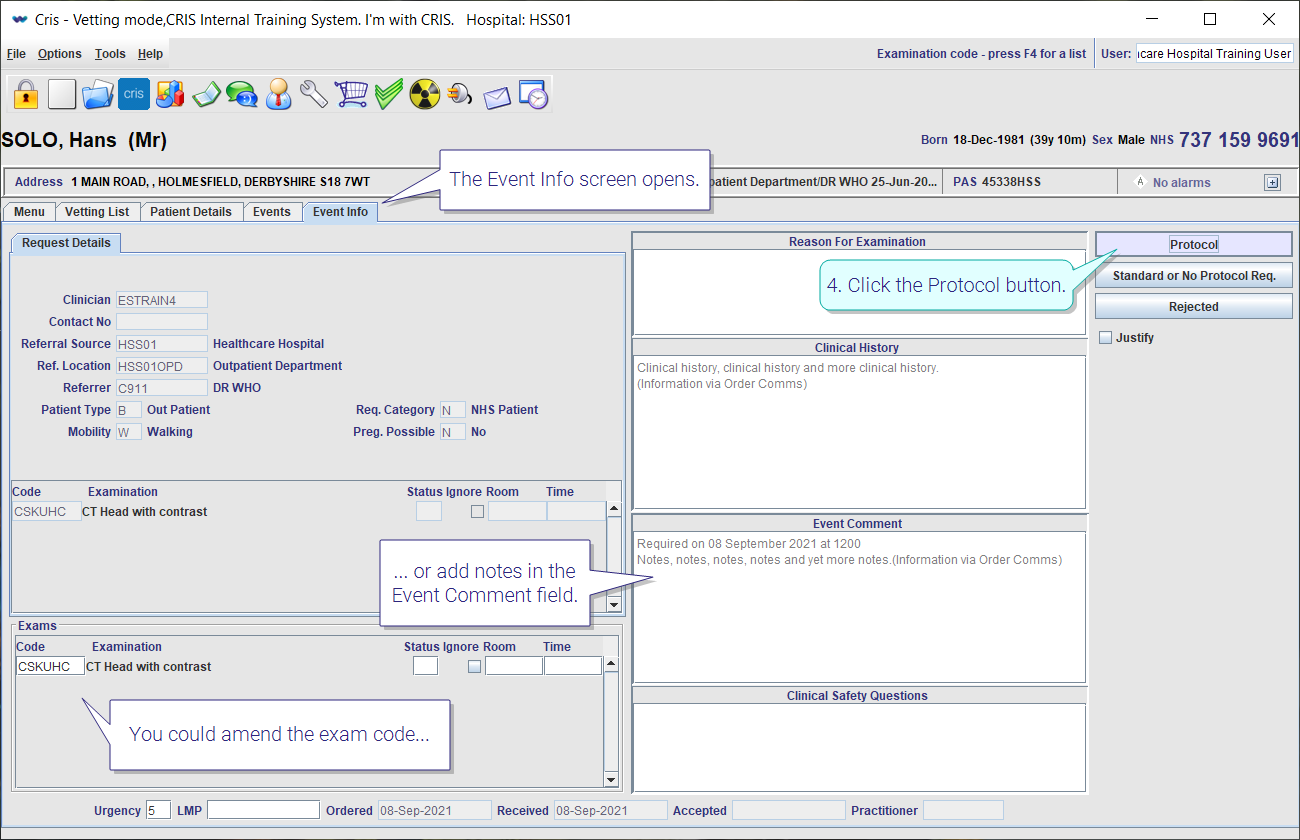
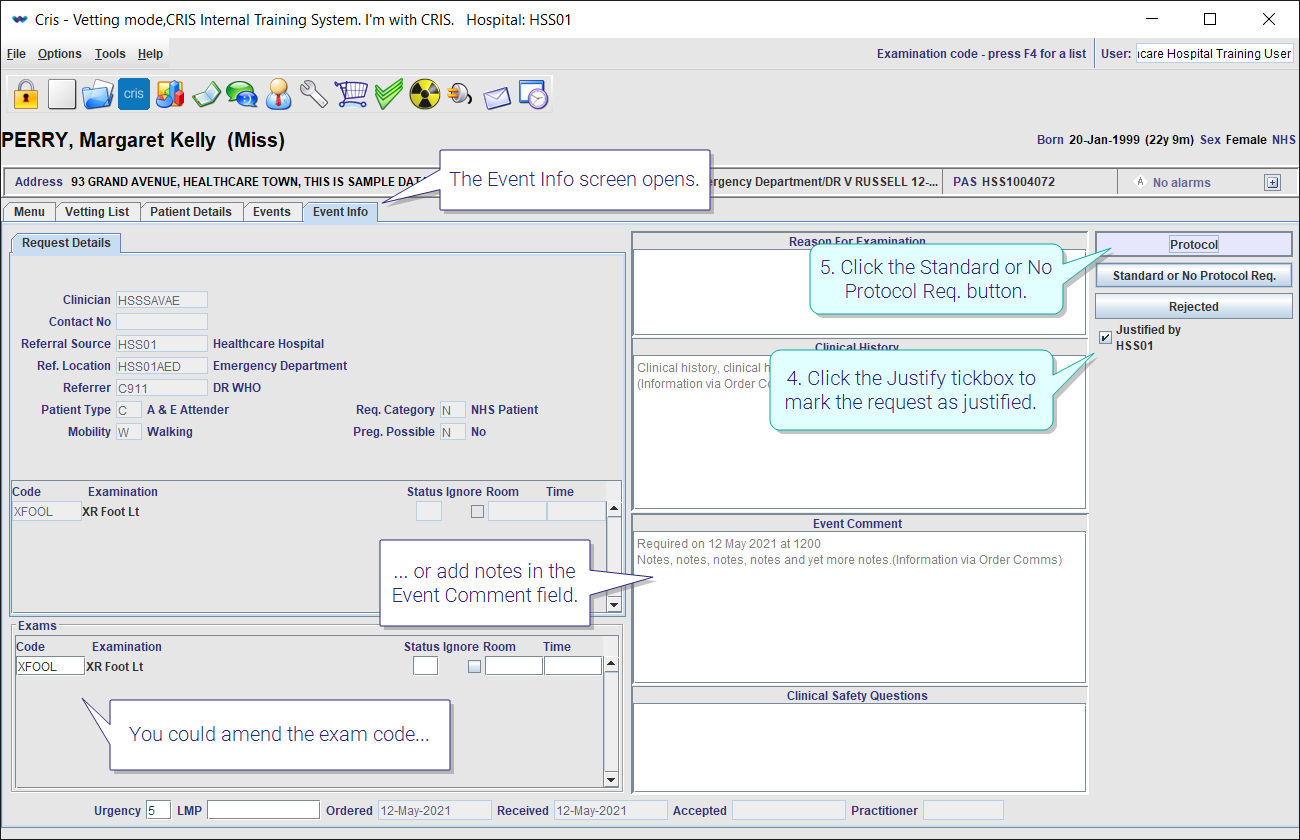
The Event Info screen opens. You could amend the exam code or add notes in the Event Comment field.
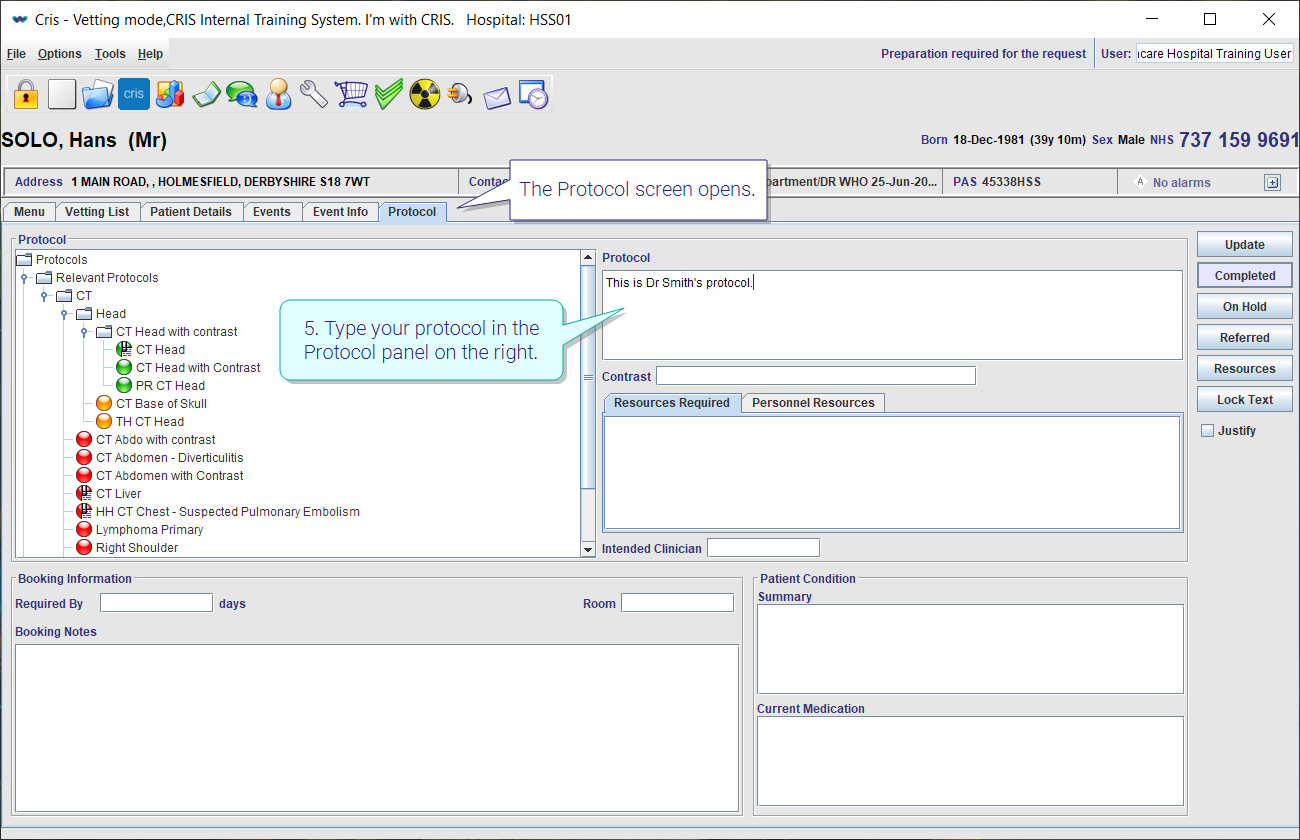
The Protocol screen opens.
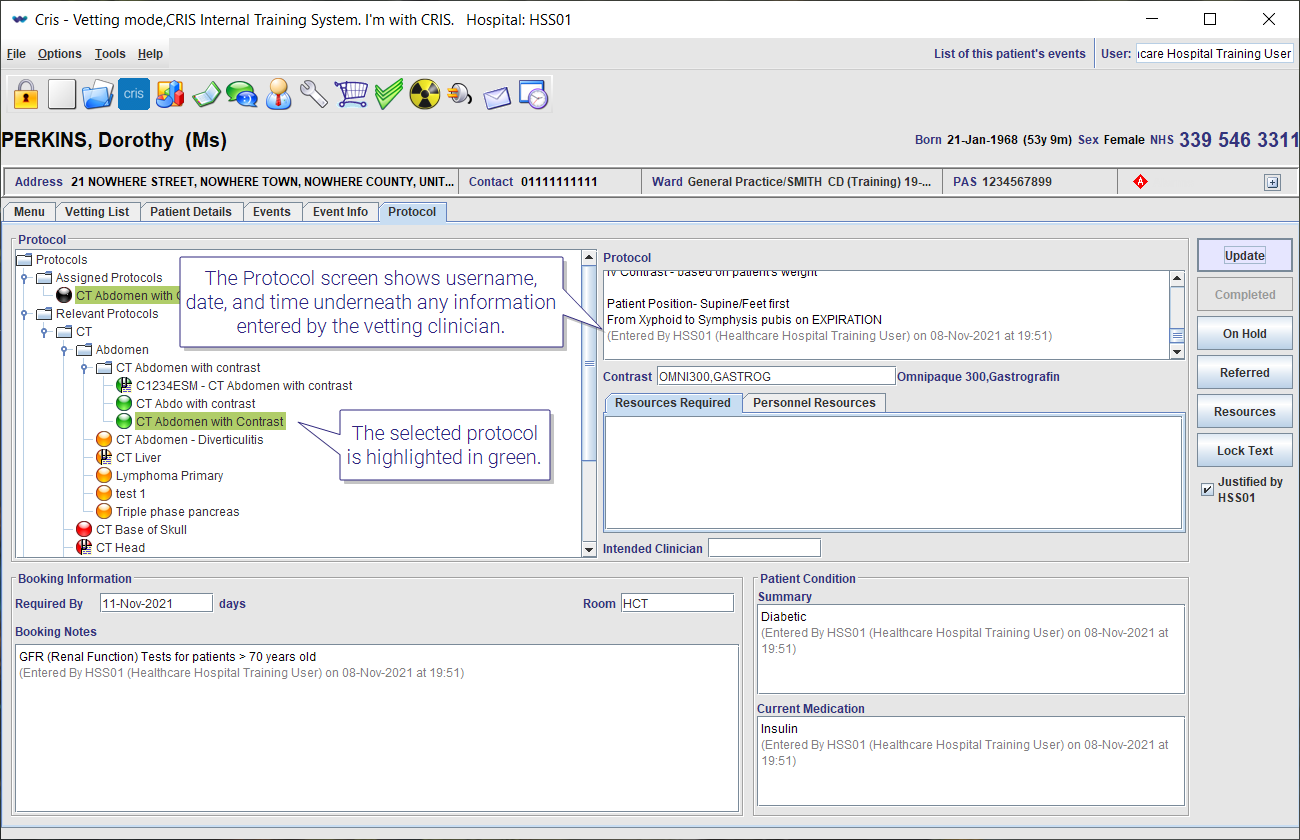
Your protocol appears in the Protocol panel on the right.
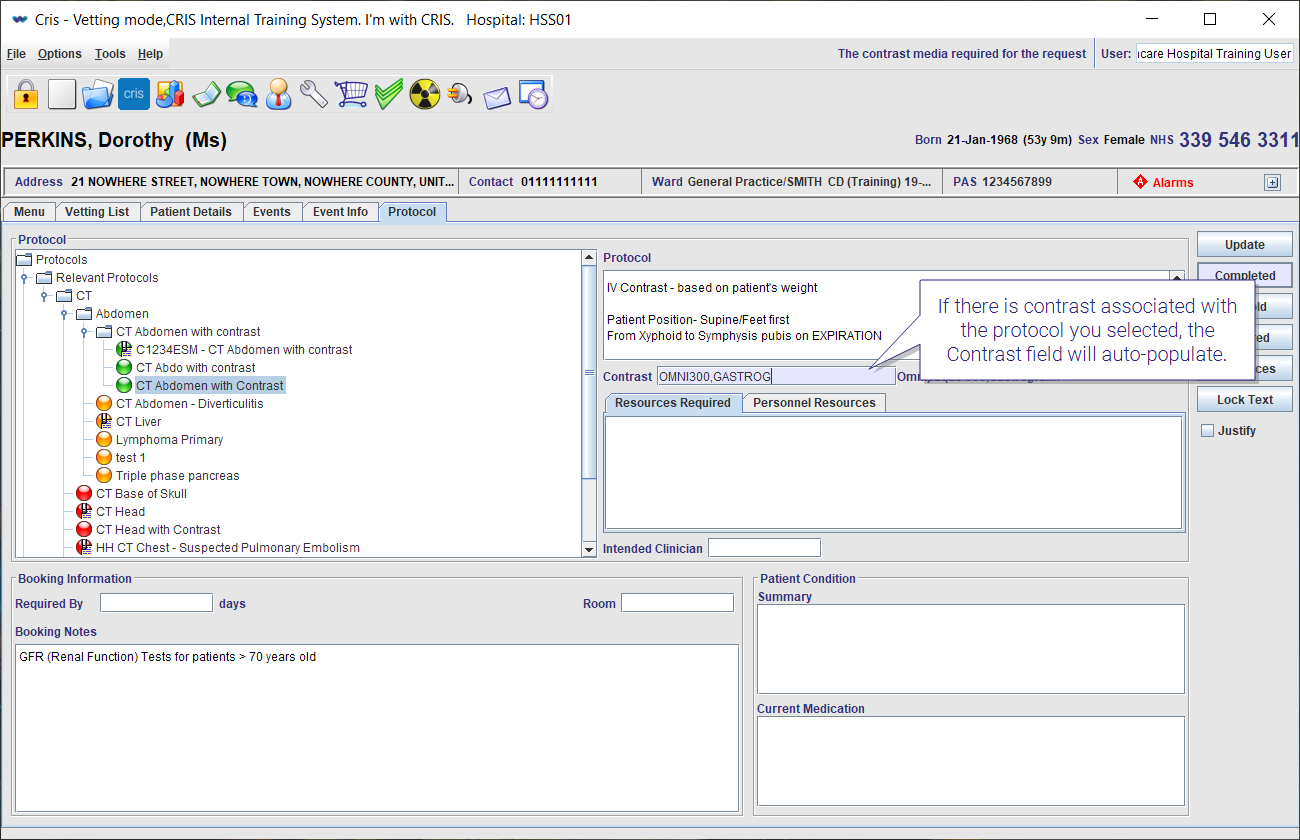
If there is contrast associated with the protocol you selected, the Contrast field will auto-populate.
If there is reporting clinician associated with the protocol you selected, the Intended Clinician field may be auto-populated.
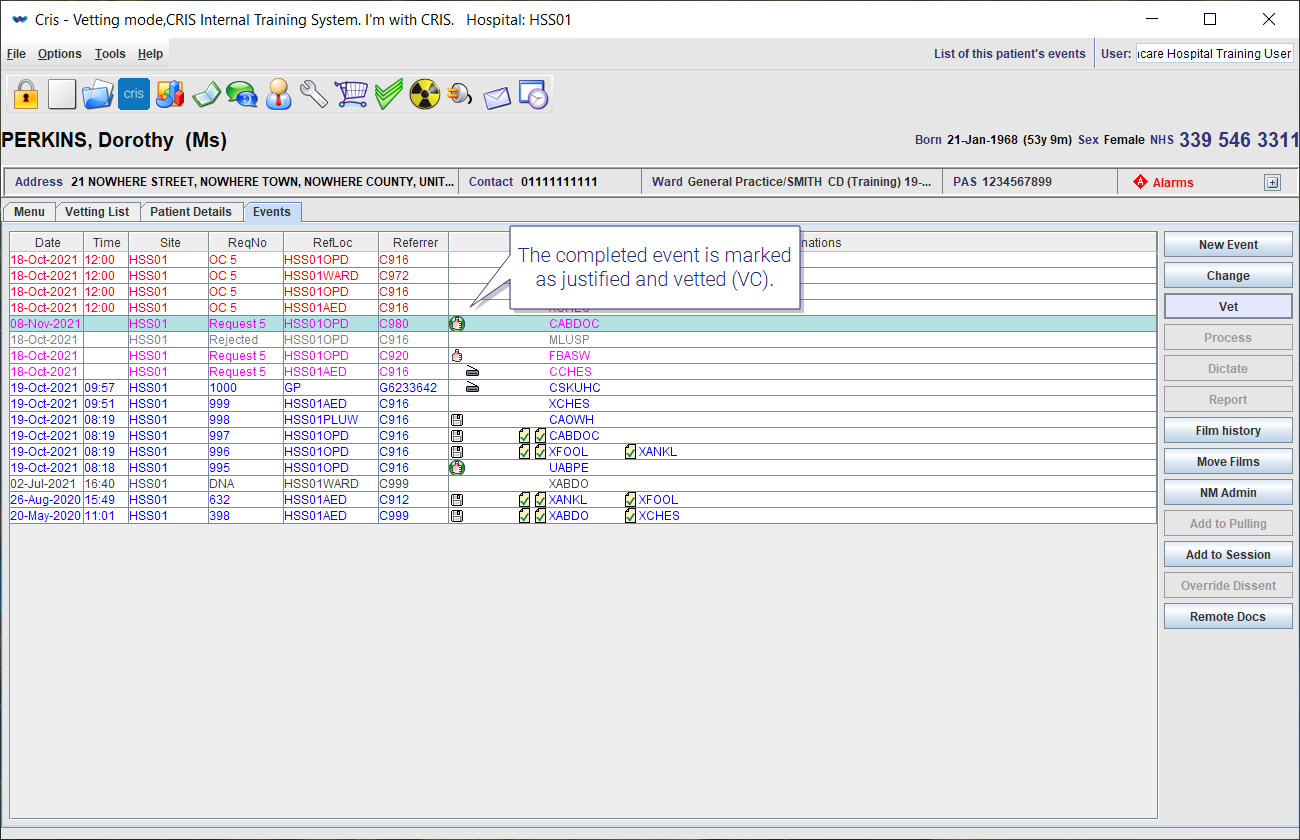
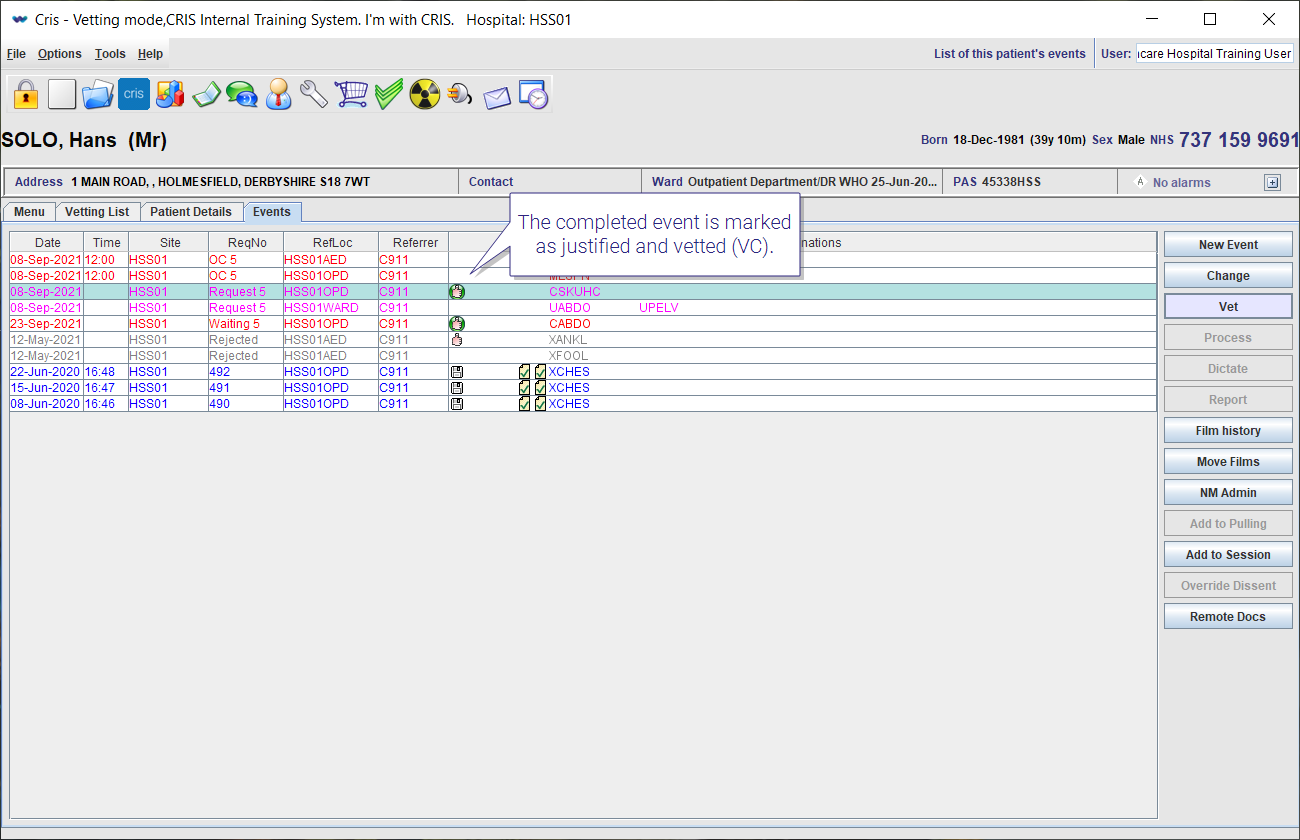
The completed event is marked as justified and vetted (VC).
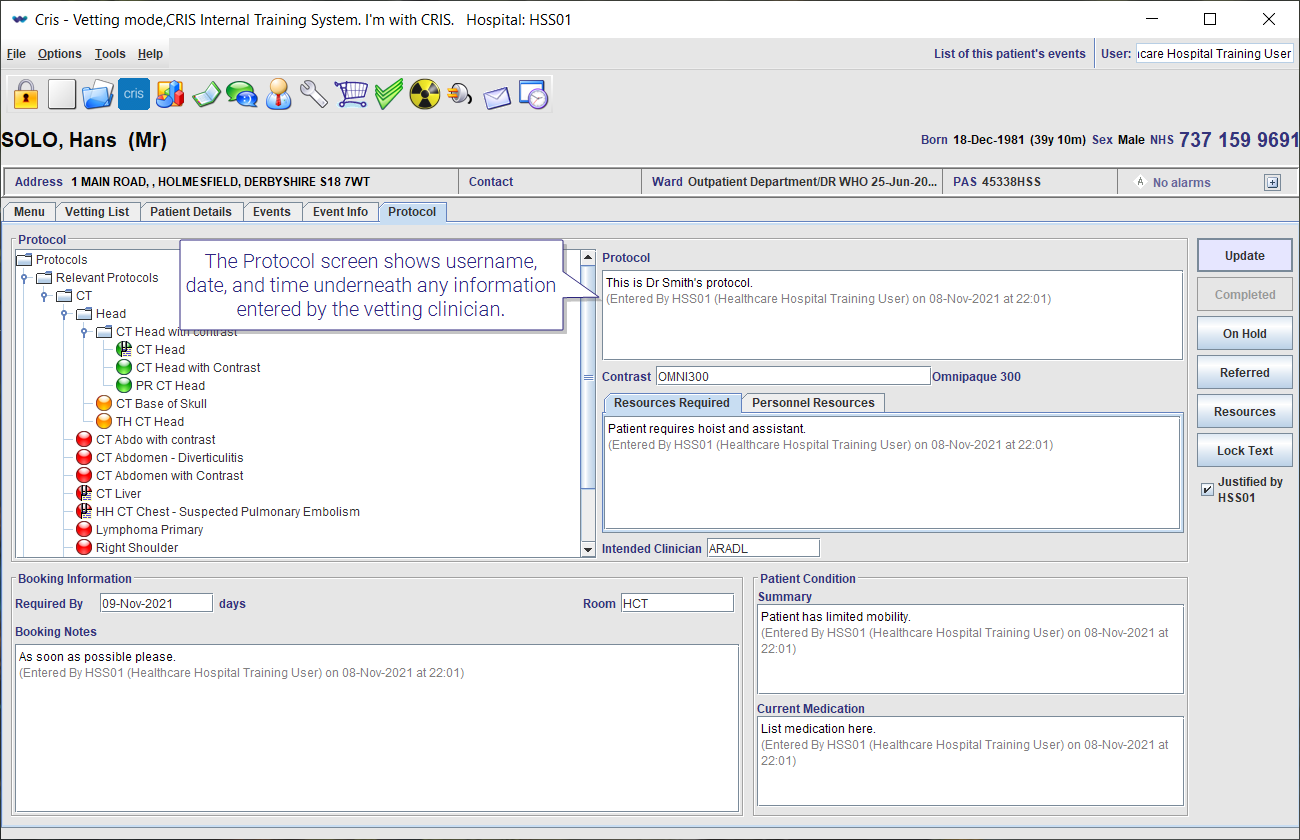
The Protocol screen shows username, date, and time underneath any information entered by the vetting clinician. The selected protocol is highlighted in green.
Warning:
Clinicians should check alarms on the patient’s record and the Patient Condition panel before selecting contrast.
Note:
-
The Protocol panel displays likely protocols based on the requested examination.
-
Cris uses a traffic light system to indicate the closeness of the match (by examination code, body part, or modality).
-
Further protocols can also be accessed via the Only Relevant to Body Parts and All Protocols folders.
|
|
Protocol matches exam code. |
|
|
Protocol matches exam code and has a linked document. Right click > View Protocol to view the document. |
|
|
Protocol matches body area. |
|
|
Protocol matches modality. |
|
|
All other protocols. |
Note:
Note:
If you do not click the Justify tickbox on the Event Info screen, you will have another chance to do so on the Protocol screen.
Tip:
To justify an event right-click > Justify. You should only do this after reviewing the request details.

Tip:
You can select a pre-set protocol then edit it to fit your requirements. If you select a protocol then click the Lock Text button, you can add text underneath without over-writing.
Tip:
If there is a protocol you use regularly, we recommend asking your system administrator to add it to the list of available protocols. See Configure Protocols.
This marks the event as vetted, and records your custom / modified protocol and specific instructions as to how it will be performed.
- Open the Vetting List.
- Select the required order / request.
- Click the Vet button.
- Click the Protocol button.
- Type your protocol in the Protocol panel on the right.
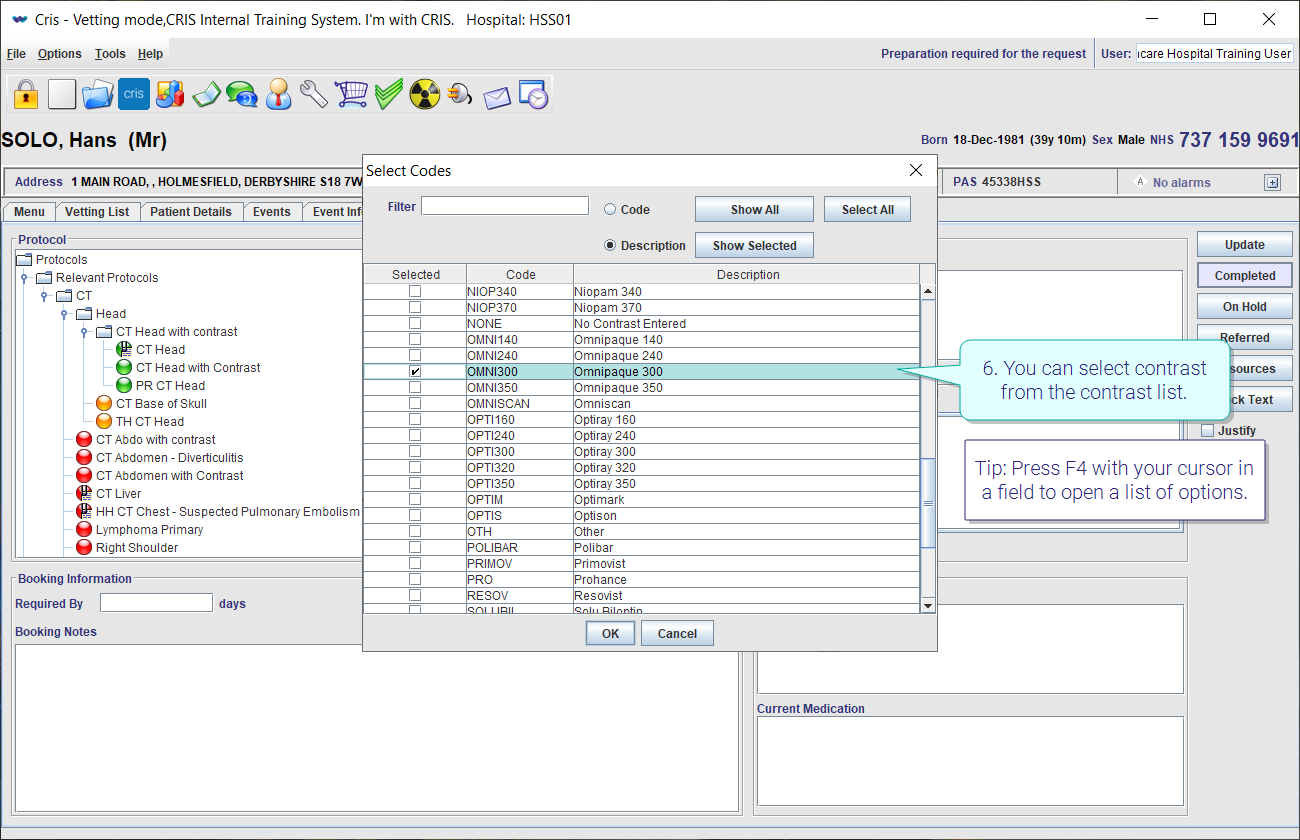
- You can select contrast from the contrast list.
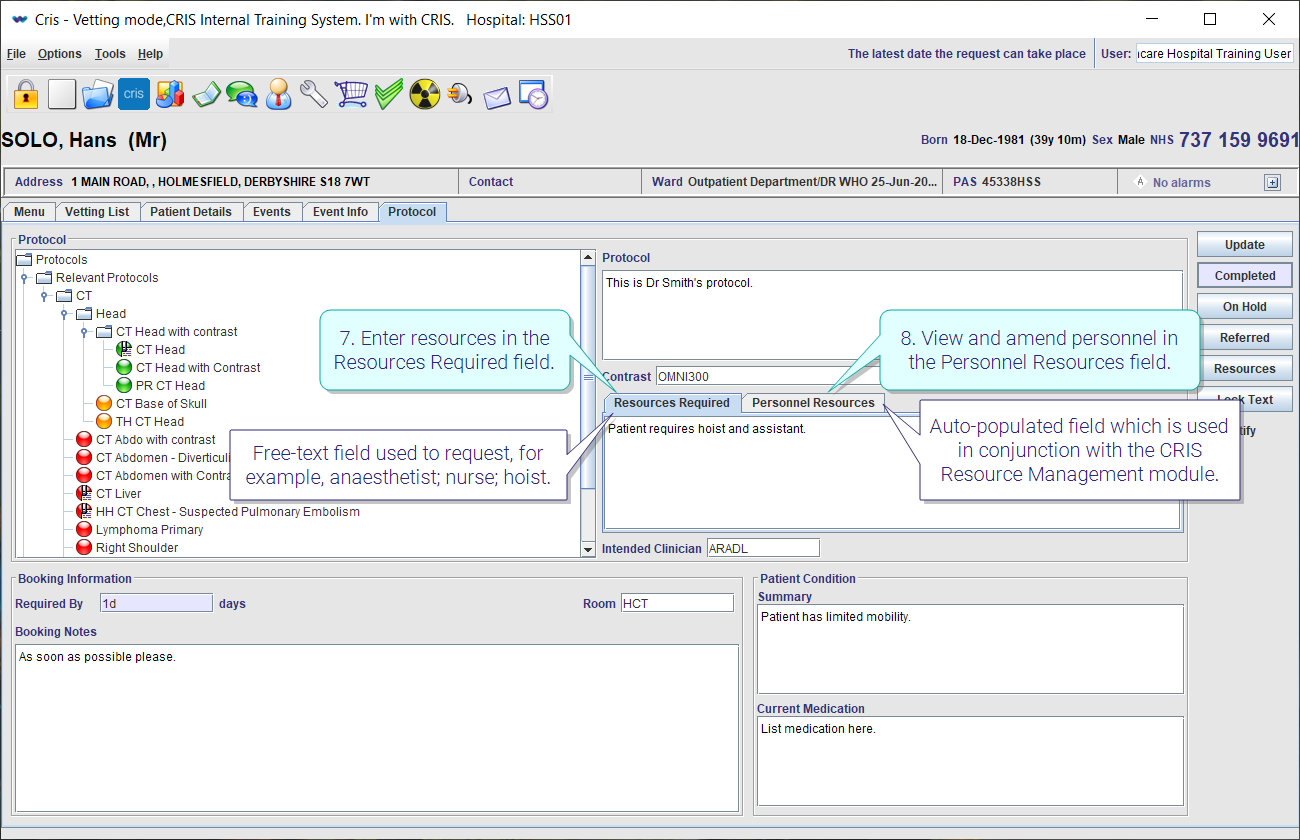
- Enter resources in the Resources Required field.
- View and amend personnel in the Personnel Resources field.
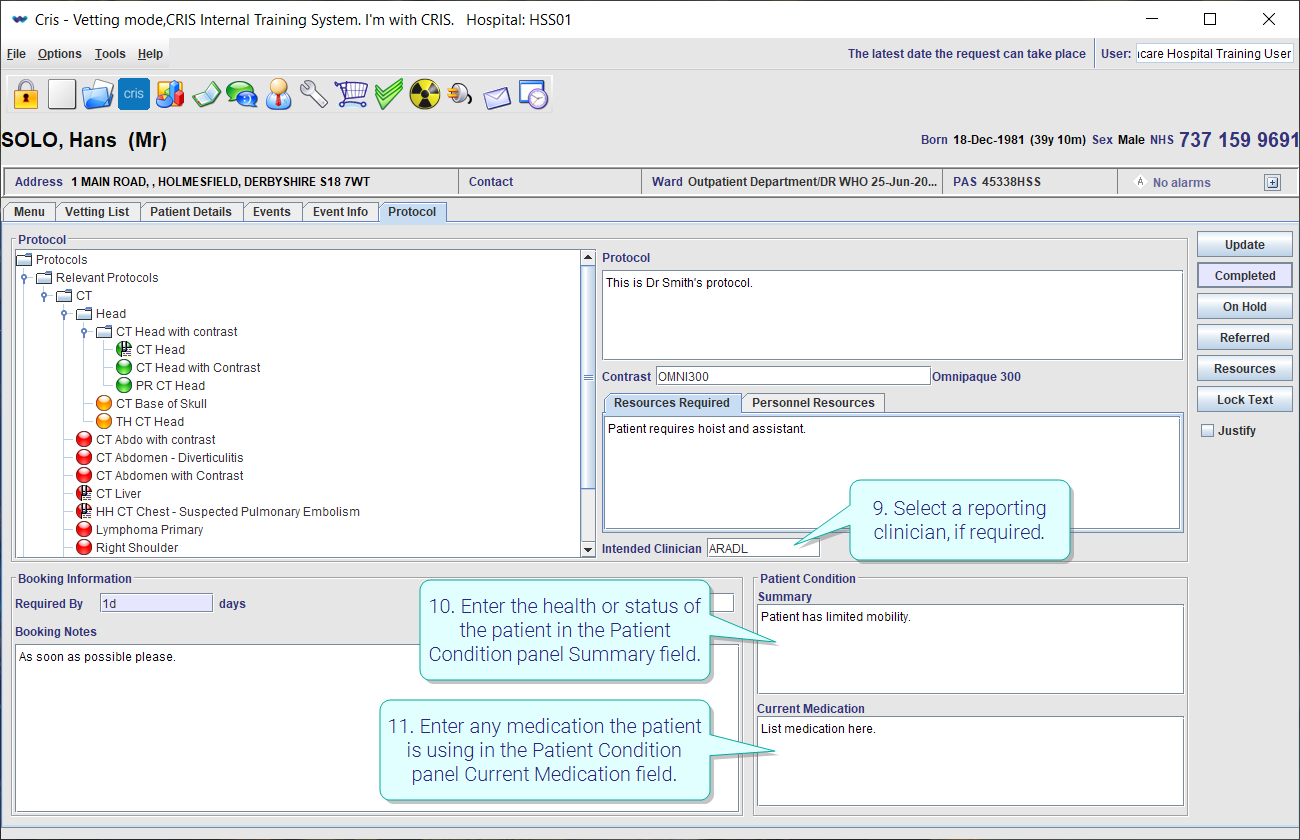
- Select a reporting clinician, if required.
- Enter the health or status of the patient in the Patient Condition panel Summary field.
- Enter any medication the patient is using in the Patient Condition panel Current Medication field.
-
Enter a date in the Booking Information panel Required By field.
-
Enter a room in the Booking Information panel Room field.
- Enter any notes for the booking clerk in the Booking Information panel Booking Notes field.
- Click the Justify tickbox to mark the request as justified (if required according to IRMER regulations).
- Click the Completed button to finish and save.

The Event Info screen opens. You could amend the exam code or add notes in the Event Comment field.
The Protocol screen opens.

The completed event is marked as justified and vetted (VC).
The Protocol screen shows username, date, and time underneath any information entered by the vetting clinician.
Warning:
Clinicians should check alarms on the patient’s record and the Patient Condition panel before selecting contrast.
Note:
-
The Protocol panel displays likely protocols based on the requested examination.
-
Cris uses a traffic light system to indicate the closeness of the match (by examination code, body part, or modality).
-
Further protocols can also be accessed via the Only Relevant to Body Parts and All Protocols folders.
|
|
Protocol matches exam code. |
|
|
Protocol matches exam code and has a linked document. Right click > View Protocol to view the document. |
|
|
Protocol matches body area. |
|
|
Protocol matches modality. |
|
|
All other protocols. |
Note:
| Resources Required | Free-text field used to request, for example, anaesthetist; nurse; hoist. |
| Personnel Resources |
Database field which is used in conjunction with the Cris Resource Management module and is auto-populated based on the group of personnel specified as required via the Exams per Hospital table. This element of the protocol is then used to determine diary availability based on required resources at the time of making an appointment. |
Note:
If you do not click the Justify tickbox on the Event Info screen, you will have another chance to do so on the Protocol screen.
Tip:
To justify an event right-click > Justify. You should only do this after reviewing the request details.
Tip:
You can select a pre-set protocol then edit it to fit your requirements. If you select a protocol then click the Lock Text button, you can add text underneath without over-writing.
Tip:
If there is a protocol you use regularly, we recommend asking your system administrator to add it to the list of available protocols. See Configure Protocols.
This marks the event as vetted, but with no specific instructions as to how it will be performed. Typically used for exams which do not require contrast and are performed in a standard way throughout the department.
- Open the Vetting List.
- Select the required order / request.
- Click the Vet button.
- Click the Justify tickbox to mark the request as justified (if required according to IRMER regulations).
- Click the Standard or No Protocol Req. button.
The Event Info screen opens. You could amend the exam code or add notes in the Event Comment field.
The Protocol screen closes.
The completed event is marked as justified and vetted (VC).
![]()
Note:
If you do not click the Justify tickbox on the Event Info screen, you will have another chance to do so on the Protocol screen.
Tip:
To justify an event right-click > Justify. You should only do this after reviewing the request details.
Use this option if you need more information before deciding how / when the examination will be performed.
-
From the Vetting List, highlight the required order / request and click the Vet button.

- Click the Protocol button.
- Click the On Hold button.
The Event Info screen opens.
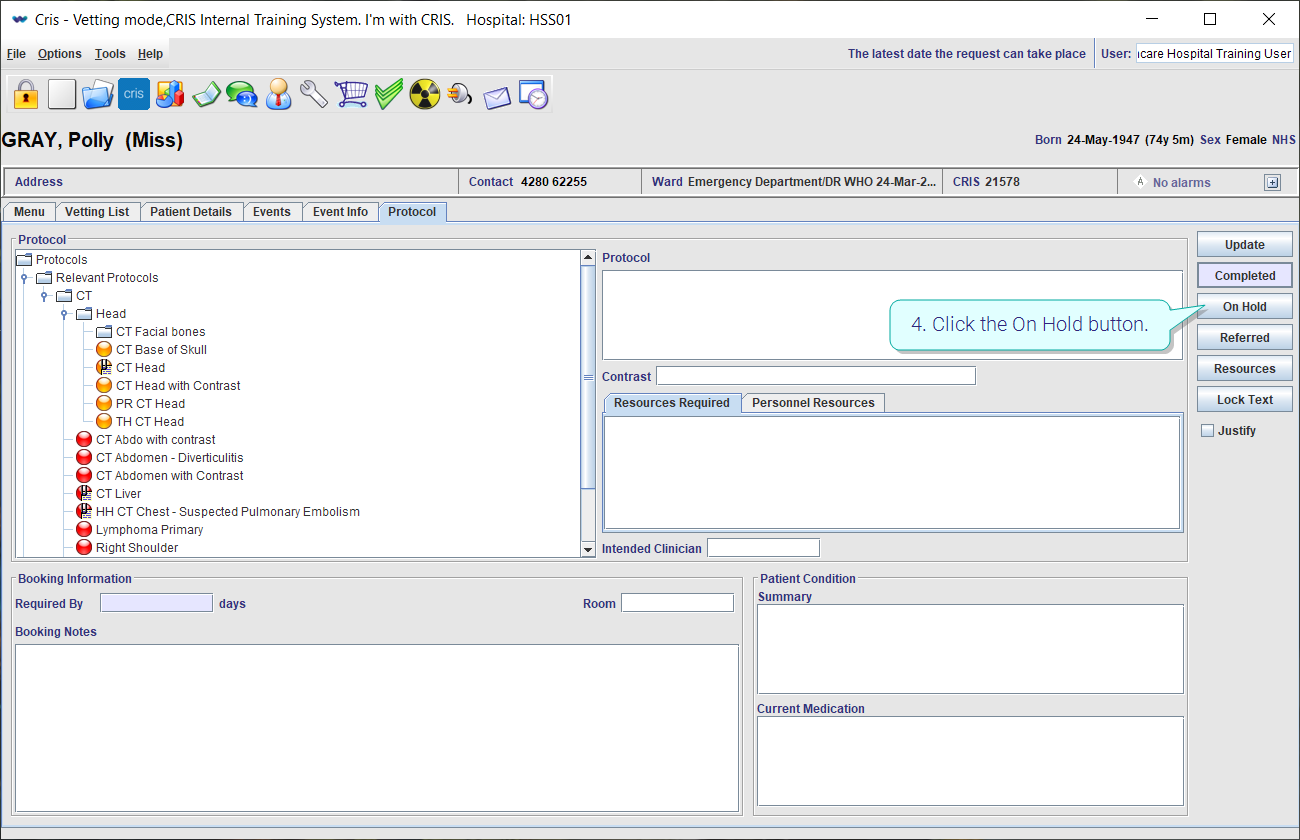
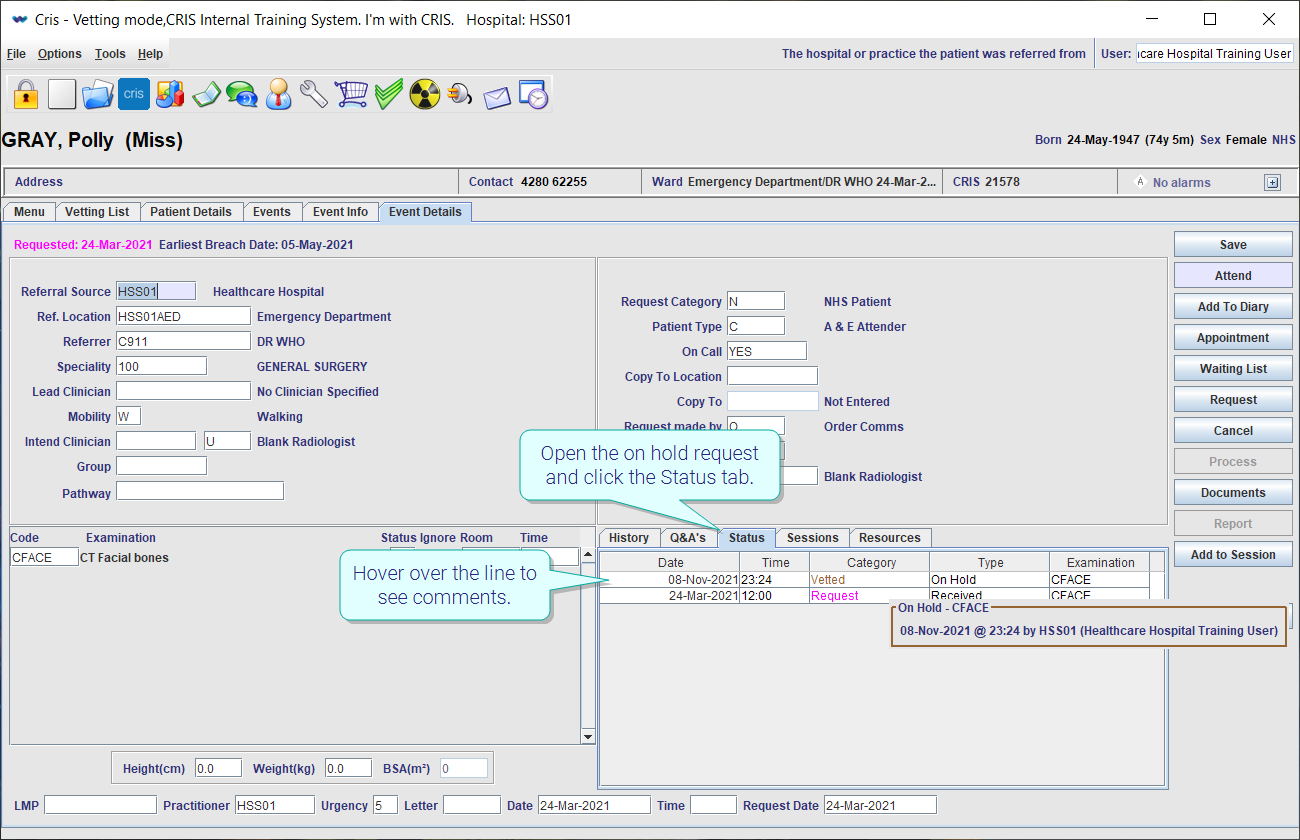
The request is marked as vetting on hold (VH).
![]()
Open the rejected request and click the Status tab.
Hover over the line to see comments.
Use this option if you decide to refer vetting to another clinician.
- Open the Vetting List.
- Select the required order / request.
- Click the Vet button.
- Click the Protocol button.
-
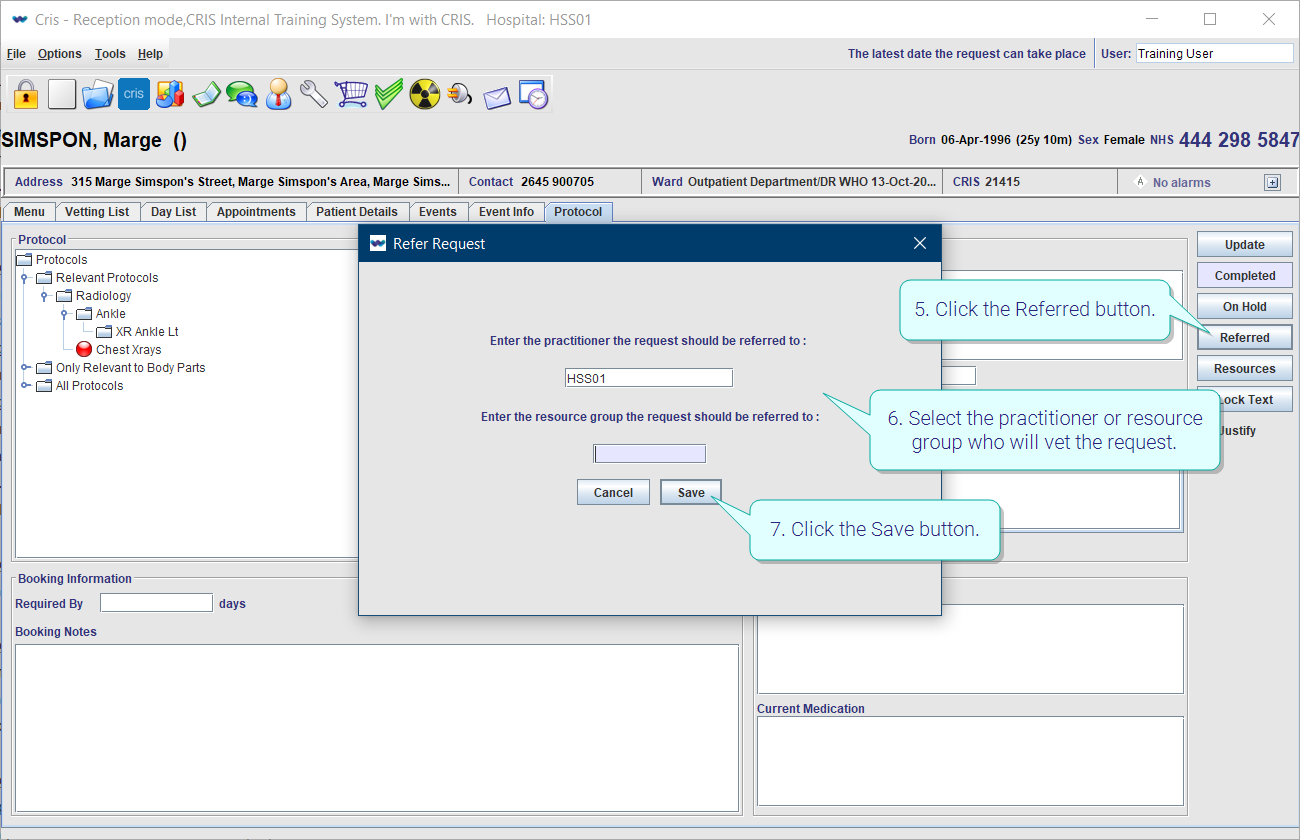
Click the Referred button.
-
Select the practitioner or resource group who will vet the request.
-
Click the Save button.
The Event Info screen opens.
The Protocol screen opens.
The Refer Request window opens.
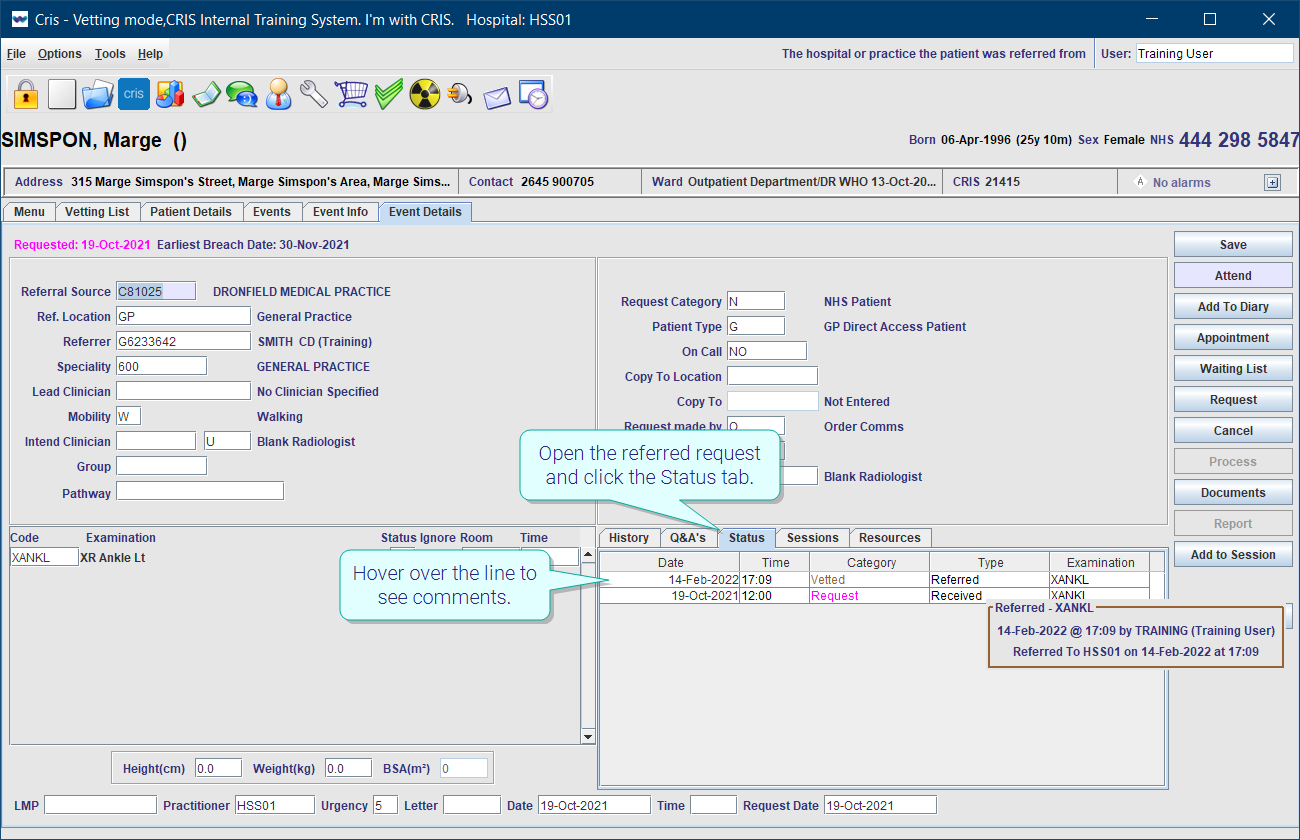
The request is marked as vetting referred (VR).
![]()
Open the referred request and click the Status tab.
Hover over the line to see comments.
Use this option if you decide that the exam(s) will not be performed. Your reason for rejection will be recorded and available to the referring clinician.
- Open the Vetting List.
- Select the required Request / Order.
- Click the Vet button.
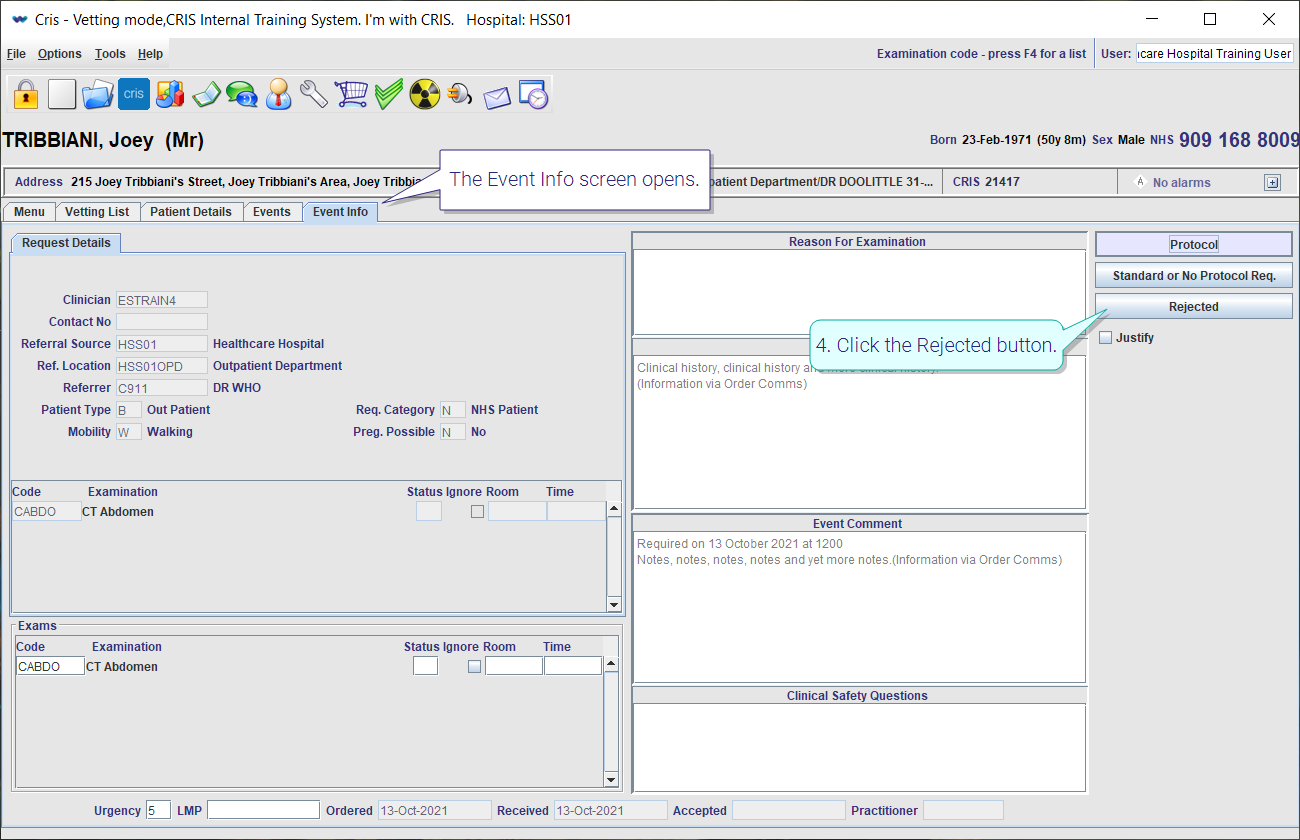
- Click the Rejected button.
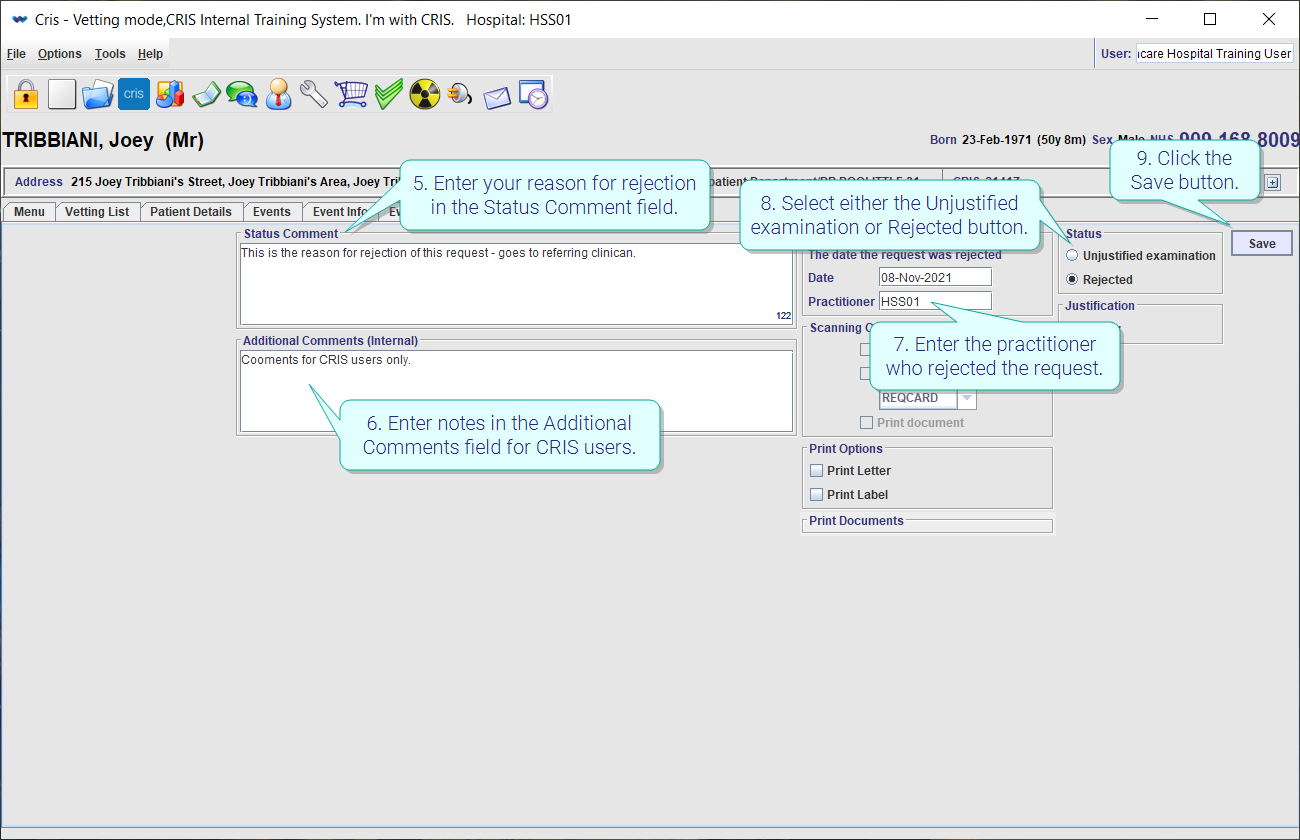
-
Enter your reason for rejection in the Status Comment field. This will be available to the referring clinician.
-
Optional: Enter notes in the Additional Comments field for Cris users.
-
Enter the practitioner who rejected the request. This will be recorded on the Event Info screen.
-
Select either the Unjustified examination or Rejected button.
-
Click the Save button.
The Event Info screen opens.
The Cancel Order screen opens.
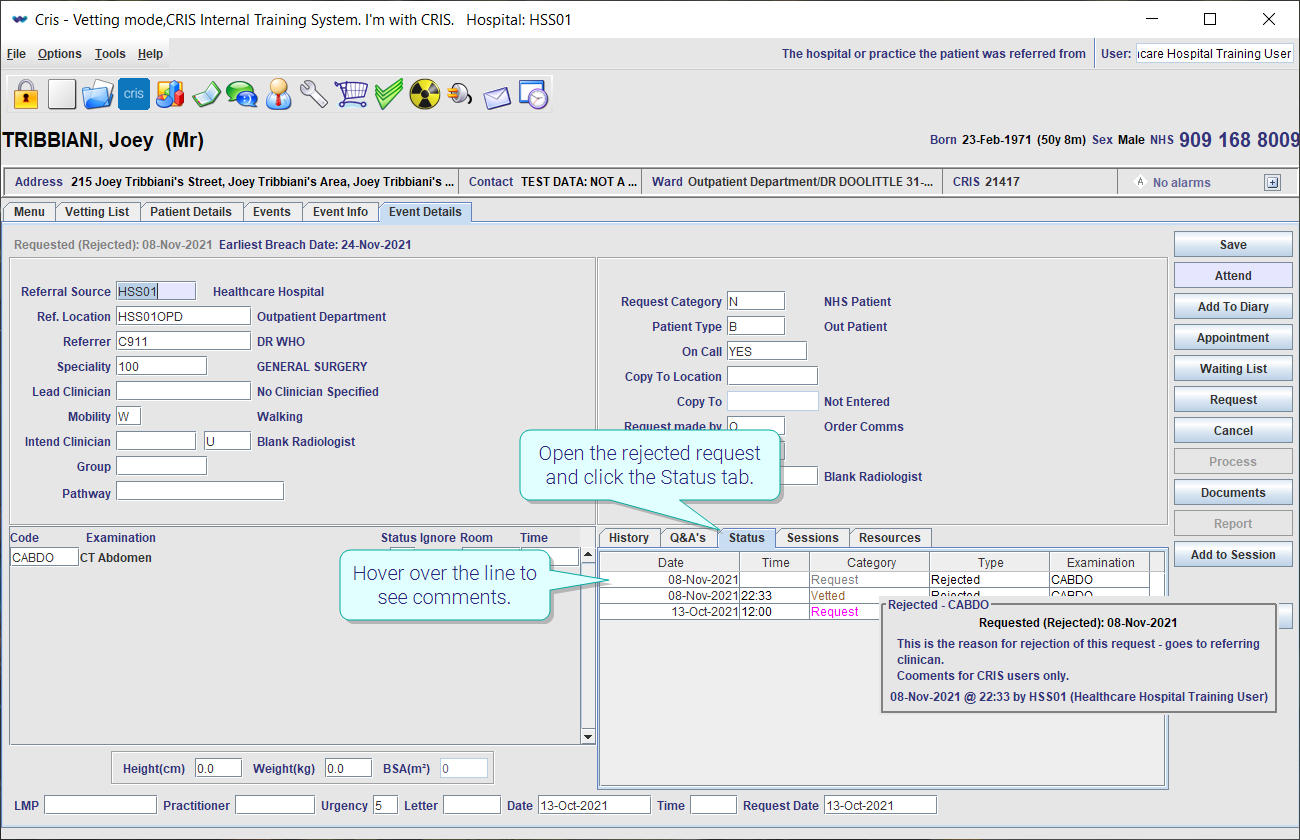
The request is marked as vetting rejected (VJ).
![]()
Open the rejected request and click the Status tab.
Hover over the line to see comments.
Note:
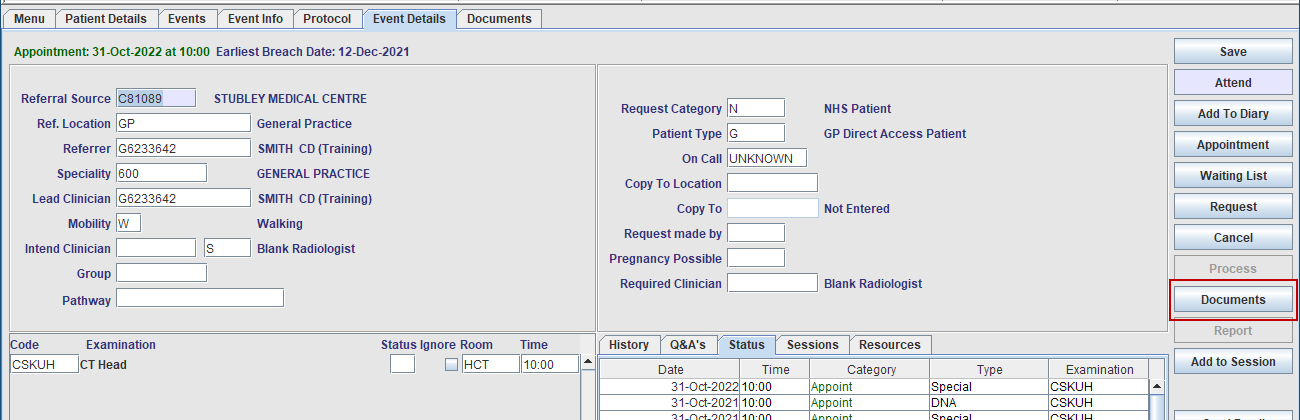
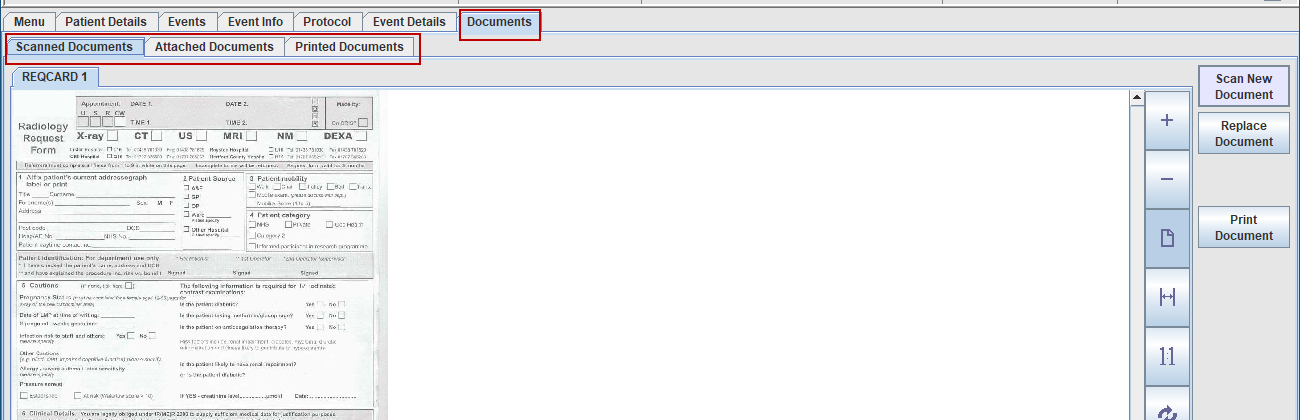
If there are any scanned documents (for example, request card or questionnaire) click the Documents button to open the Document tab next to the Event Details tab.
Note:
| Button | Description |
|---|---|
|
Update |
Save when information has been added to an already-vetted request, or when a request is marked as 'Justified’ after being vetted. |
|
Completed |
Save vetting information. |
|
On Hold |
Put the request on hold pending further information. |
|
Referred |
Assign the request to an alternative clinician, either to seek a second opinion or to share workload. |
|
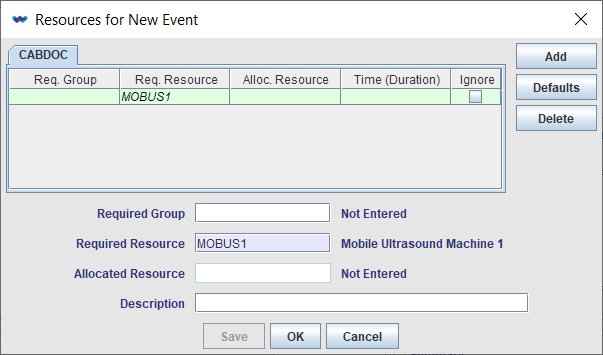
Resources |
Open a new window to add or amend resources. Specify an individual or individuals rather than just the vetting group.
|
|
Lock Text |
Prevents manually-entered text being over-written or deleted, should a different / additional protocol be selected after your manual adjustments. If you choose one protocol, then would like to add another protocol, click Lock Text between selections. |
Tip:
Hold Ctrl while clicking to select multiple items, for example, protocols.
Tip:
Double-click in a field, or press F4 with the cursor in that field to display available values. Select one value, or leave blank to see all.
Tip:
Enter, for example, 3d or 1w in a date field then press Enter to convert the code to a date 3 days or 1 week from now.