Create protocols
System administrators and vetting clinicians can create vetting protocols for performing procedures comprising, for example, preparation, contrast, required resources, and booking instructions. To manage protocols you need
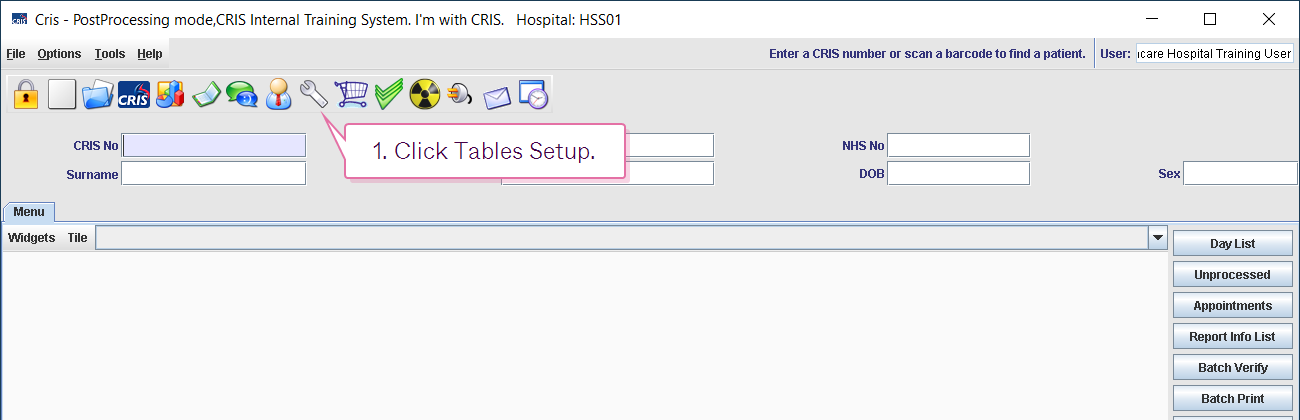
- Click Tables Setup.

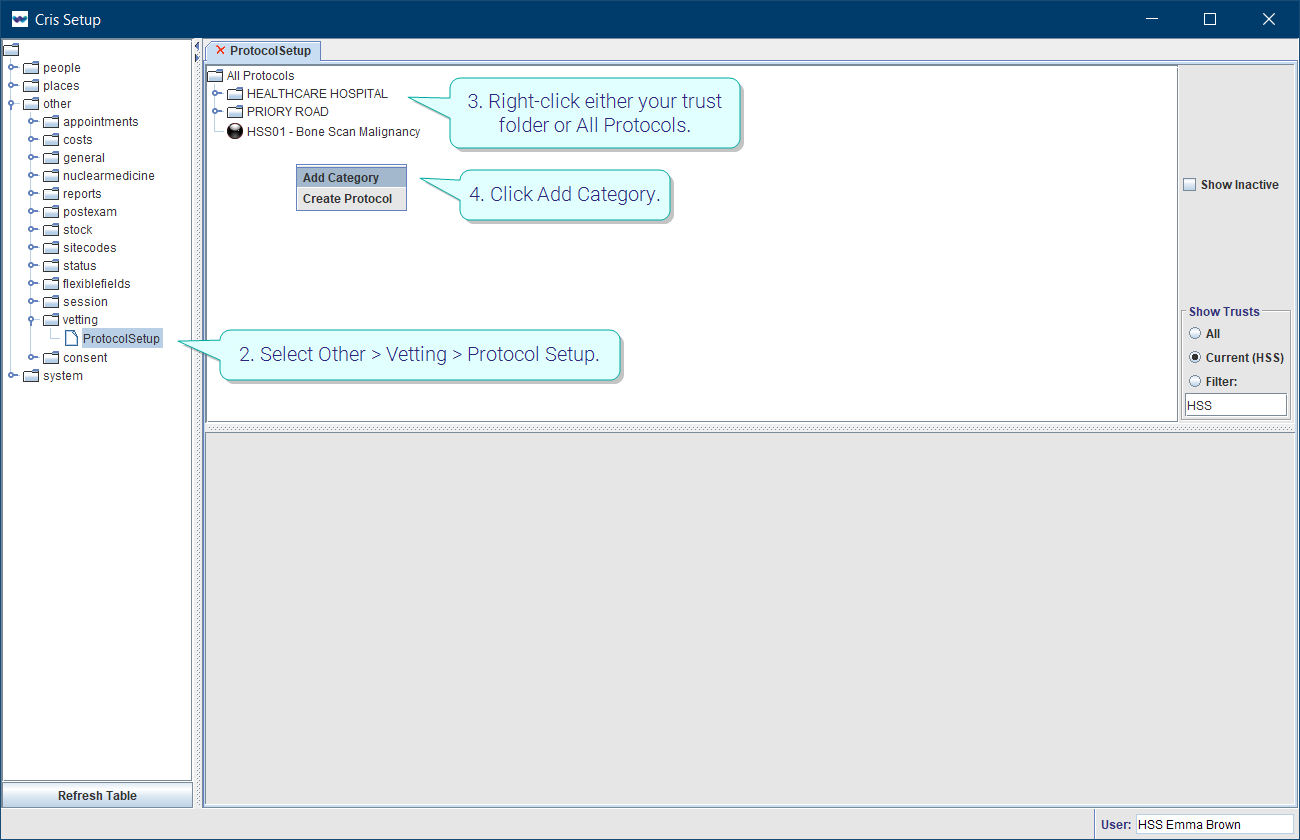
- Select Other > Vetting > Protocol Setup.
- Right-click either your trust folder or All Protocols.
- Click Add Category.
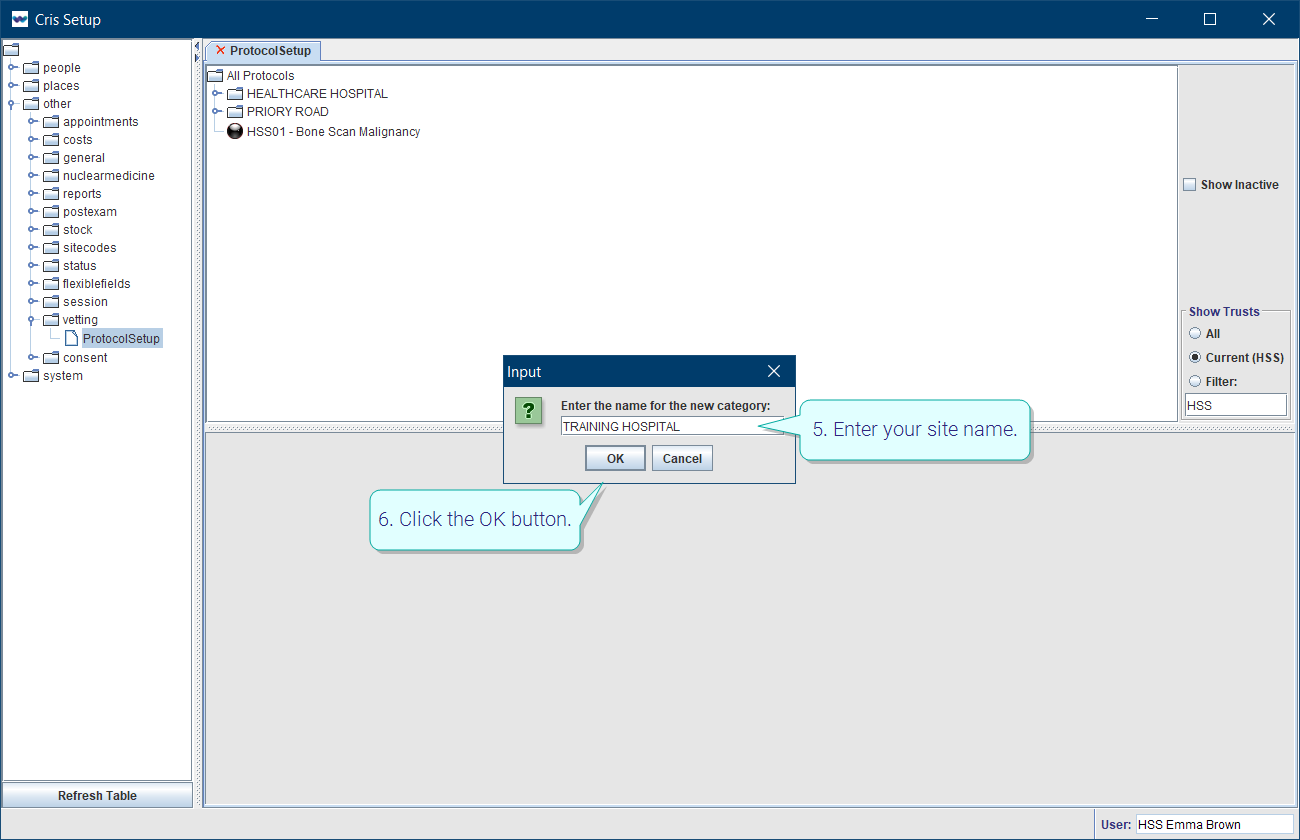
- Enter your site name.
- Click the OK button.
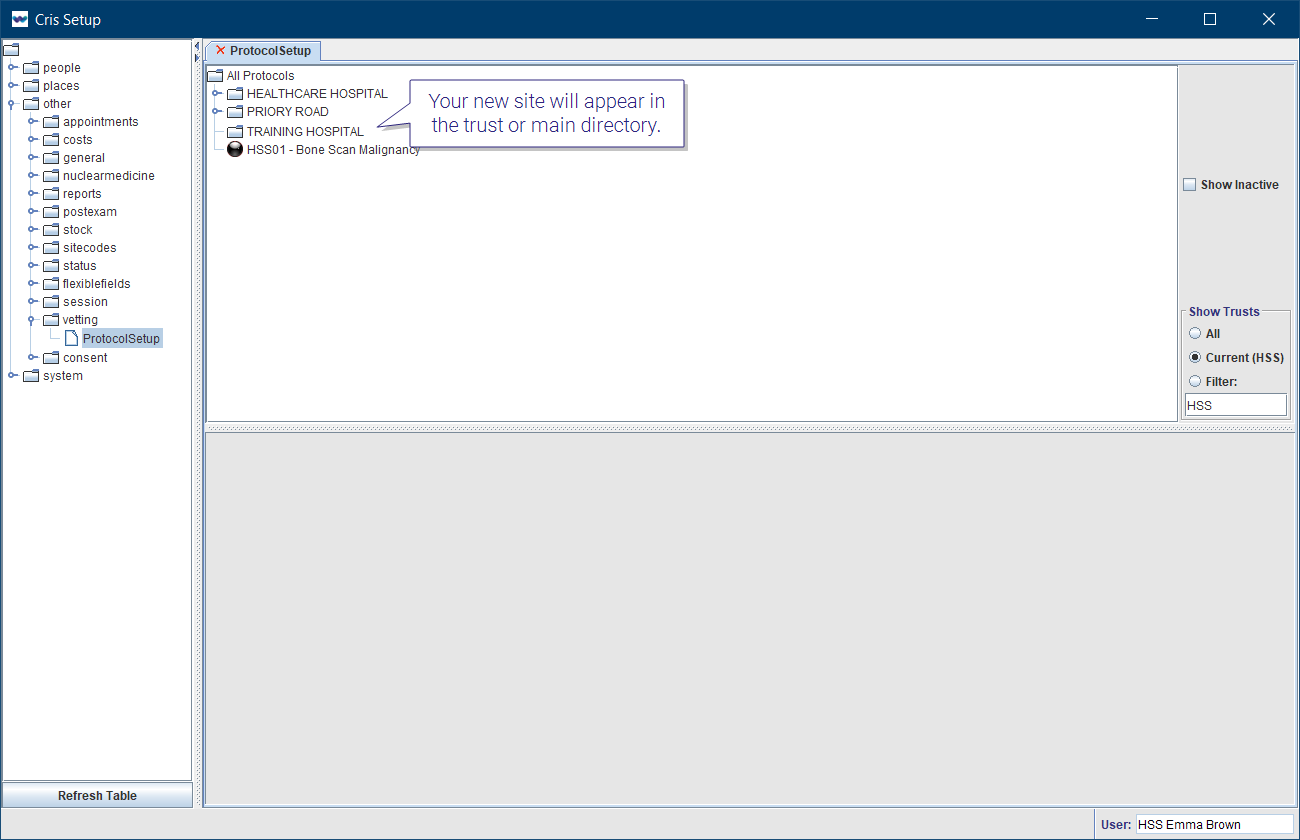
Your new site will appear in the trust or main directory.
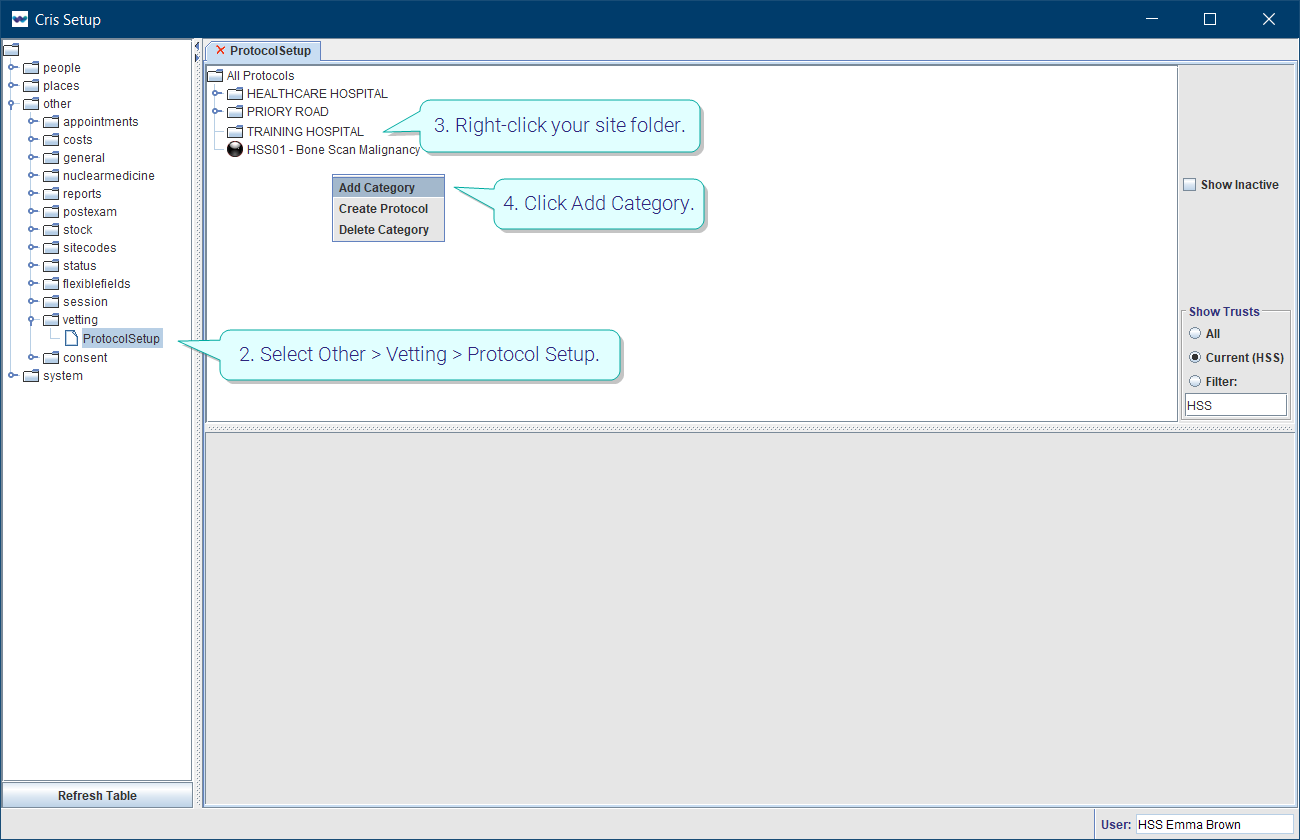
- Click Tables Setup.
- Select Other > Vetting > Protocol Setup.
- Right-click your site folder.
- Click Add Category.
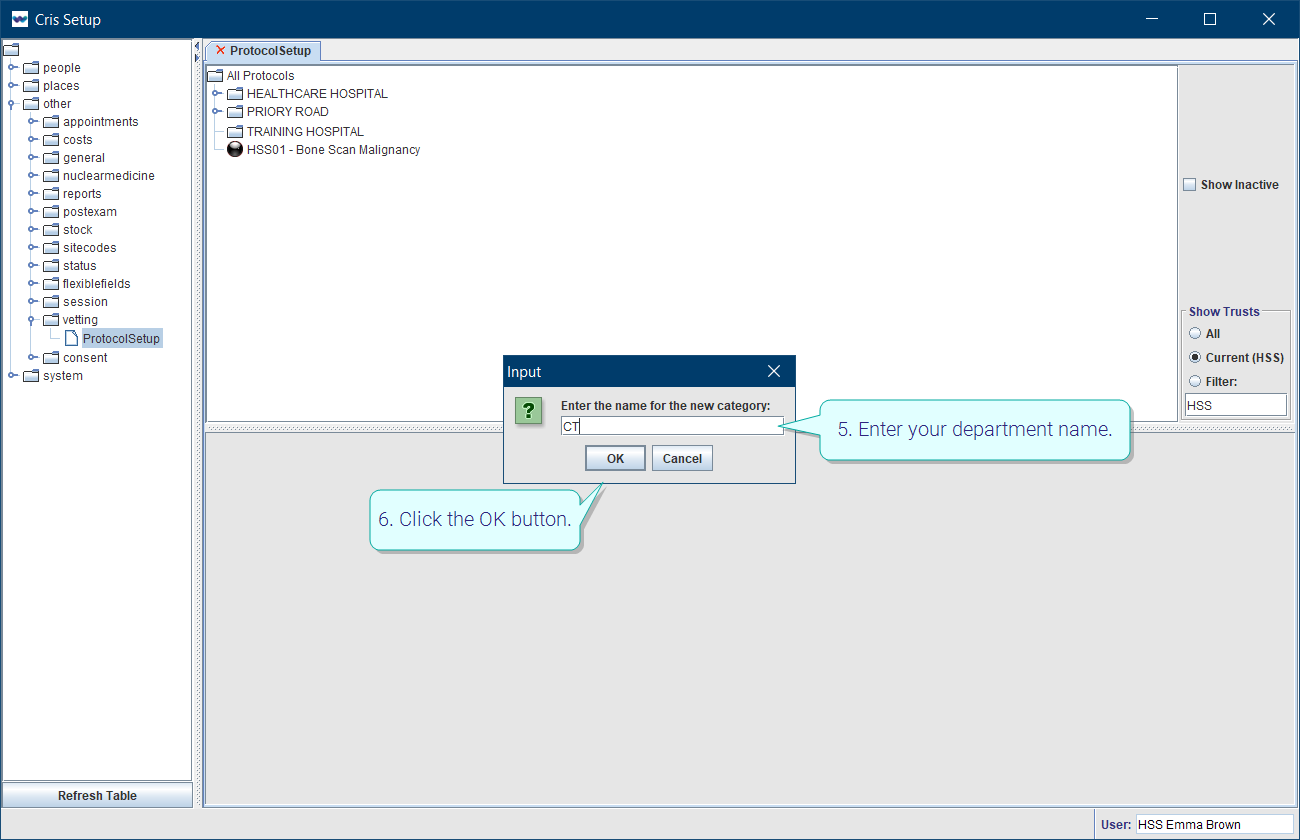
- Enter your department name.
- Click the OK button.
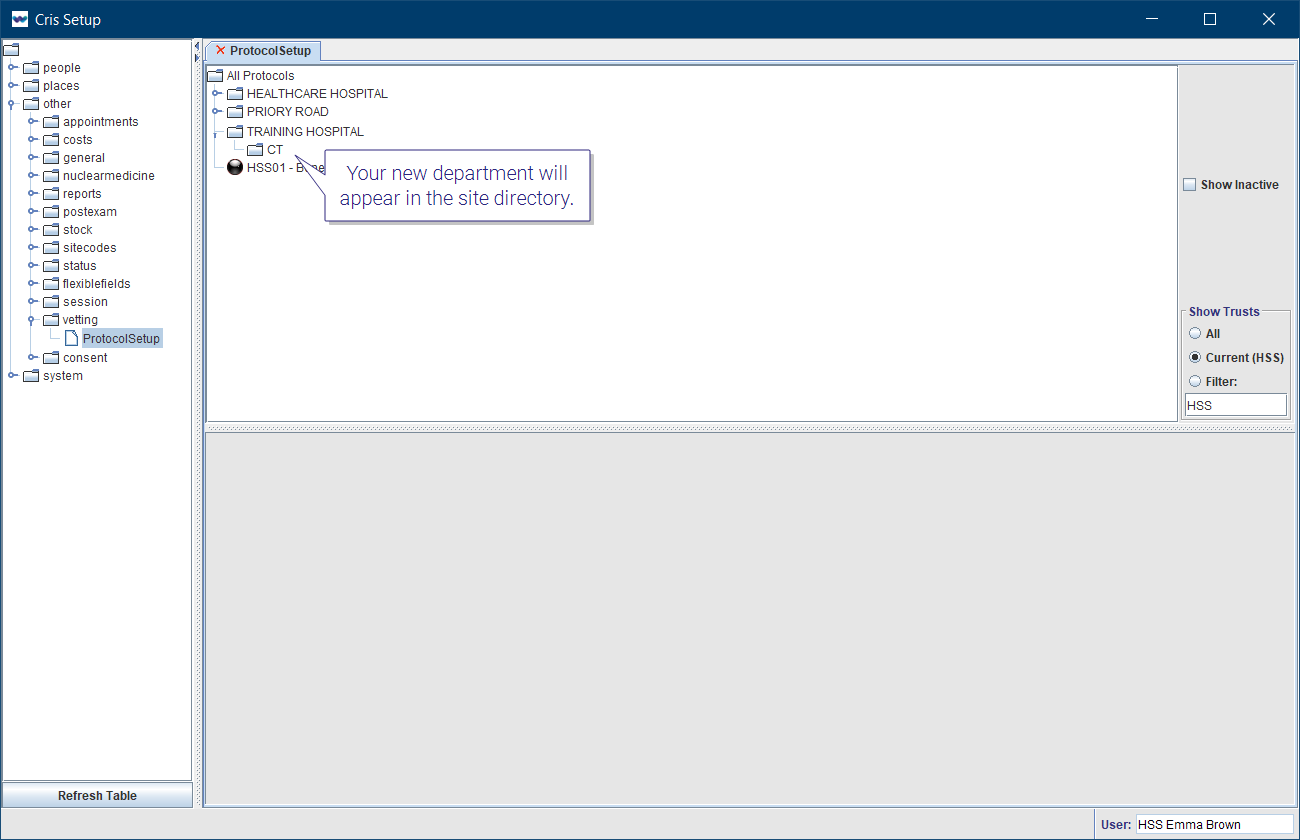
Your new department will appear in the site directory.
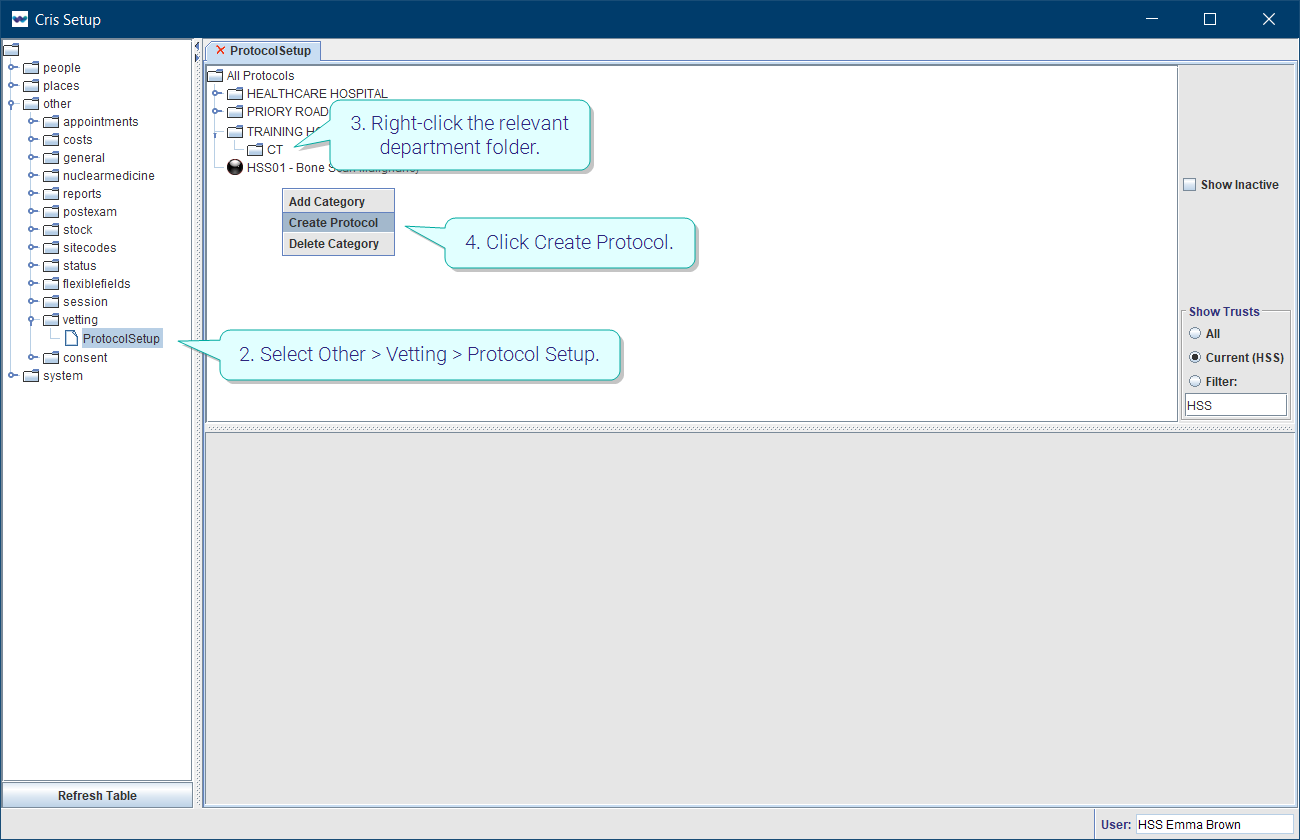
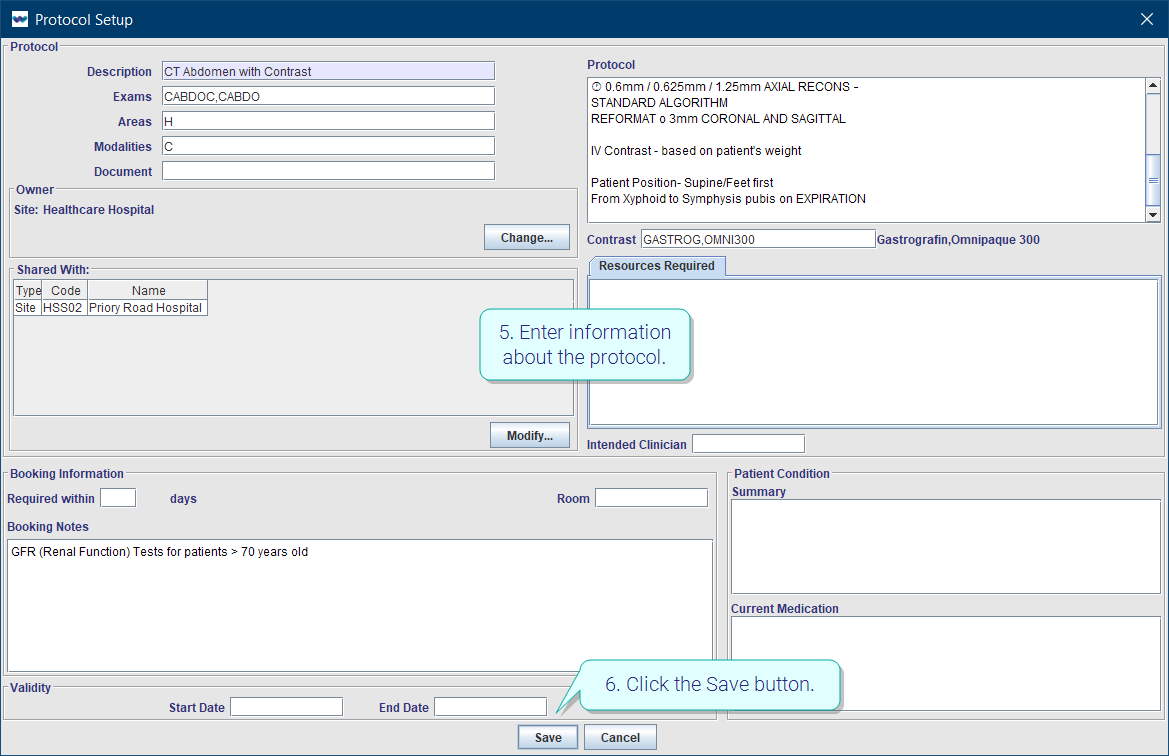
- Click Tables Setup.
- Select Other > Vetting > Protocol Setup.
- Right-click the relevant department folder.
- Click Create Protocol.
- Enter information about the protocol (see table below).
- Click the Save button.
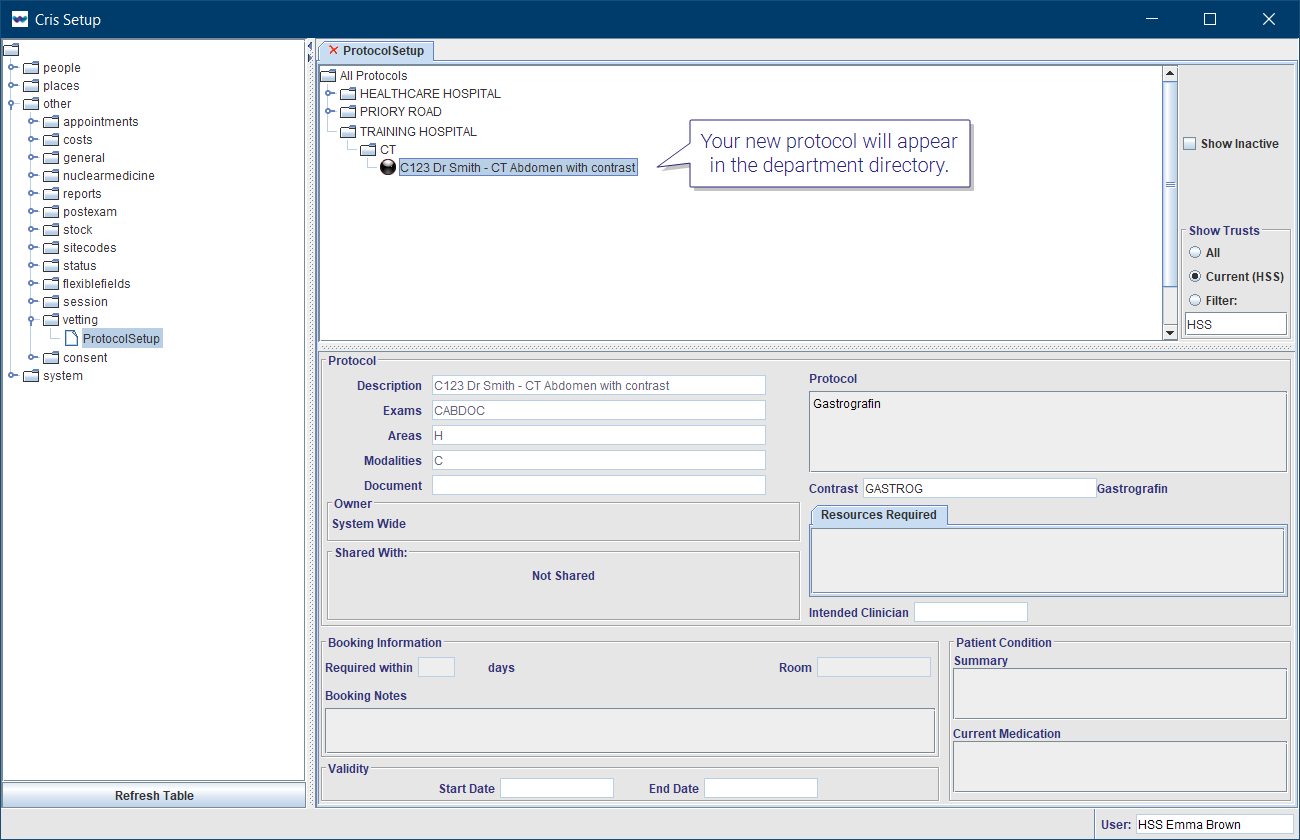
Your new protocol will appear in the department directory.
Protocol set up
| Field | Description | |
|---|---|---|
|
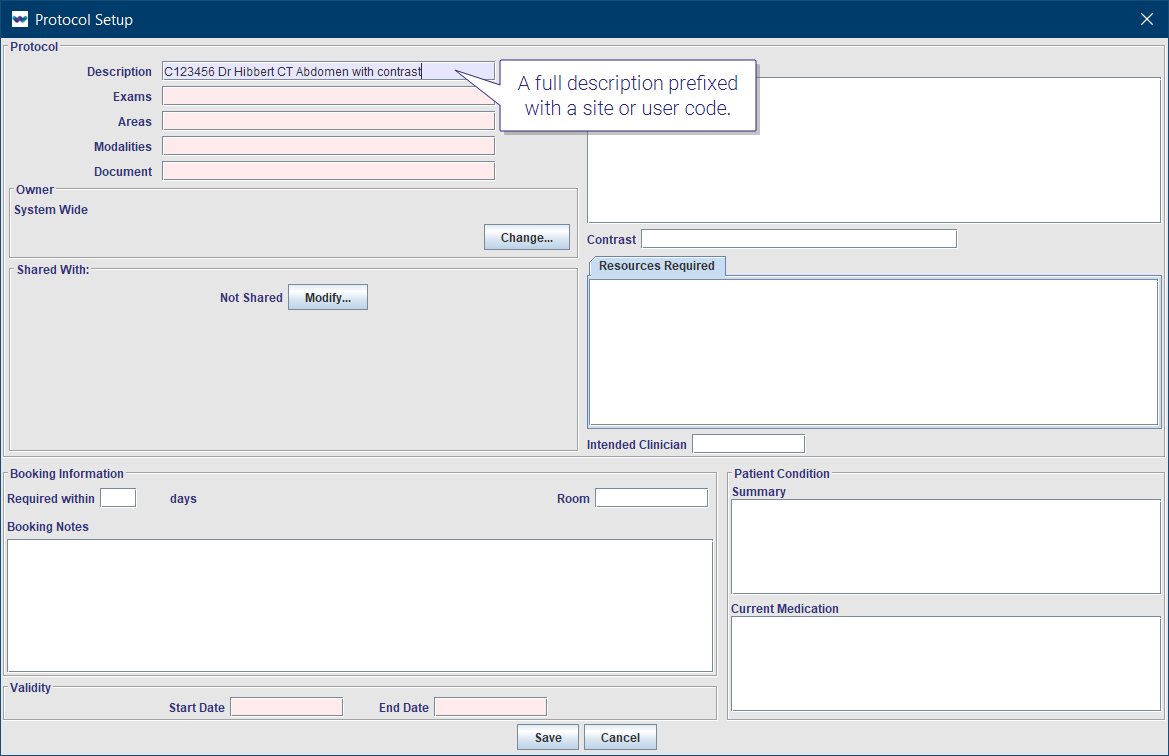
Description * |
A full description prefixed with a site or user code. |
|
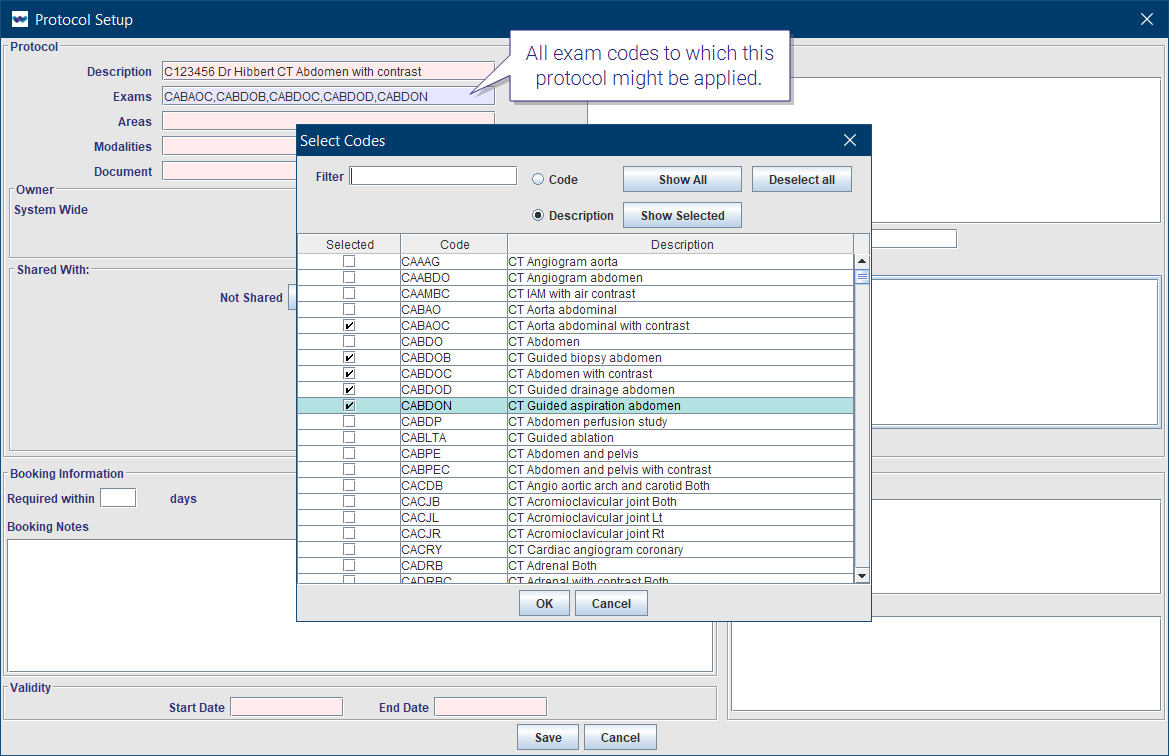
Exams |
All exam codes to which this protocol might be applied. |

|
Areas | All body areas to which this protocol might be applied. |
|
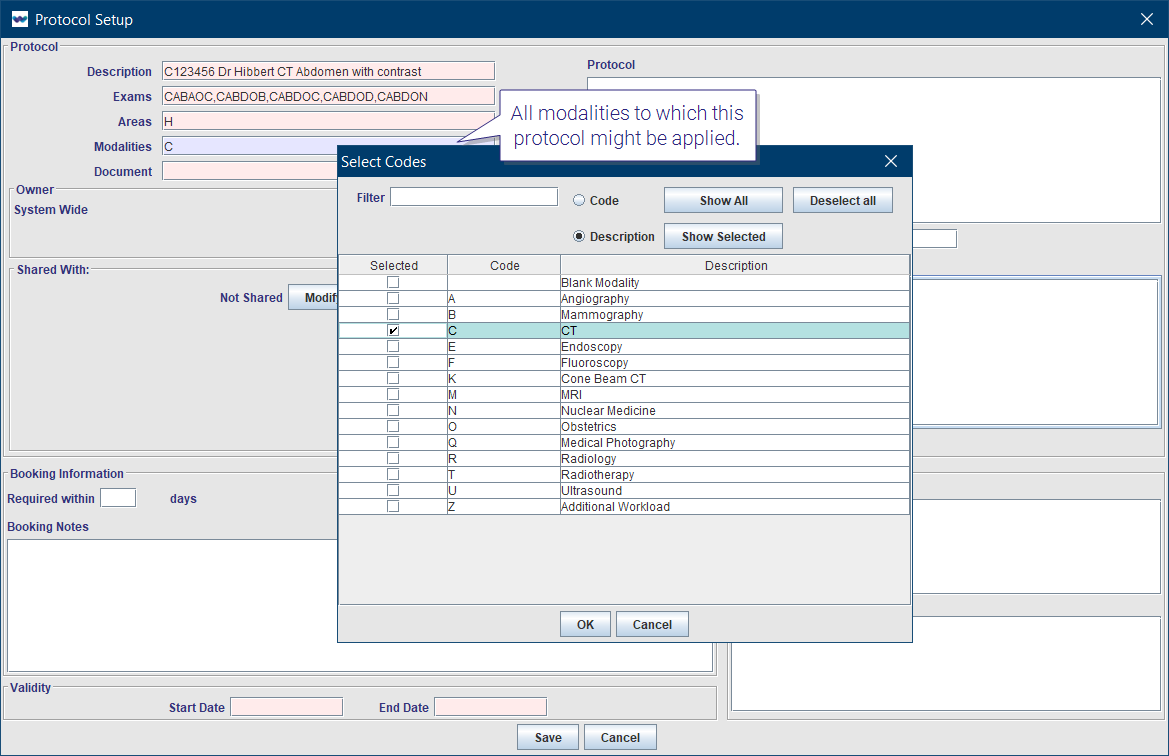
Modalities | All modalities to which this protocol might be applied. |
|
Document |
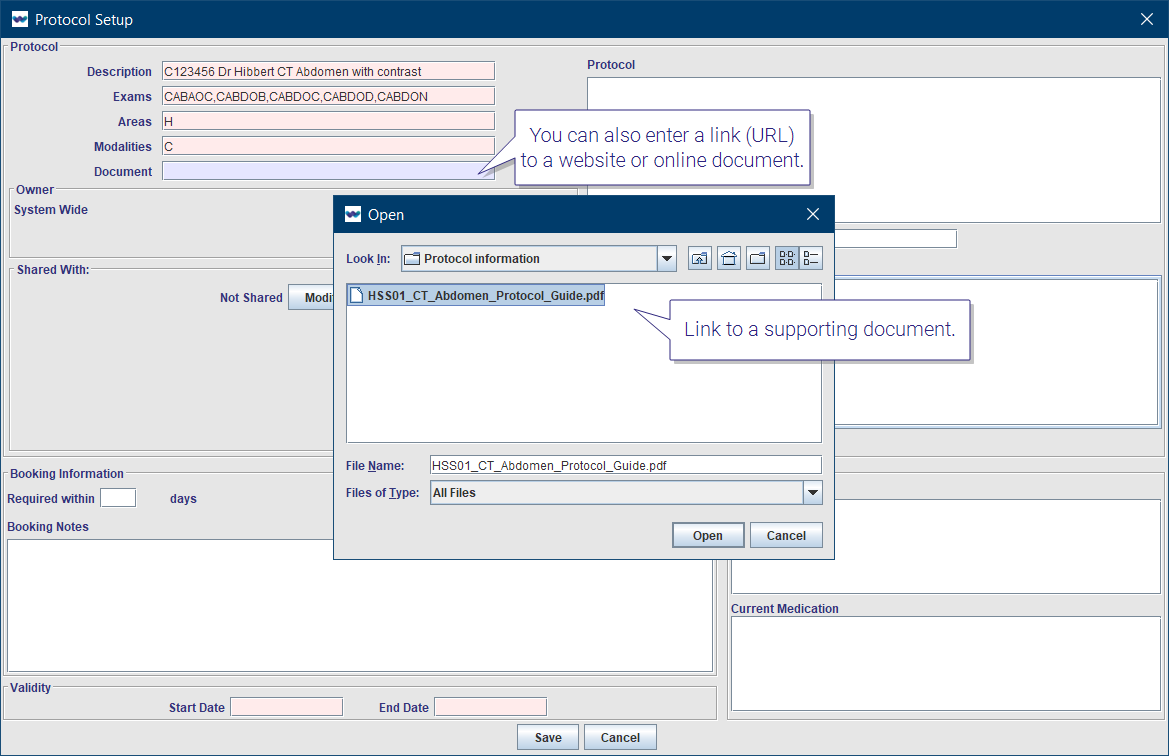
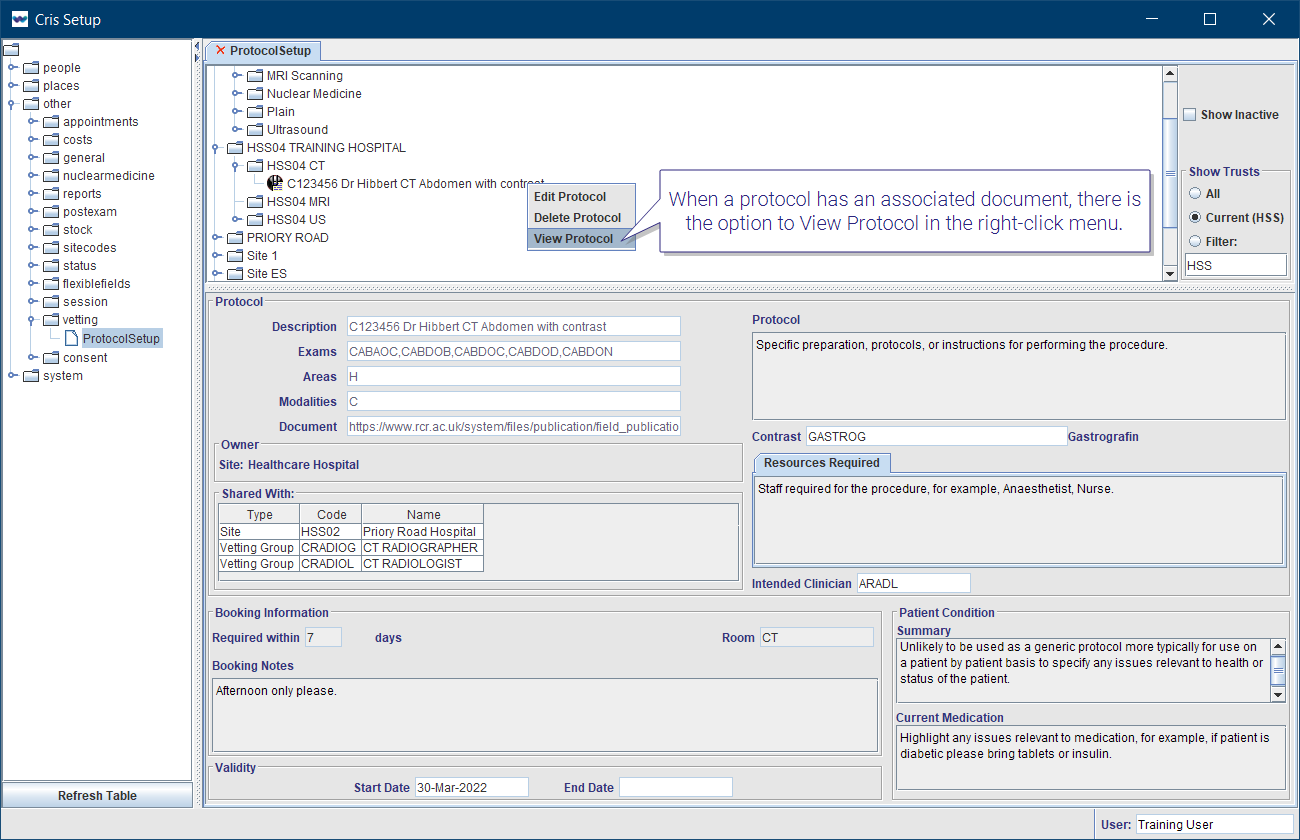
Link to a supporting document (which is saved on the hospital network, not your C drive), or a website / online document. When a protocol has an associated document, there is the option to View Protocol in the right-click menu. This will open the document, either locally or in a web browser.
Example: These links are for illustration only, and not real documents: Document on hospital network (not C drive) - N:\Vetting\Protocols\CT\Abdomen_with_contrast.pdf Online document - https://www.rcr.ac.uk/CT_Abdomen_Guide.pdf |
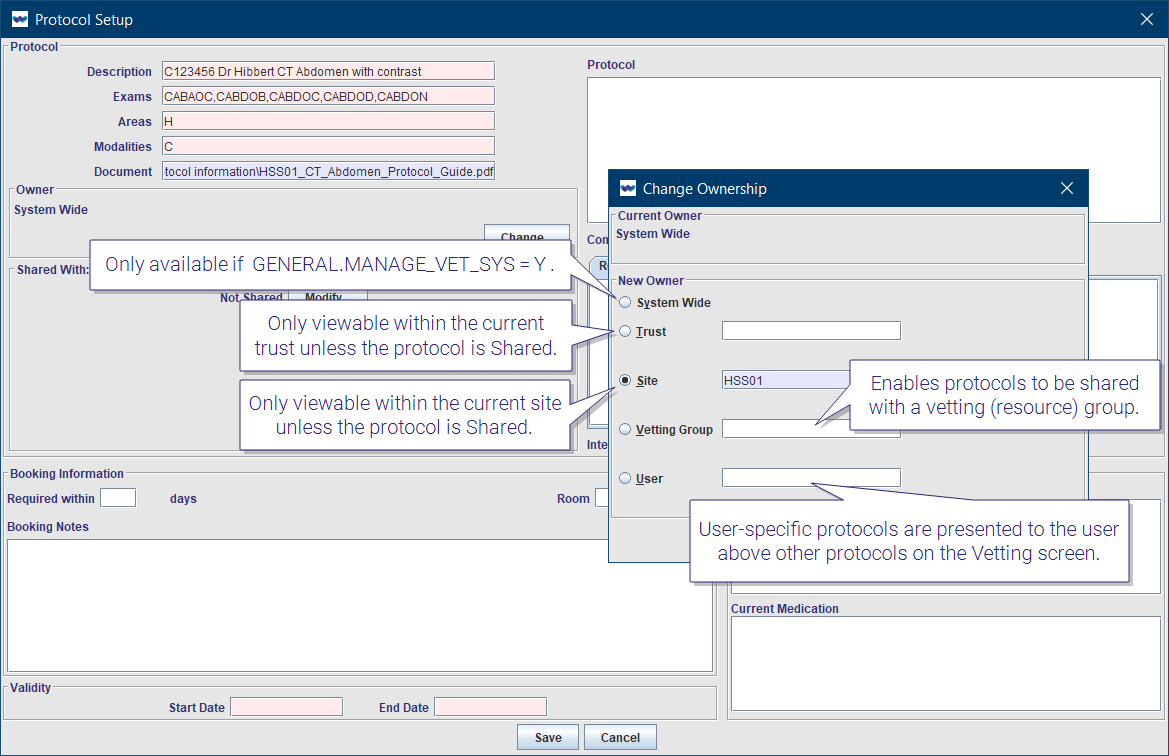 |
Owner |
System - Allows protocols to be created and shared across the whole system / consortium. Only available if GENERAL.MANAGE_VET_SYS = Y. See vetting administrator permissions. |
| Trust - Only viewable within the current trust, unless the protocol is shared. | ||
| Site - Only viewable within the current site, unless the protocol is shared. | ||
|
Vetting Group ** - Enables protocols to be shared with a vetting (resource) group. |
||
|
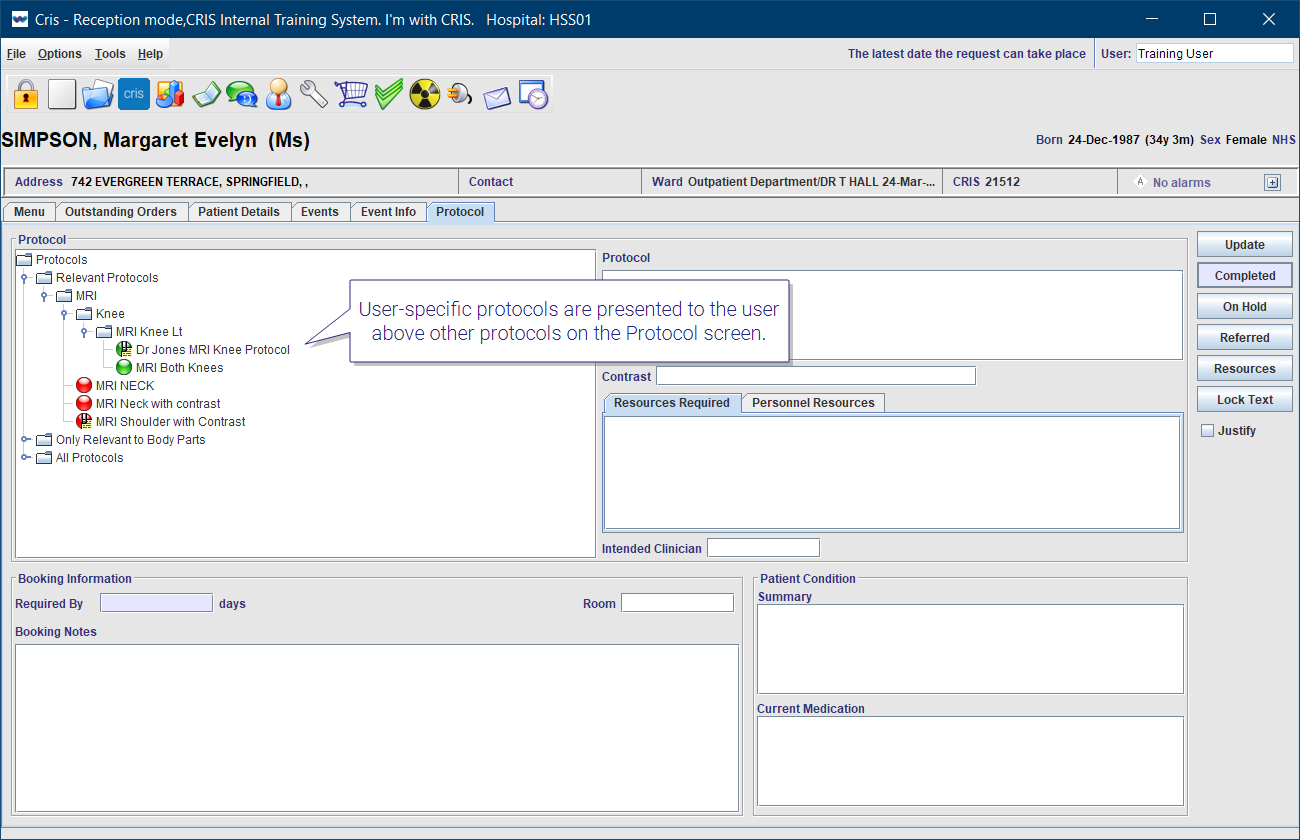
User - User-specific protocols are presented to the user above other protocols on the Protocol screen, unless the protocol is shared. |
||
|
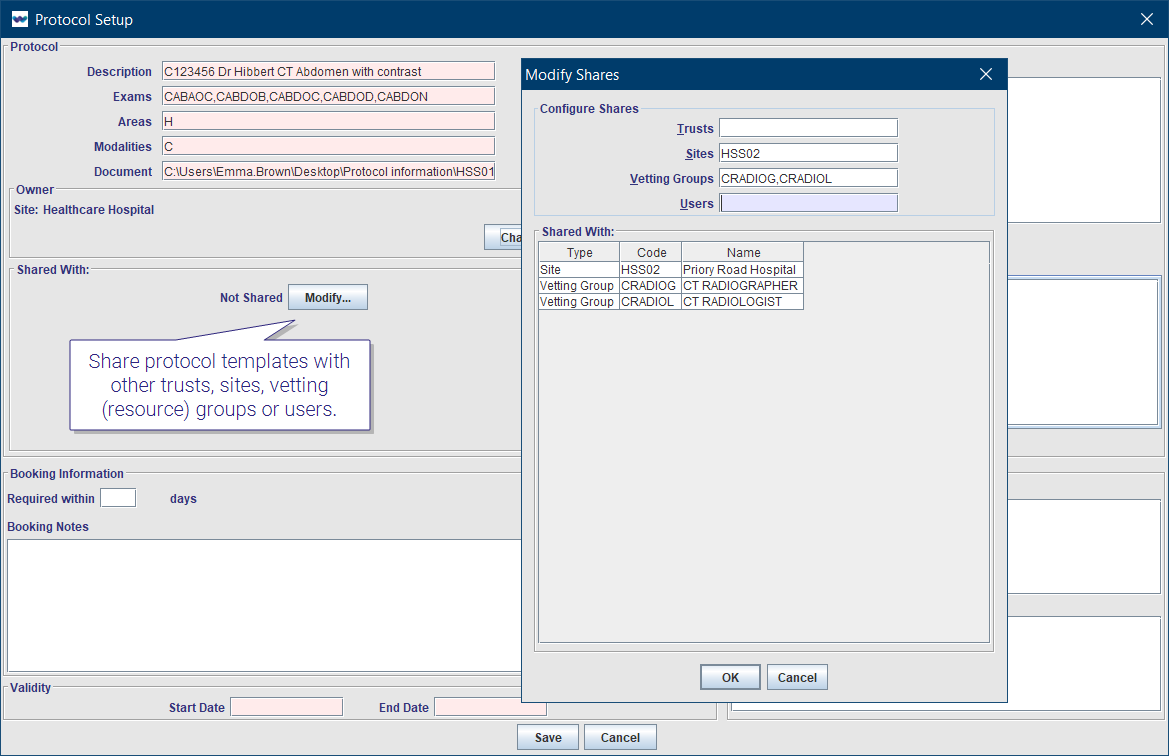
Shared With |
Share protocol templates with other trusts, sites, vetting (resource) groups or users. Example: Use the Shared With function if the Resource module is not deployed and you would like to share a protocol with several users:
|
|
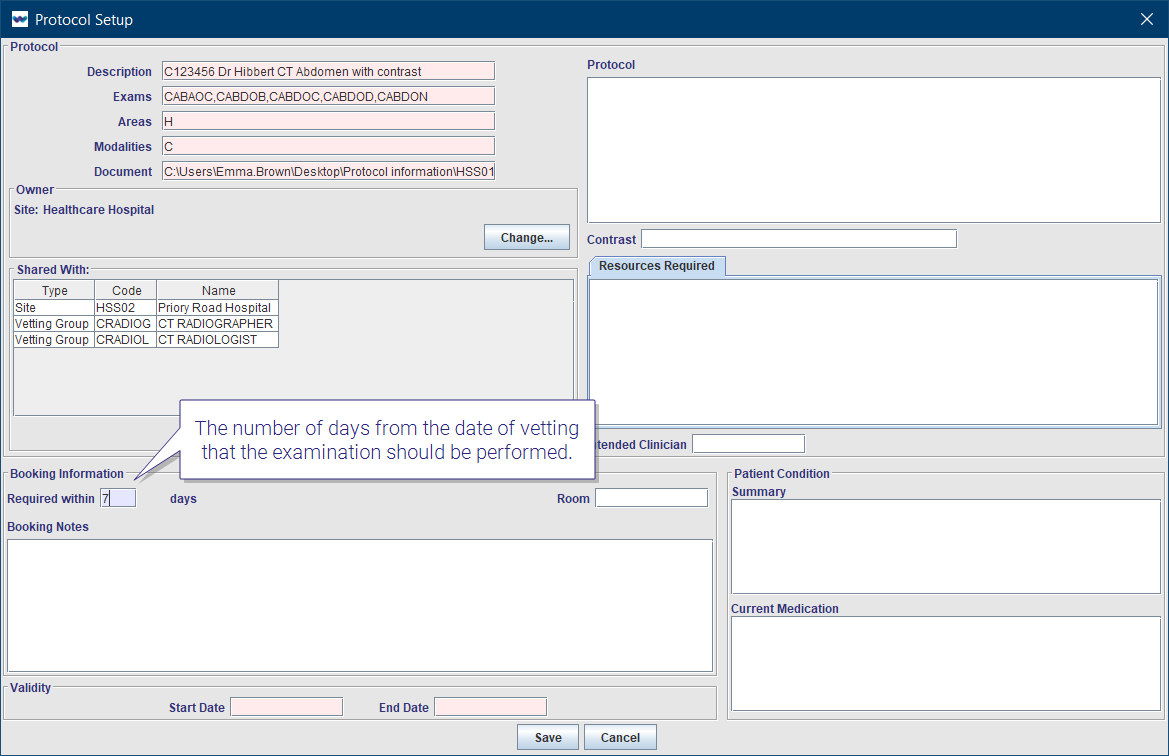
Required within [ ] Days | The number of days from the date of vetting that the examination should be performed. This will auto-populate the Required By field on the Protocol screen. The date can be changed, if necessary, when vetting individual events. |
|
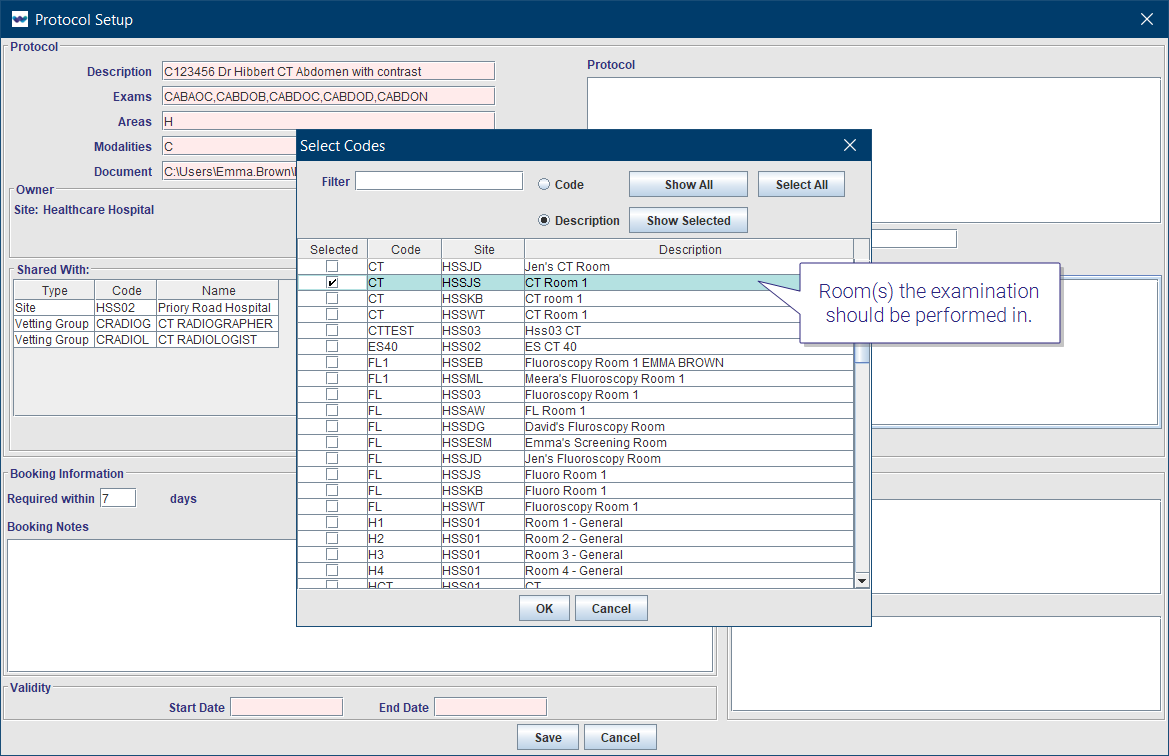
Room | Room(s) the examination should be performed in. This can be amended via the Protocol screen if required. |
|
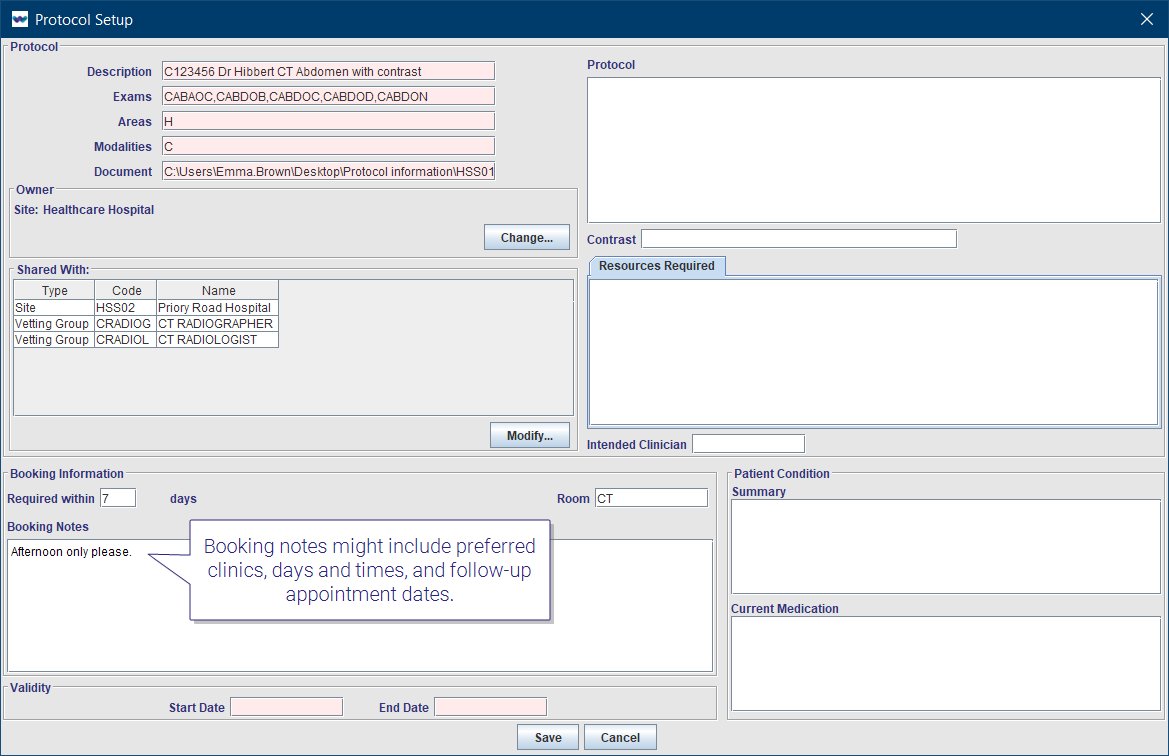
Booking Notes | Intended for the booking clerk, booking notes might include preferred clinics, days and times, and follow-up appointment dates. |
|
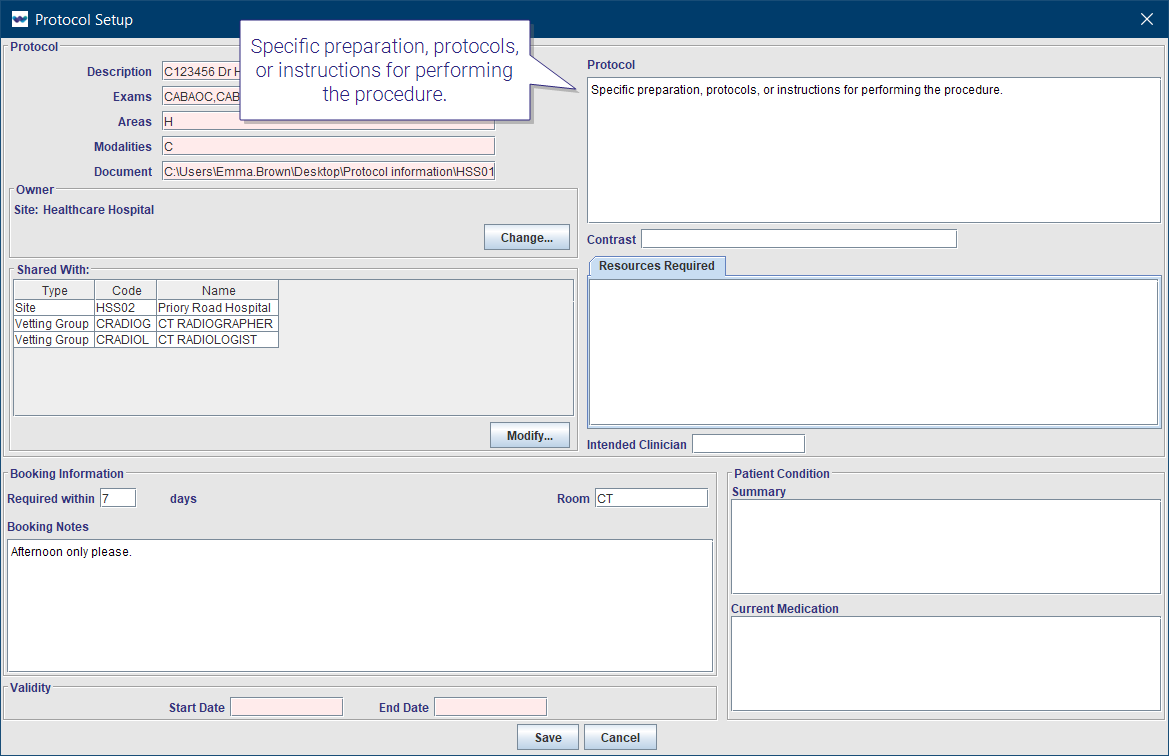
Protocol | Specific preparation, protocols, or instructions for performing the procedure. |

|
Contrast | Select specific contrast(s) required for the examination. |
|
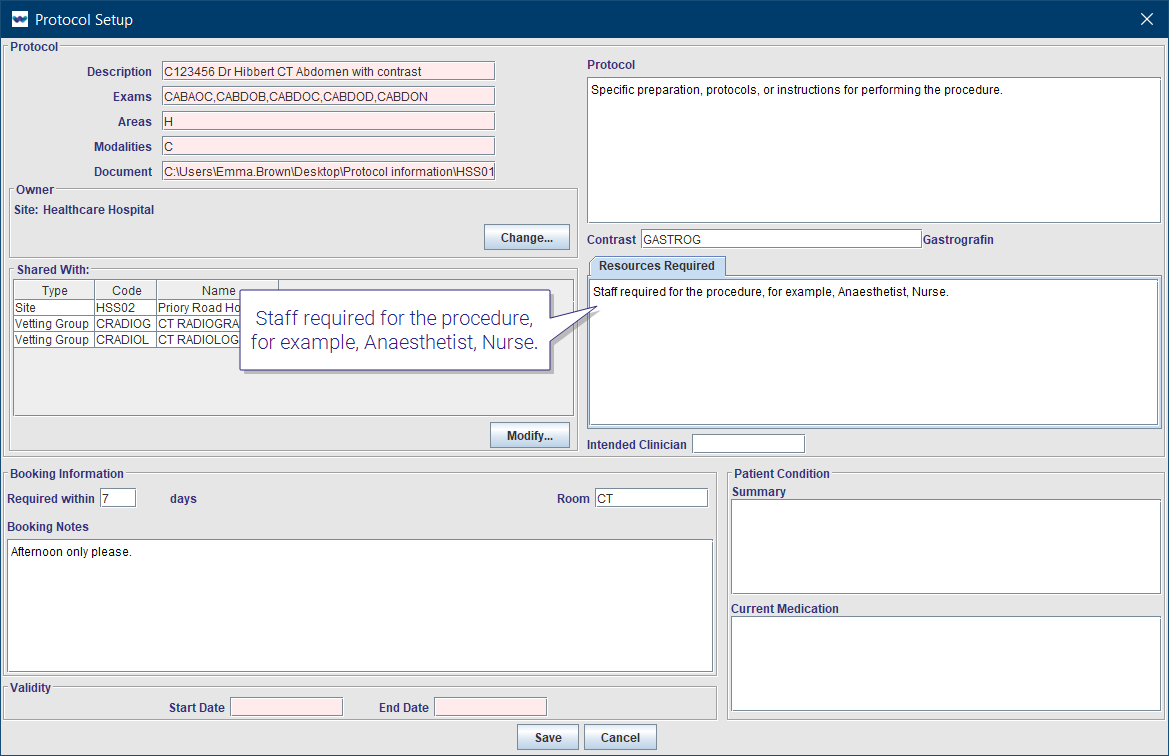
Resources Required | Staff required for the procedure, for example, Anaesthetist, Nurse. |
|
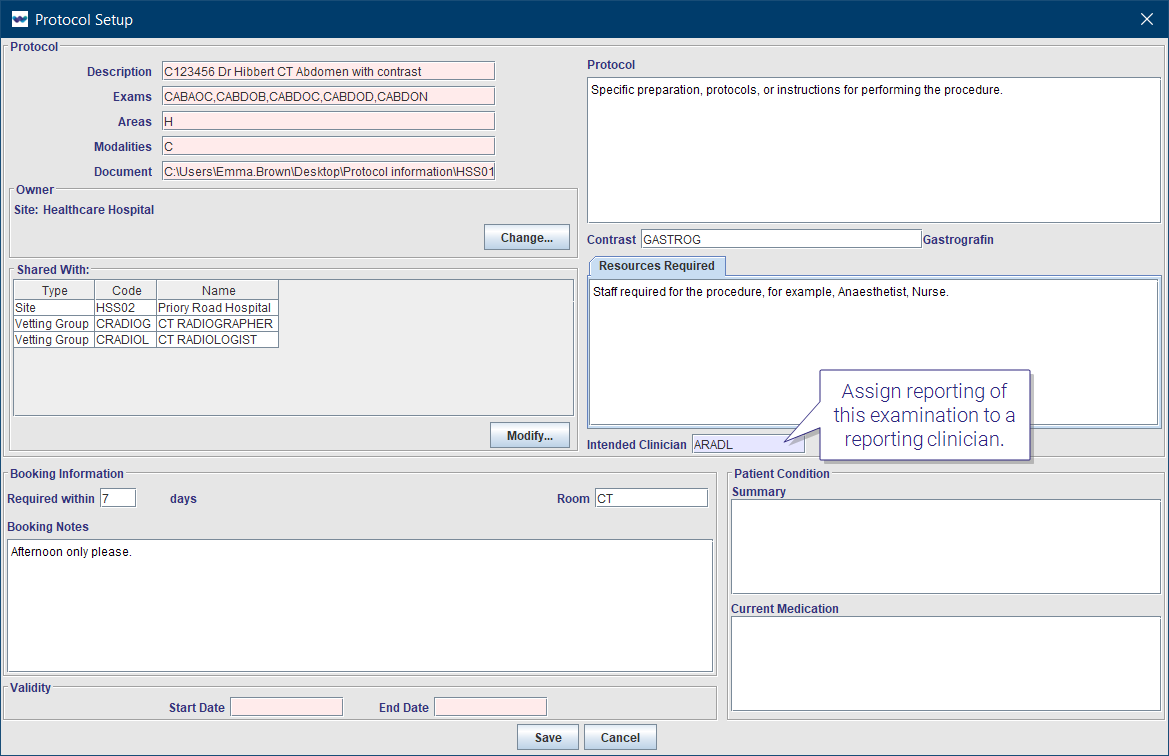
Intended Clinician | Assign reporting of this examination to a reporting clinician. This will populate the Intended Clinician field on the Event Details, Protocol, and Post Processing screens. It will also make the event appear on the reporting clinician's worklist. |
|
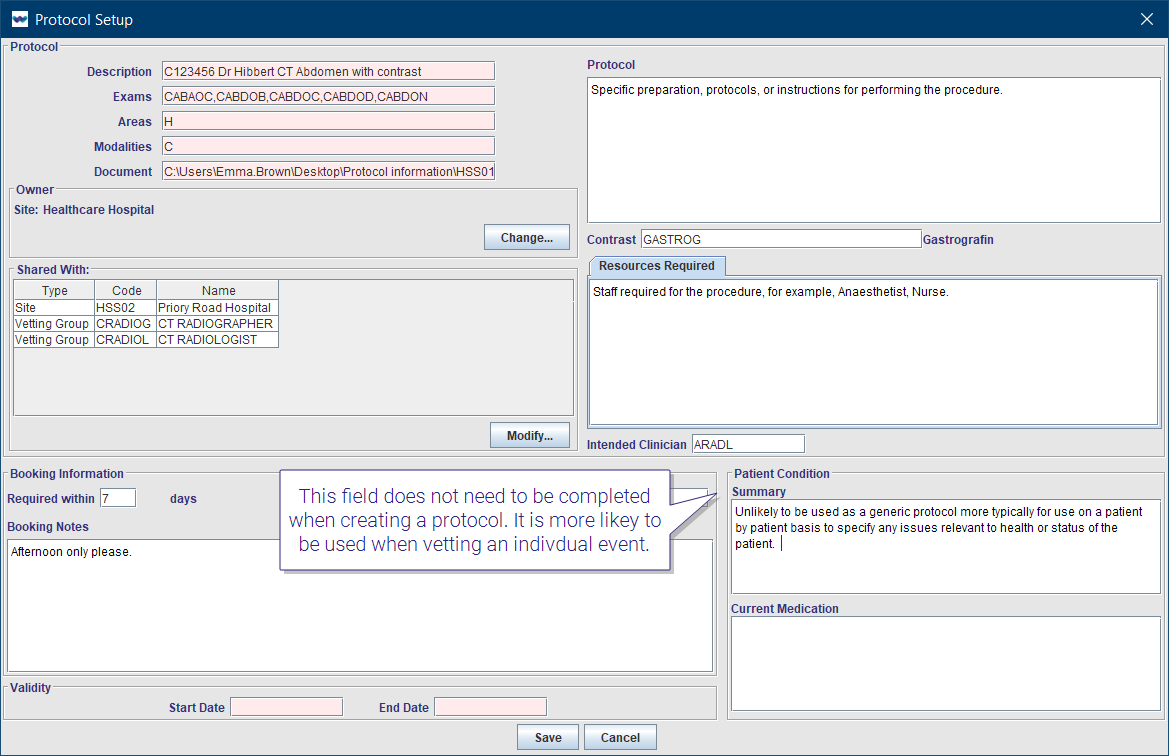
Patient Condition | This field does not need to be completed when creating a protocol. It is more likely to be used when vetting an individual event. |
|
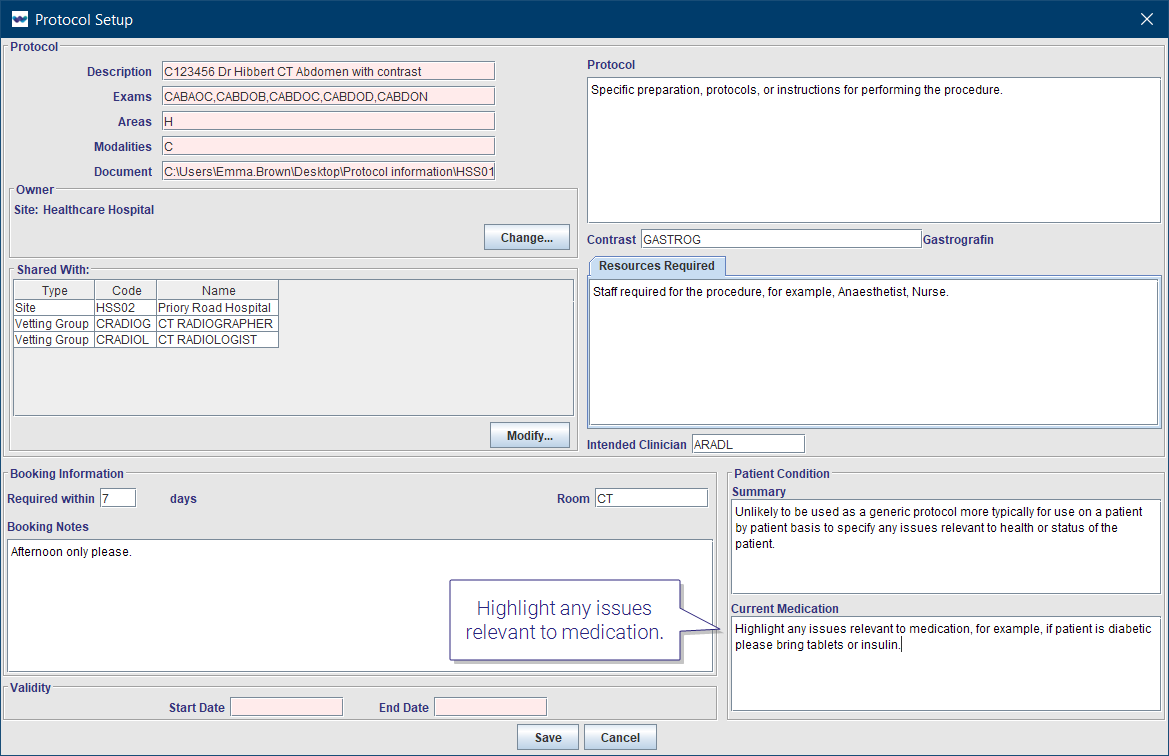
Current Medication | Highlight any issues relevant to medication - contra-indications, diabetic patients. |
|
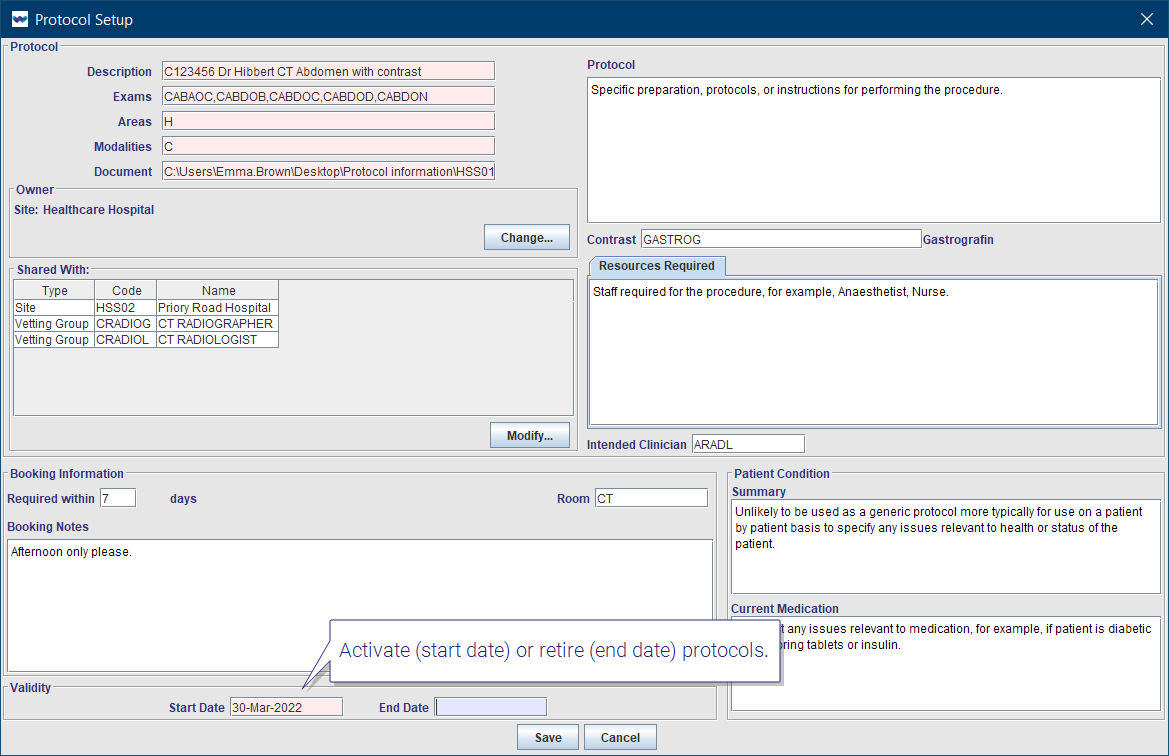
Start ~ and End Date |
Activate (start date) or retire (end date) protocols. Leaving Start Date blank will immediately activate the new protocol. Tip: End-dated items are not shown in Cris tables by default. Select the Show Inactive or Show End Dated tickbox to see end-dated items.
|

Note:
* This field is mandatory.
Note:
** This option requires implementation of the Resources module.
Note:
-
Only a user with Trust or System level permissions can create or delete categories (folders).
-
A user with lower level permissions (Site and Group) can assign and remove protocols within categories, but not create or delete those categories.
-
When creating a protocol, the default ownership will be the highest level to which the creating user has permission to manage.
-
A user may change ownership of a category or protocol to any of the other levels which that user has permission to manage.
Tip:
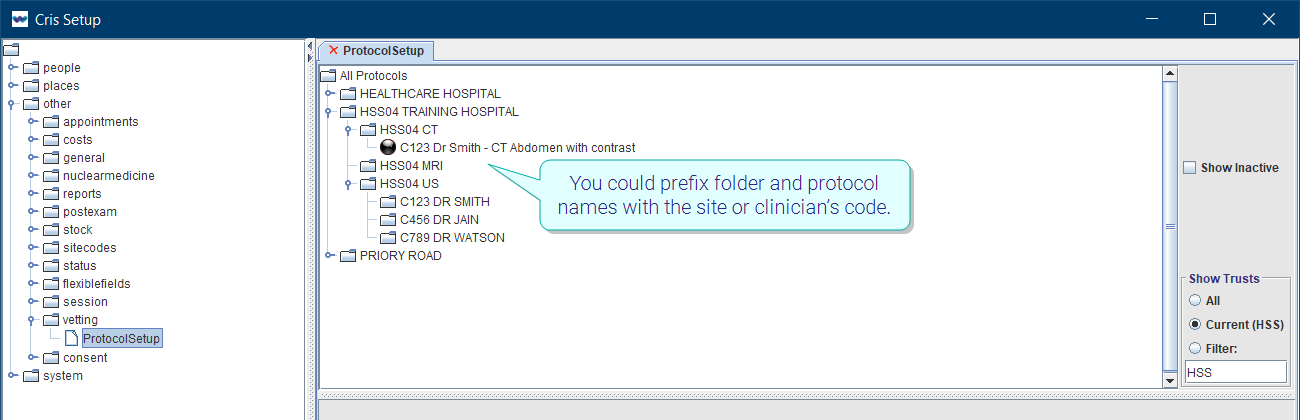
When creating categories and protocols, we recommend that you create unique names (to avoid having several folders named, for example "CT").
You could prefix folder and protocol names with the site (NACS) or clinician (professional registration) code.
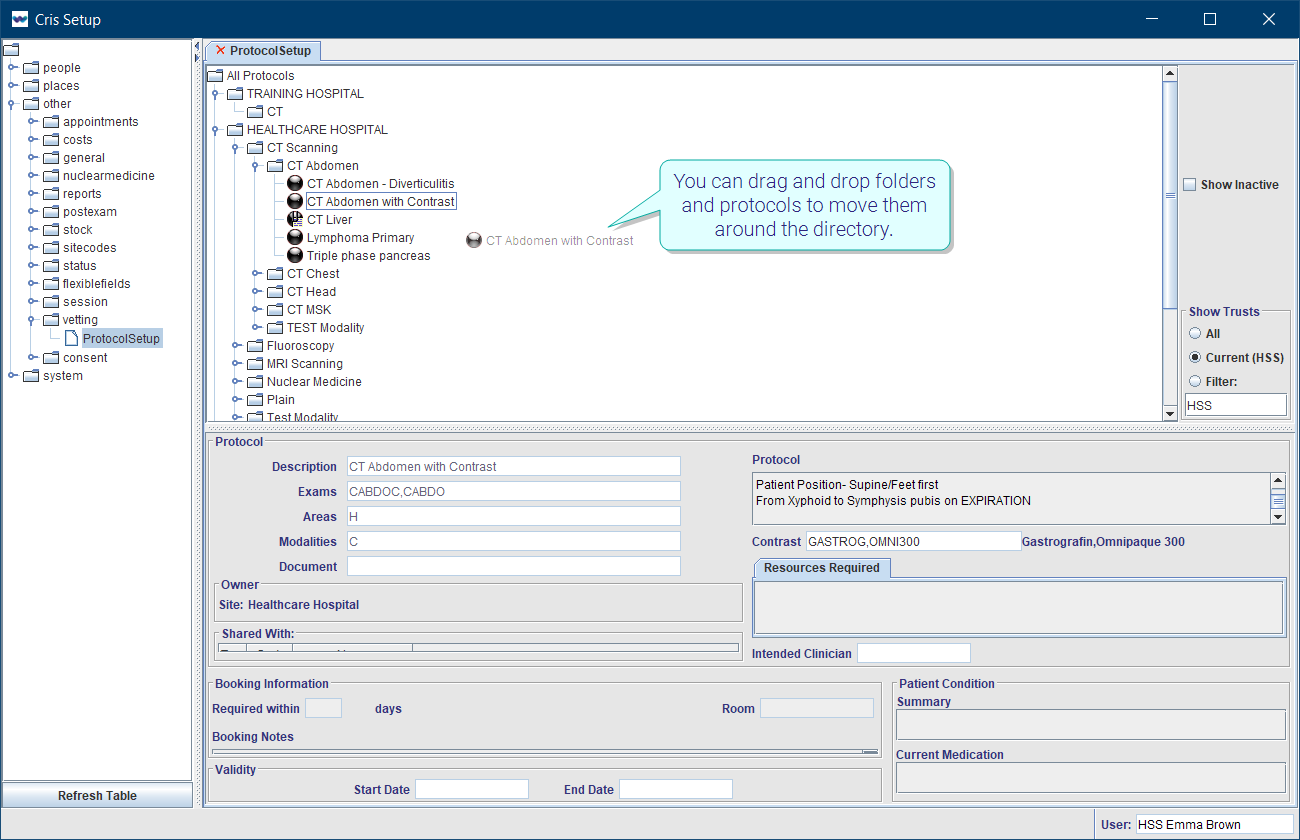
Tip:
You can drag and drop folders and protocols to move them around the directory.
Tip:
Double-click, or press the F4 key with your cursor in a field, to open a list of options.
OR
If you know the required codes, enter a comma-separated list.