Security settings for Vetting
- Create an activity called MODVET, which has VETTINGH as its parent group.
- Create two new roles called RADIOGV and RADIOLV, which have RADIOG and RADIOL as their parent groups.
- Initially, during the pilot phase of Vetting module deployment, assign the activity MODVET to each user in the pilot.
- When you are ready to go live with the Vetting module, assign the roleRADIOGV or RADIOLV (instead of RADIOG and RADIOL) to all vetting users.
The activity MODVET allows an individual (user) or role (user group) to use the Vetting module.
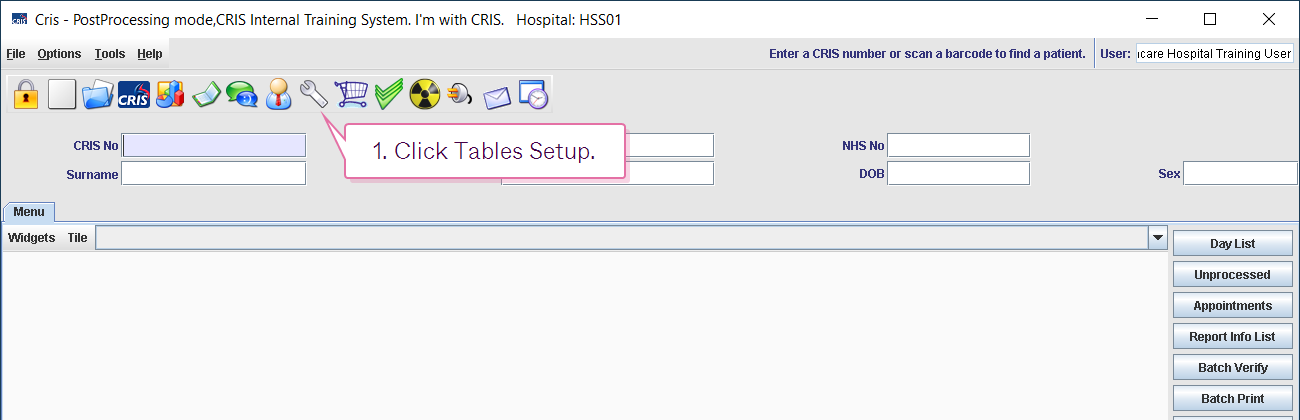
- Click Tables Setup.

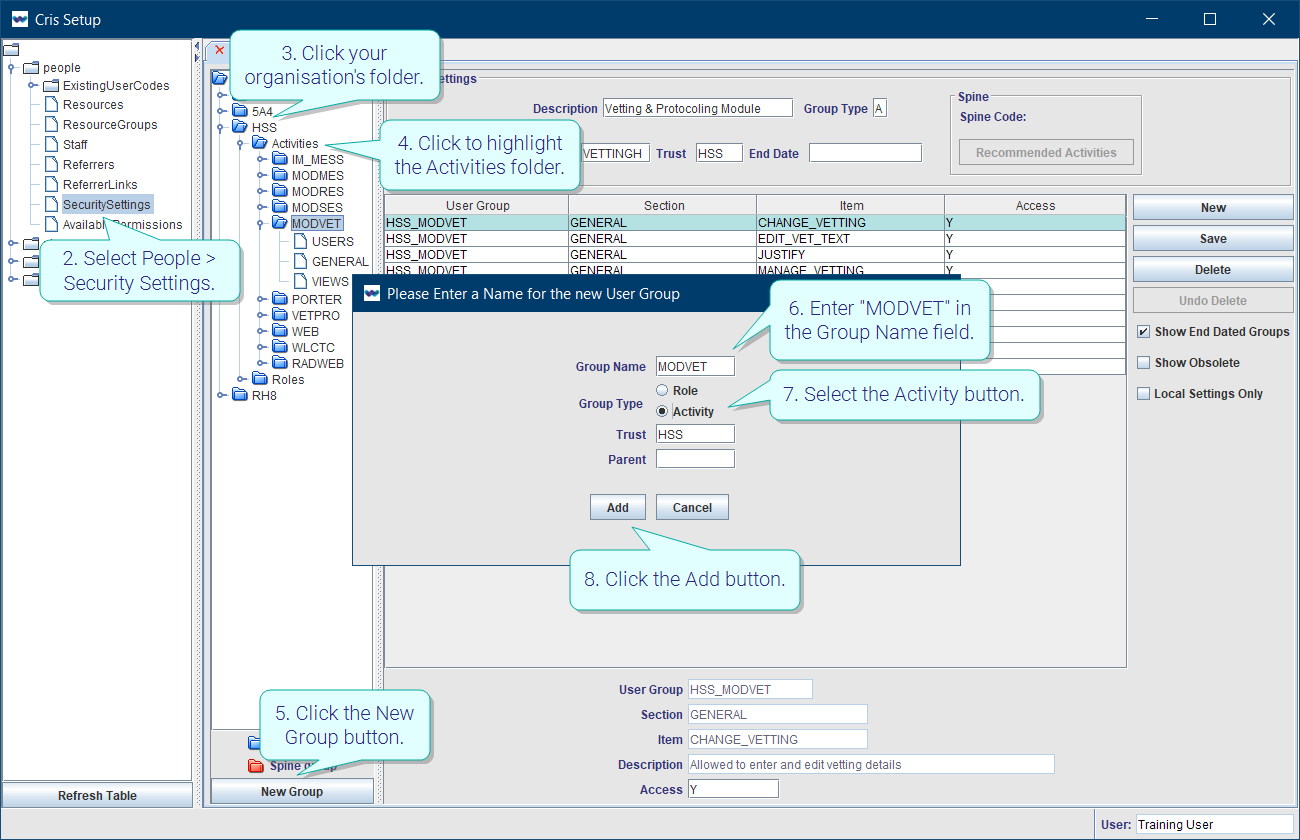
- Select People > Security Settings.
- Click your organisation's folder.
- Click to highlight the Activities folder.
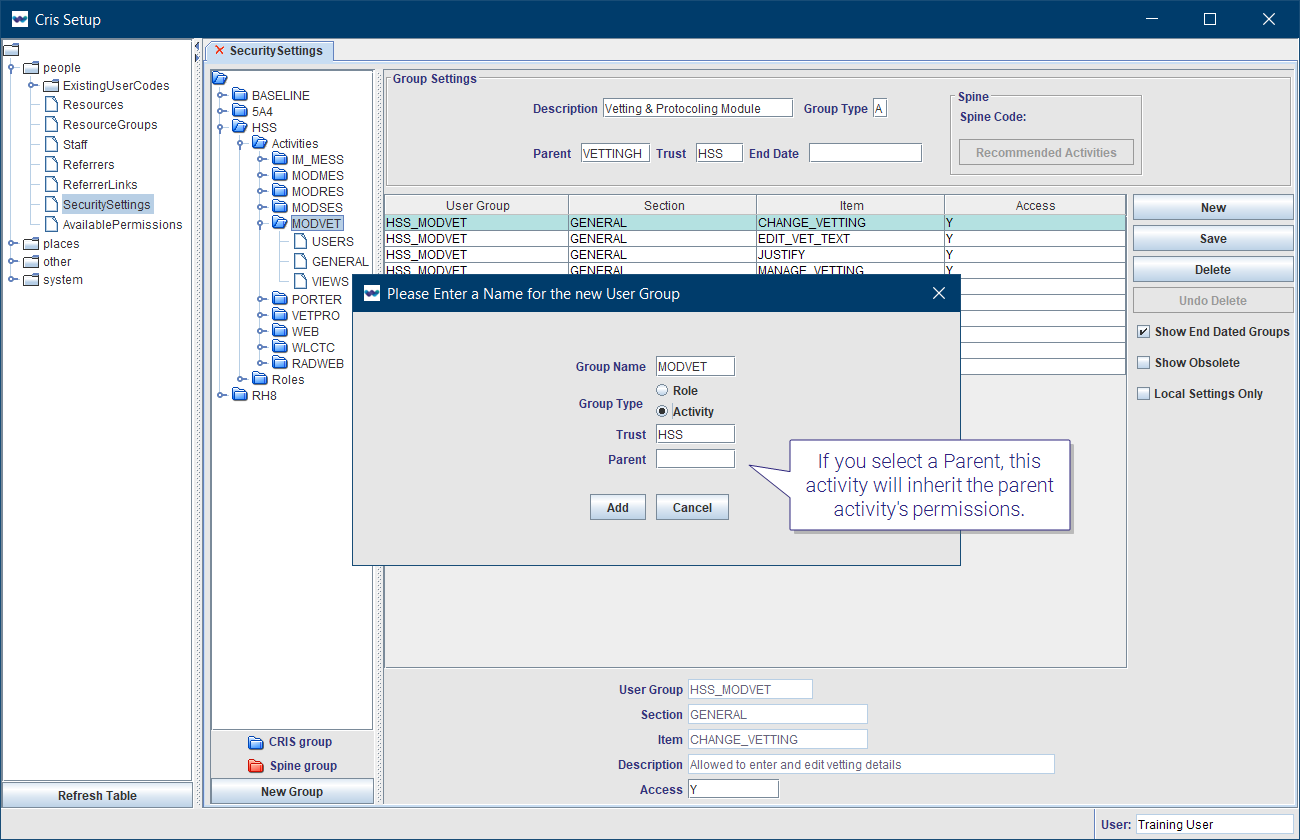
- Click the New Group button.
- Enter "MODVET" in the Group Name field.
- Select the Activity button.
- Click the Add button.
- Double-click to open the new folder.
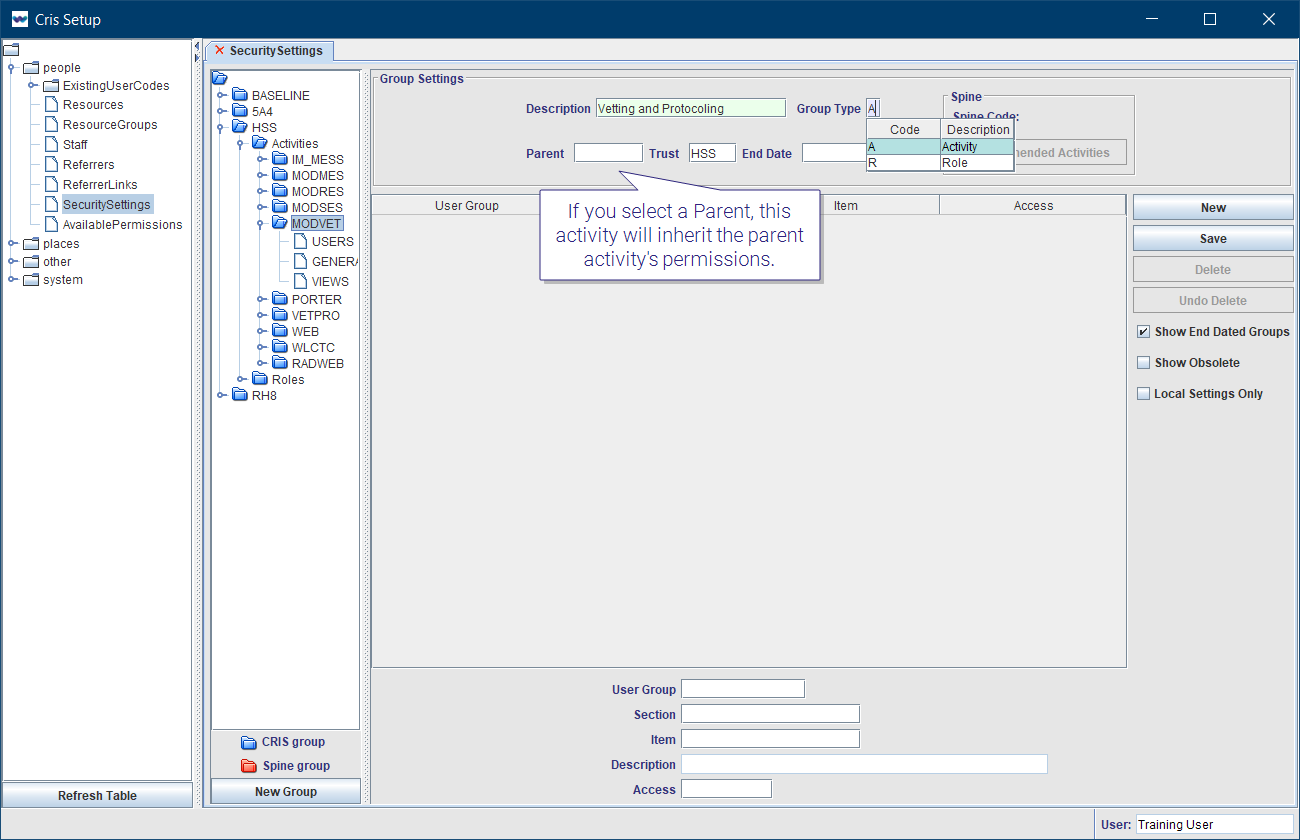
- Enter "Vetting and Protocolling" in the Description field.
- Click the Save button.
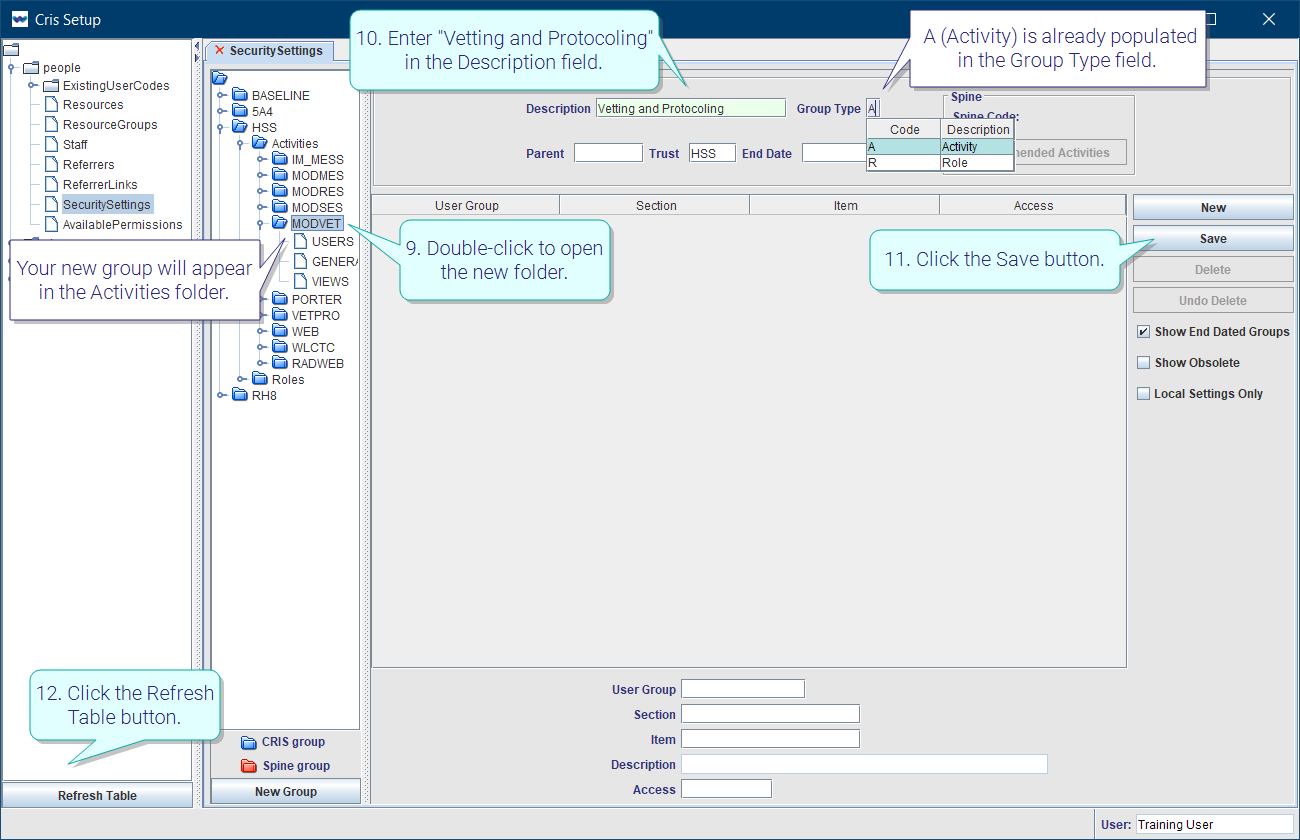
- Click the Refresh Table button.
Your new group will appear in the Activities folder.
A (Activity) is already populated in the Group Type field.
Add permissions
-
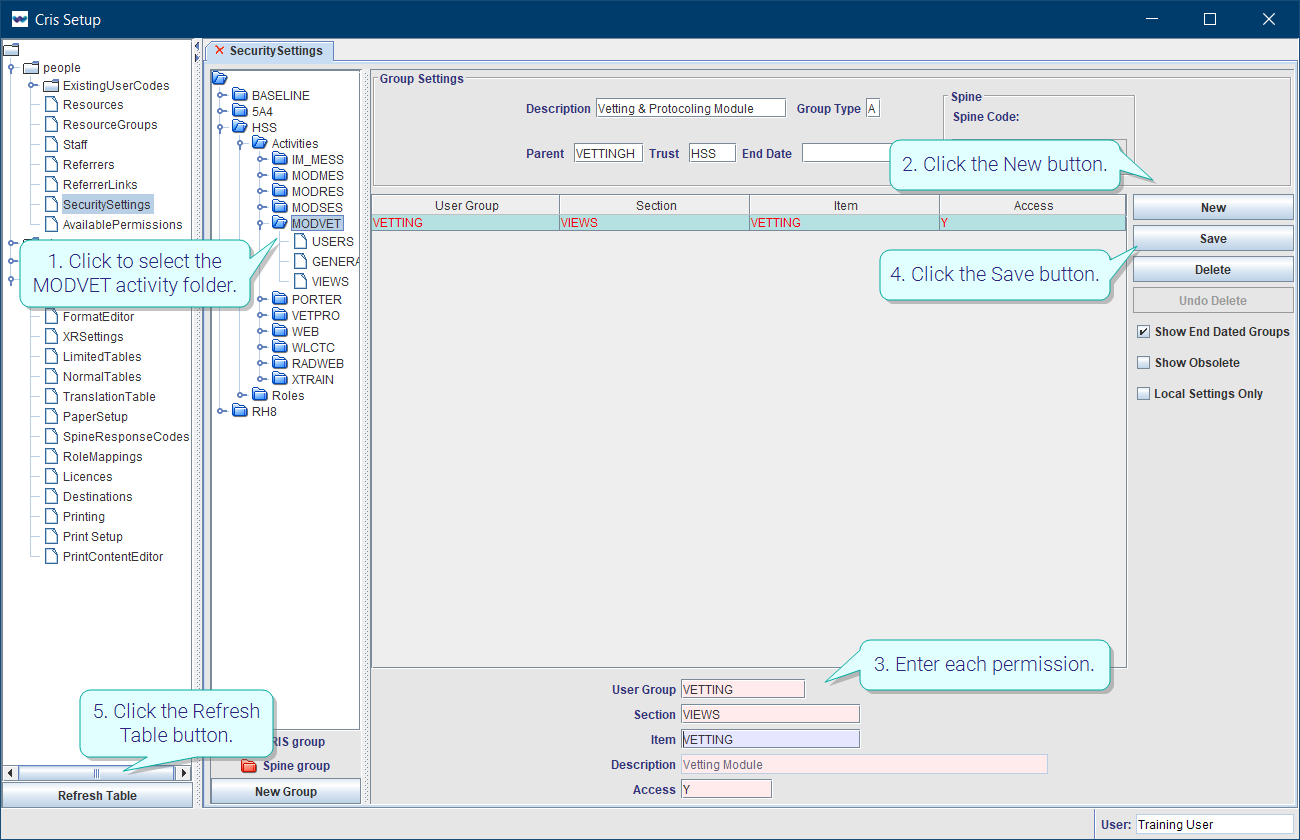
Click to select the MODVET activity folder.
-
Click the New button.
-
Enter each permission (see table below).
-
Click the Save button.
-
Once you have entered all permissions, click the Refresh Table button.
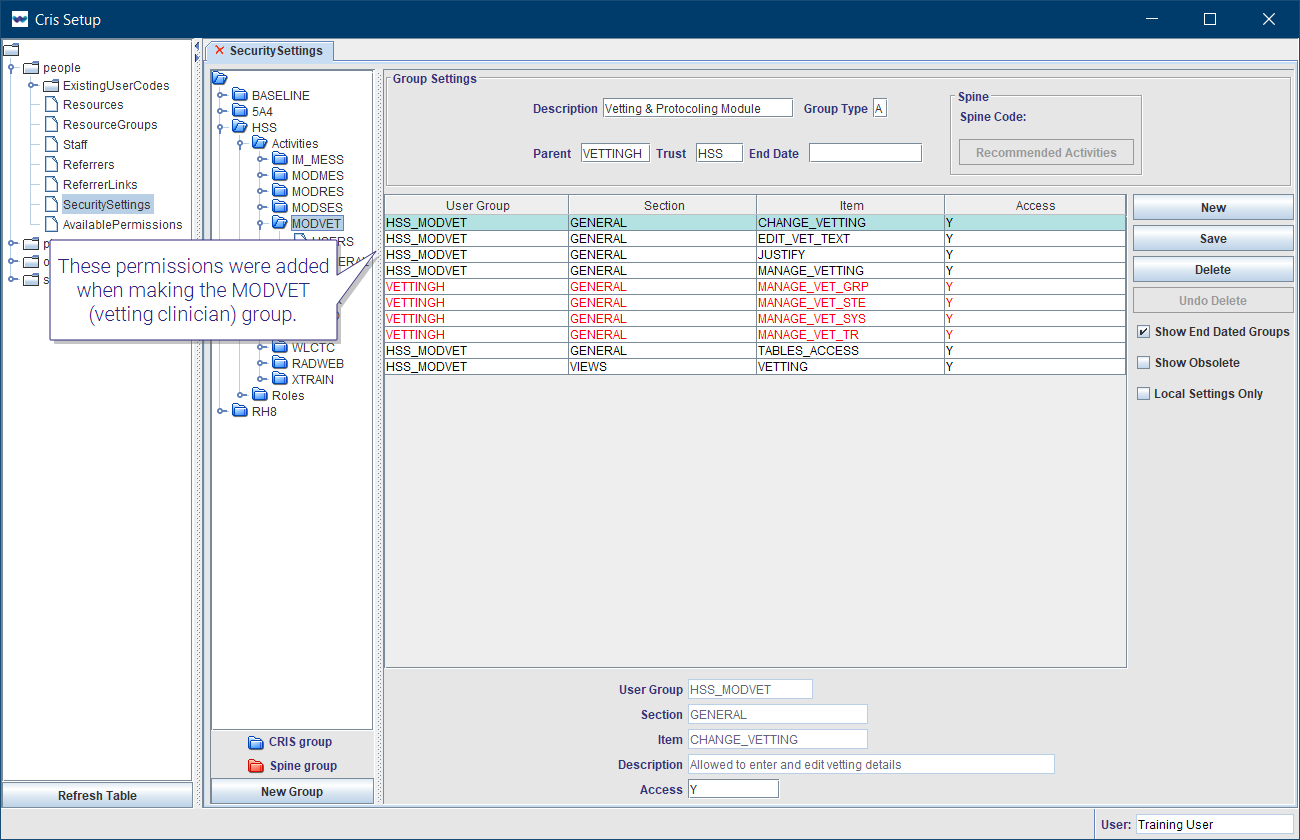
Vetting clinician permissions
| User Group | Section | Item | Description | Access | |
|---|---|---|---|---|---|
|
MODVET | GENERAL | MANAGE_VETTING | Manage the Vetting List. For example, assign events. | Y |
| MODVET | GENERAL | CHANGE_VETTING | Enter and edit vetting details. | Y | |
| MODVET | GENERAL | JUSTIFY | Mark an event as justified via the Justify tickbox. | Y | |
| MODVET | GENERAL | *EDIT_VET_TEXT |
Edit any other user's vetting free text. |
Y | |
| MODVET | VIEWS | VETTING | View vetting information throughout the system. | Y |
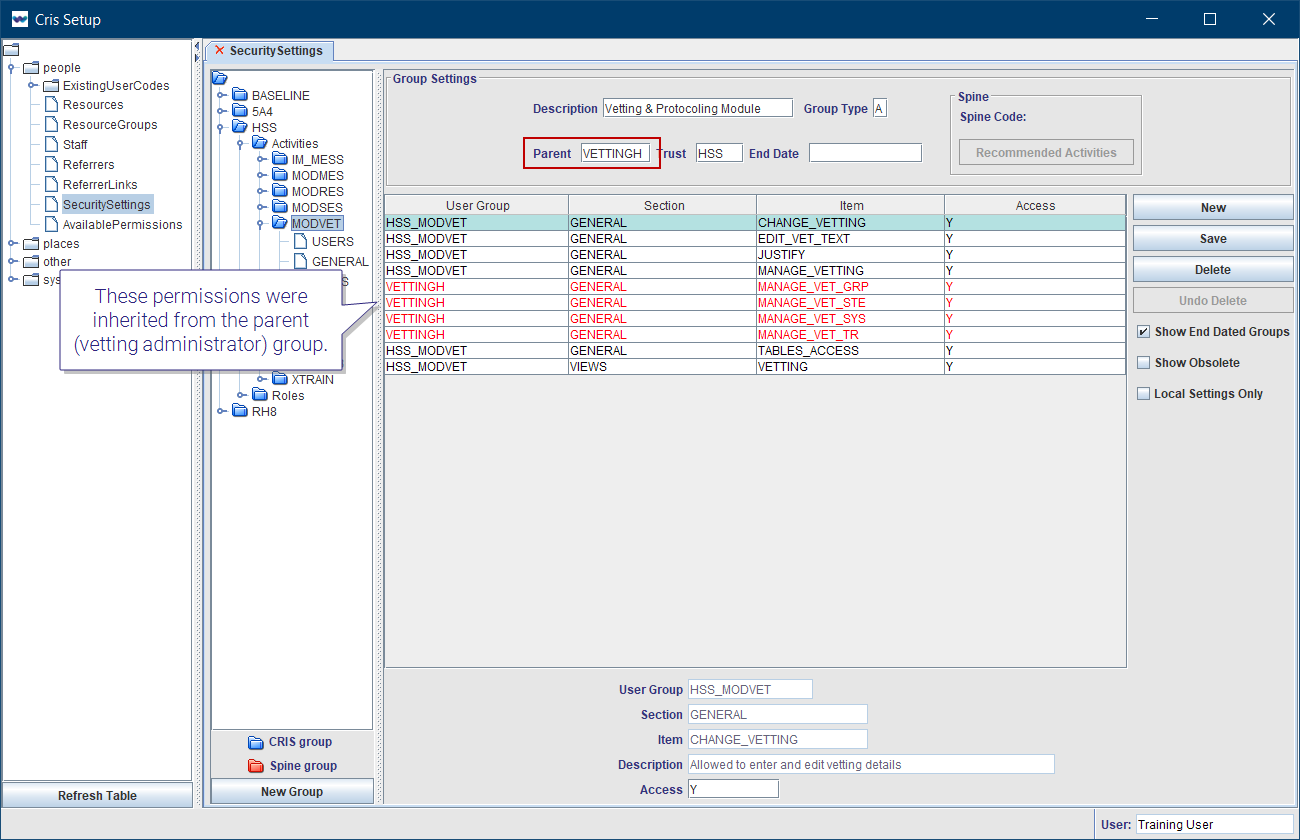
Vetting administrator permissions
| User Group | Section | Item | Description | Access | |
|---|---|---|---|---|---|
|
MODVET | GENERAL |
TABLES_ACCESS |
Edit Setup tables. | Y |
| VETTINGH | GENERAL | MANAGE_VET_SYS |
* This setting will override all others, giving access to system-level protocols. |
Y - view all protocols in the consortium. N - view only your trust protocols. |
|
| VETTINGH | GENERAL | MANAGE_VET_TR | * Edit protocols assigned to a specific Trust. | Y | |
| VETTINGH | GENERAL | MANAGE_VET_STE | Edit protocols assigned to a specific Site / Hospital. | Y | |
| VETTINGH | GENERAL | MANAGE_VET_GRP |
Edit protocols assigned to a specific Resource (Vetting) Group. |
Y |
Warning:
* This permission should only be given to system administrators.
Note:
If you select a Parent when creating a new activity, the activity will inherit the parent activity's permissions.
Tip:
You can edit protocols via Other > Vetting > Protocol Setup. See Configure Protocols.
The roles (user groups) RADIOGV and RADIOLV have RADIOG and RADIOL as their parent groups, thus inherit their activities.
The roles RADIOGV and RADIOLV also allow their members to perform the vetting tasks specified in the MODVET activity.
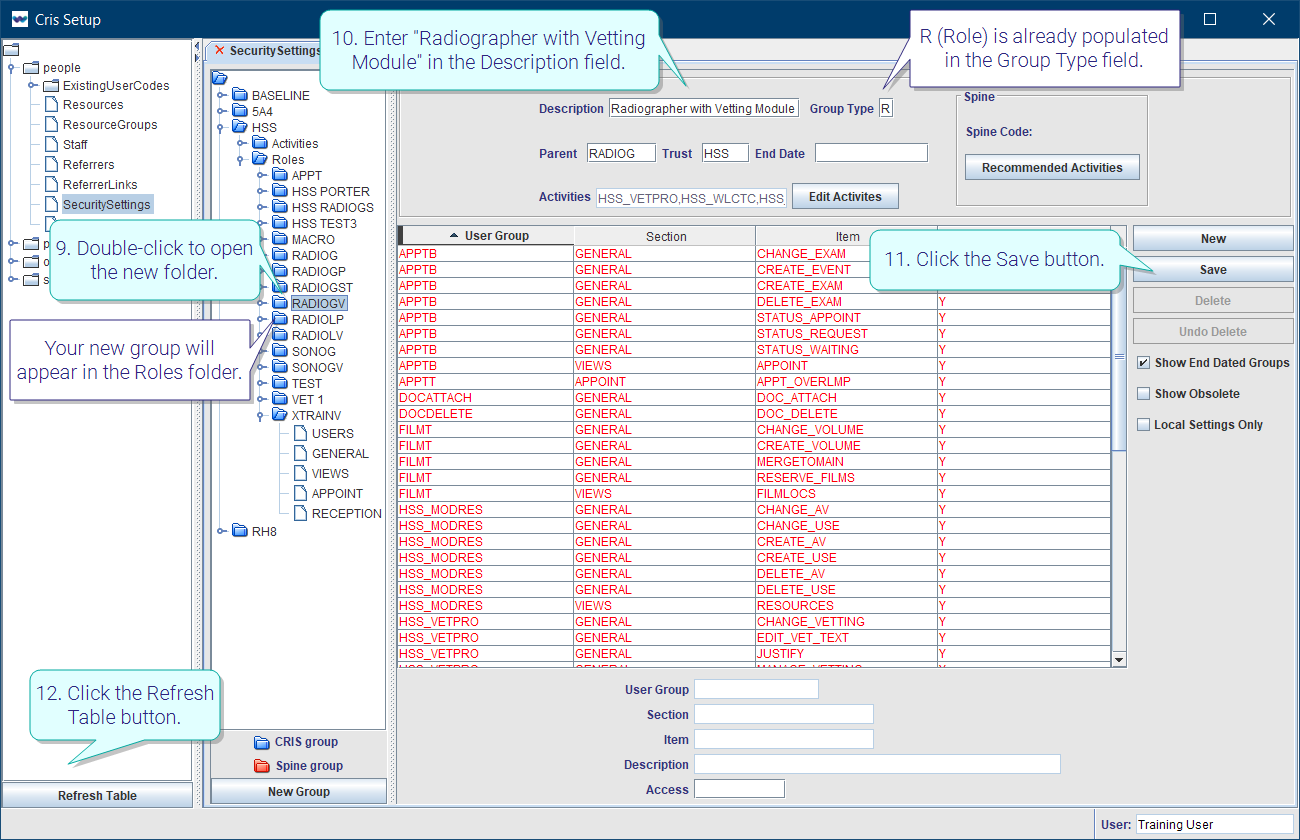
- Click Tables Setup.
- Select People > Security Settings.
- Click your organisation's folder.
- Click to highlight the Roles folder.
- Click the New Group button.
- Enter "RADIOGV" in the Group Name field.
- Select the Role button.
- Click the Add button.
- Double-click to open the new folder.
- Enter "Radiographer with Vetting Module" in the Description field.
- Click the Save button.
- Click the Refresh Table button.

Your new group will appear in the Roles folder.
R (Role) is already populated in the Group Type field.
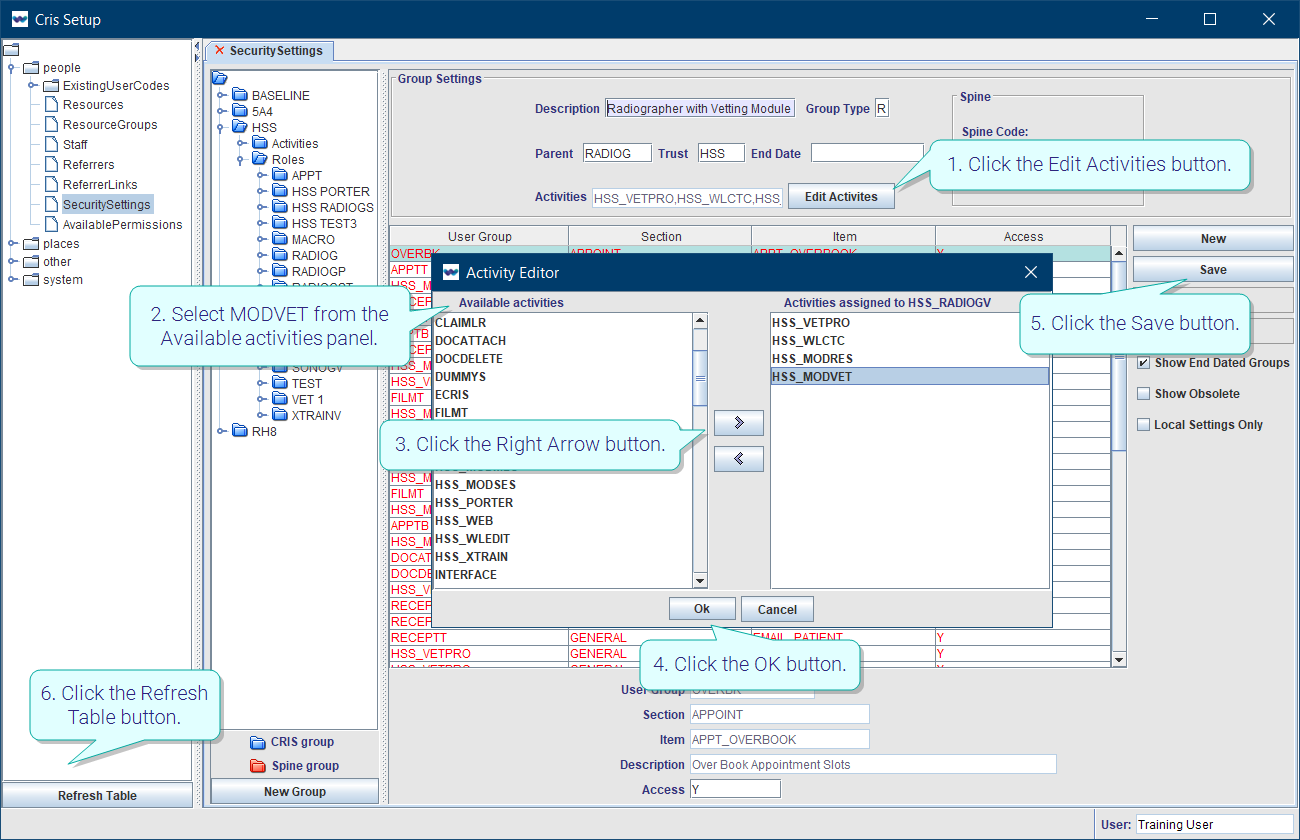
Add activities
-
Click the Edit Activities button.
-
Select MODVET from the Available activities panel.
-
Click the Right Arrow button to move it to the Activities assigned panel.
-
Click the OK button.
- Click the Save button.
- Click the Refresh Table button.
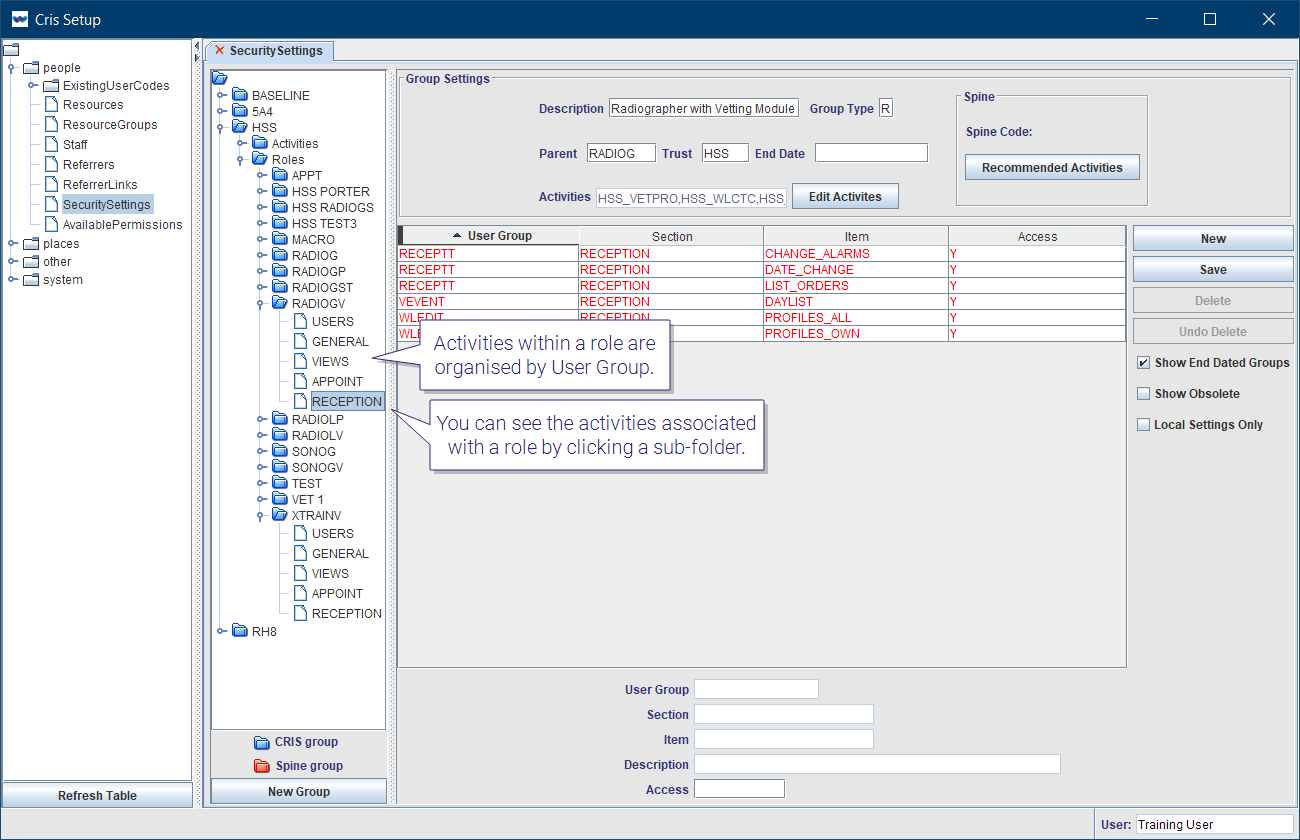
Vetting radiographer activities
The role RADIOGV contains the standard activities for a radiographer (RADIOG) plus the activity MODVET.
Vetting radiologist activities
The role RADIOLV contains the standard activities for a radiologist (RADIOL) plus the activity MODVET.
Tip:
Activities within a role are organised by User Group. You can see the activities associated with a role by clicking a sub-folder.
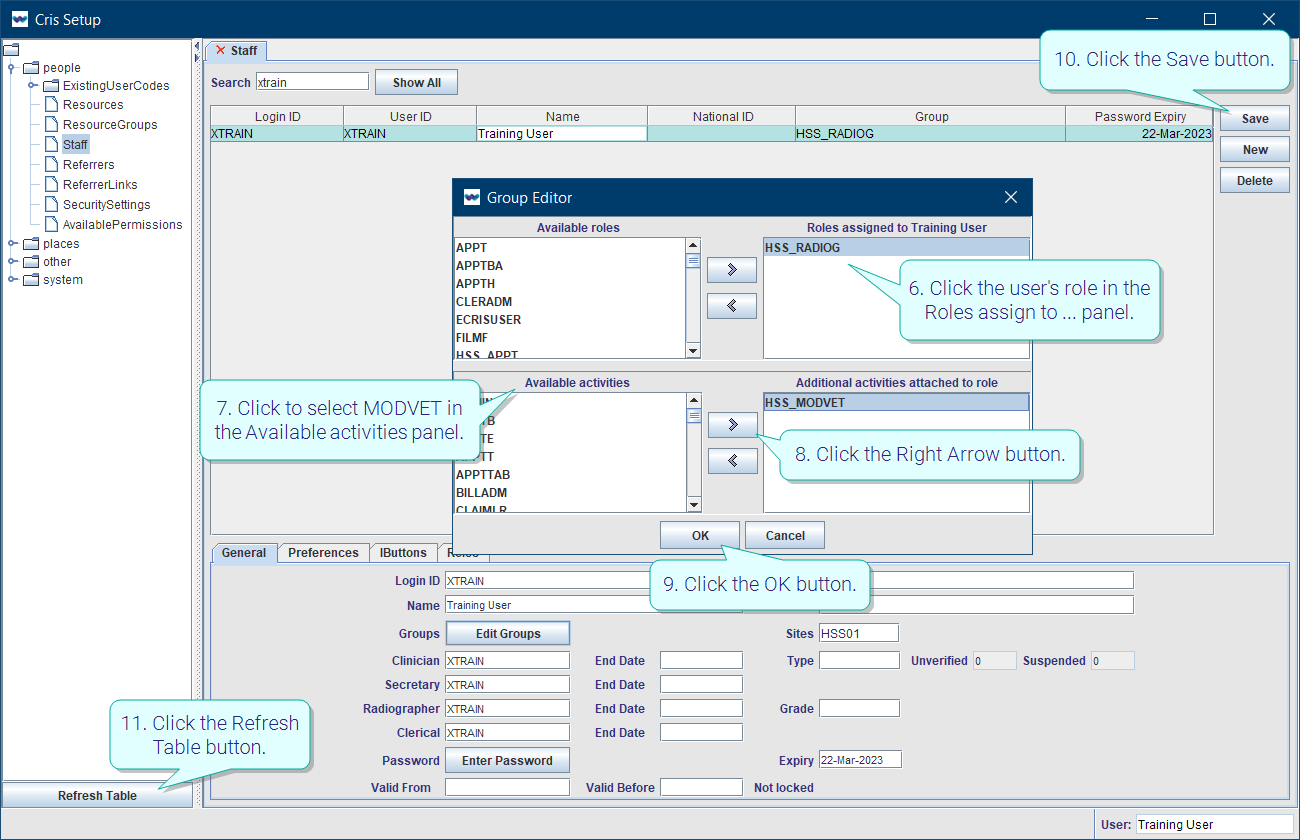
Assigning MODVET to a user allows them to perform the tasks specified in MODVET.
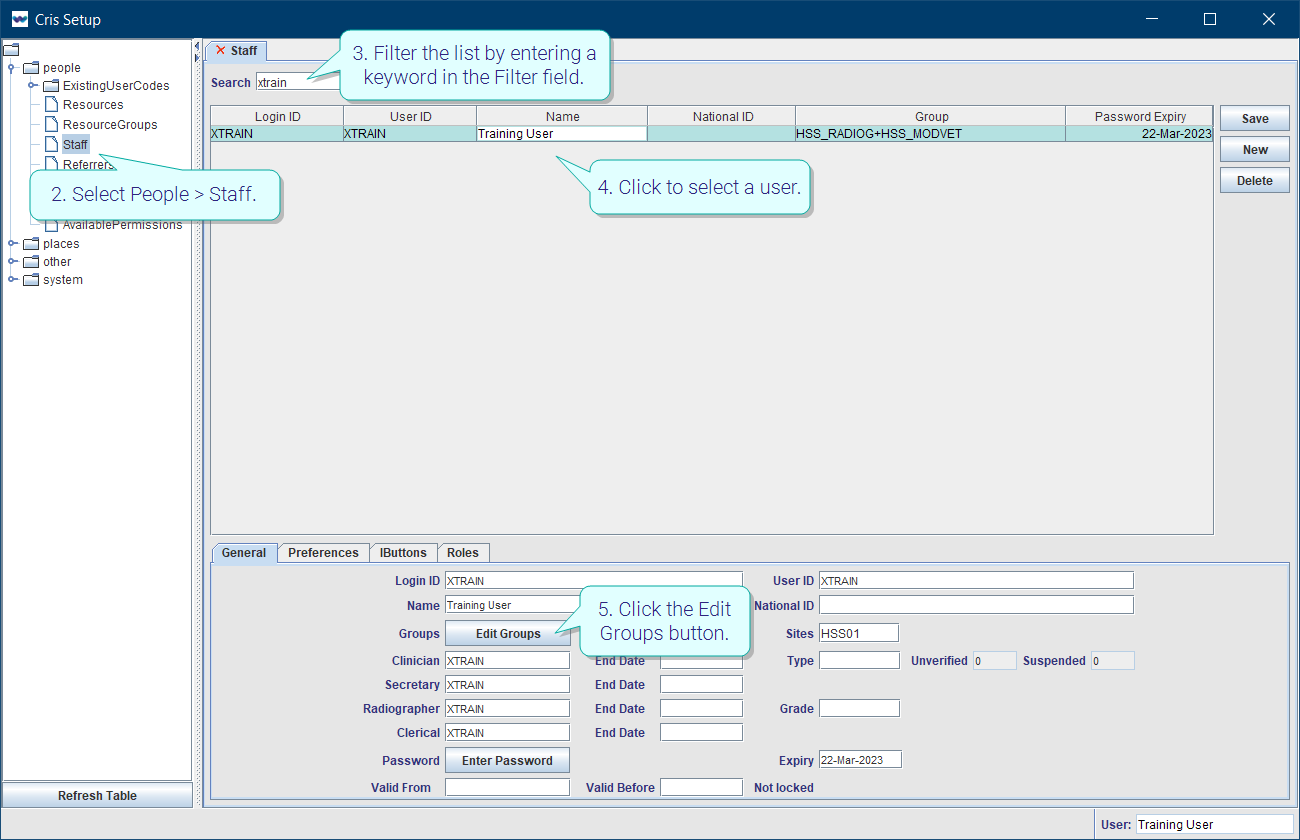
- Click Tables Setup.
- Select People > Staff.
- Filter the list by entering a keyword in the Filter field.
- Click to select a user.
- Click the Edit Groups button.
- Click the user's role in the Roles assign to ... panel.
- Click to select MODVET in the Available activities panel.
- Click the Right Arrow button to move it to the Additional activities ... panel.
- Click the OK button.
- Click the Save button.
- Click the Refresh Table button.
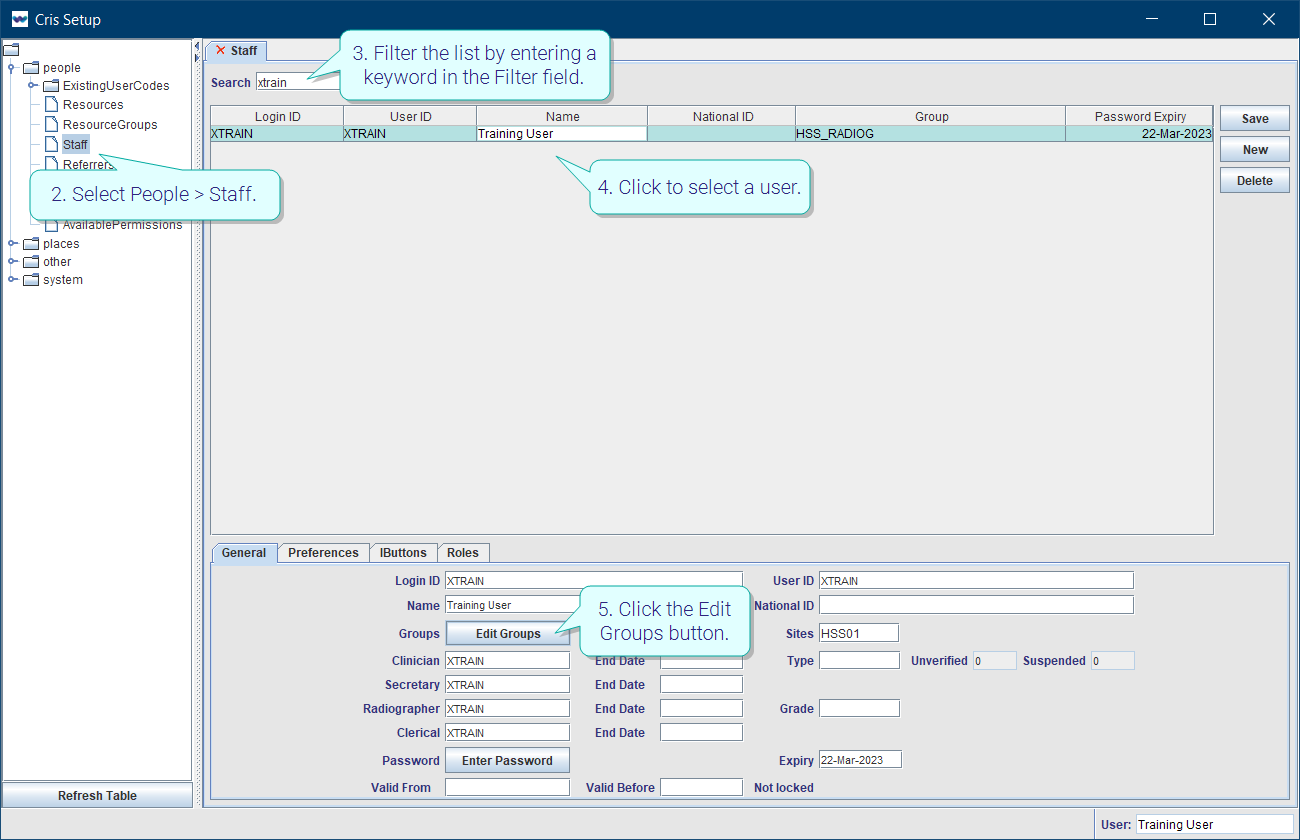
The Group Editor window opens.
Activities which can be added to the selected role are displayed in the Available activities panel.
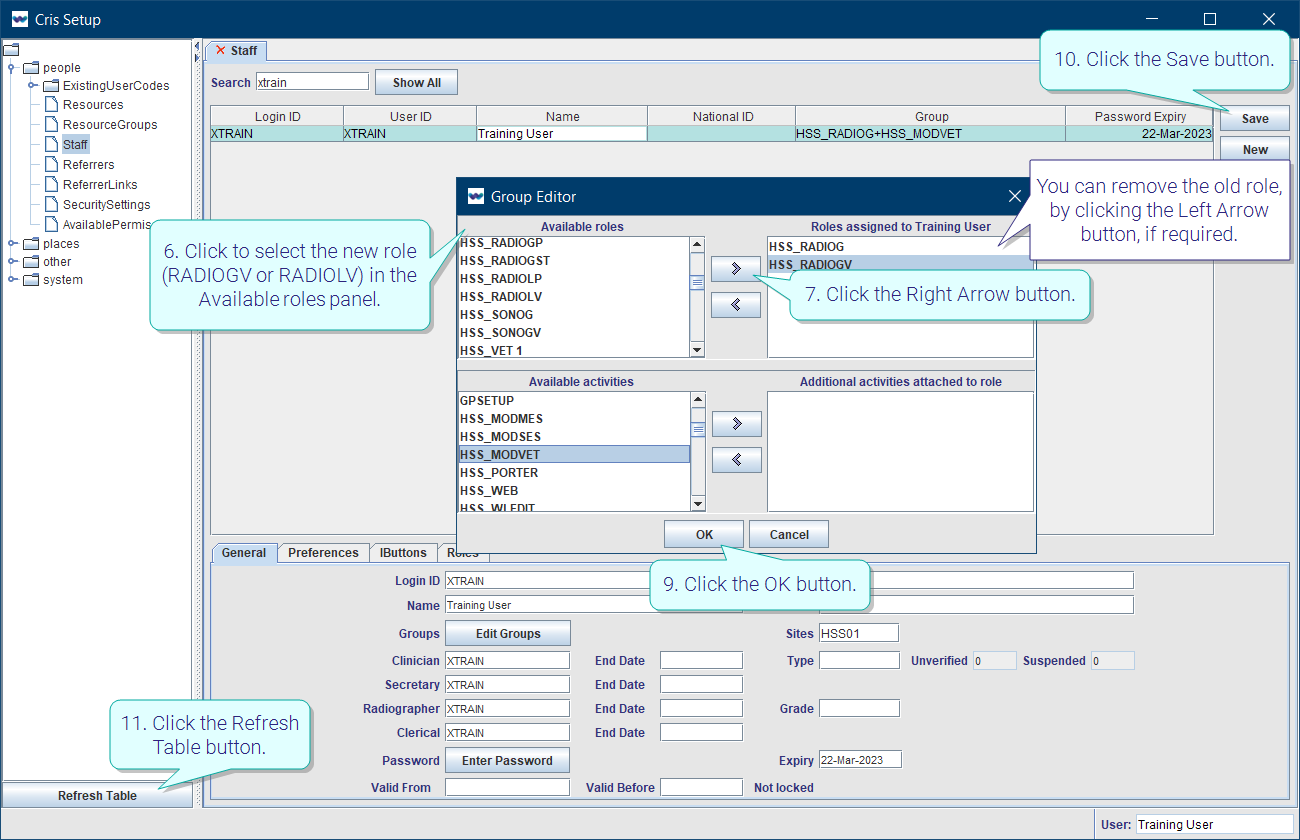
Assigning the role RADIOGV or RADIOLV to a user allows them to perform the tasks specified in MODVET.
- Click Tables Setup.
- Select People > Staff.
- Filter the list by entering a keyword in the Filter field.
- Click to select a user.
- Click the Edit Groups button.
- Click to select the new role (RADIOGV or RADIOLV) in the Available roles panel.
- Click the Right Arrow button to move it to the Roles assign to ... panel.
- Click the OK button.
- Click the Save button.
- Click the Refresh Table button.
The Group Editor window opens.
You can remove the old role, by clicking the Left Arrow button, if required.
Note:
-
You can have more than one role assigned to your Login ID.
-
You can only be logged-in with one role at a time.
-
You will be asked to choose which role each time you log in.
Security Settings for Modules:

|
|
Orders |

|
|
Vetting |

|
|
Post processing |

|
|
Reporting |

|
|
Resources |

|
|
Obstetrics |

|
|
Portering |