Assign for vetting
Assign requests for imaging to a clinician or group for vetting prior to booking.
- Open the Vetting List , the Orders List, or the patient record.
- Click to select the order.
- With the order highlighted, click the Change button.
- Enter the clinician's code in the Practitioner field (or press F4 to choose from the Clinicians table).
- If required, change the (booking) urgency in the Urgency field.
- Click the Request button.
- Select the Status Received button.
- Click the Save button.


The Event Details screen opens.
The Request Date field is auto-populated by Order Comms.

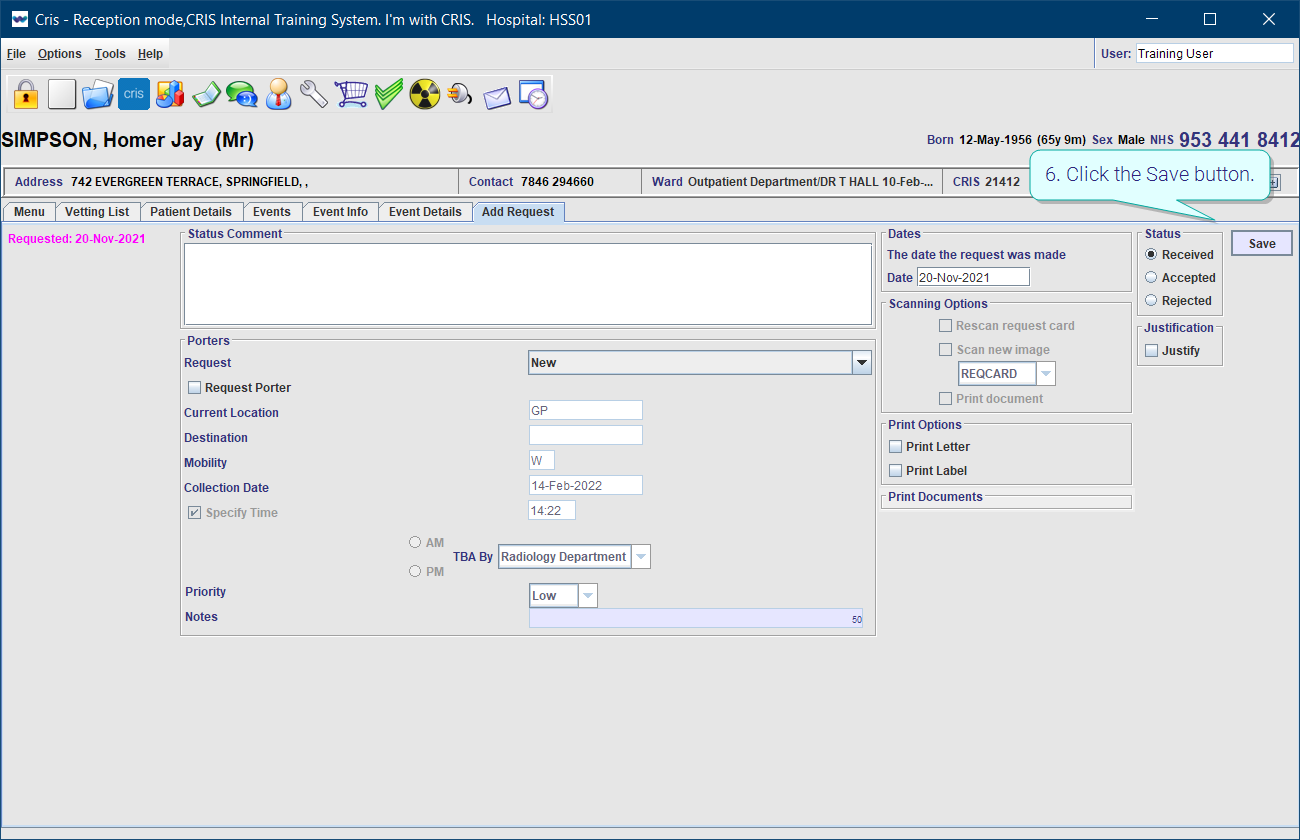
The Add Request screen opens.
The Date field is auto-populated by Order Comms.

Tip:
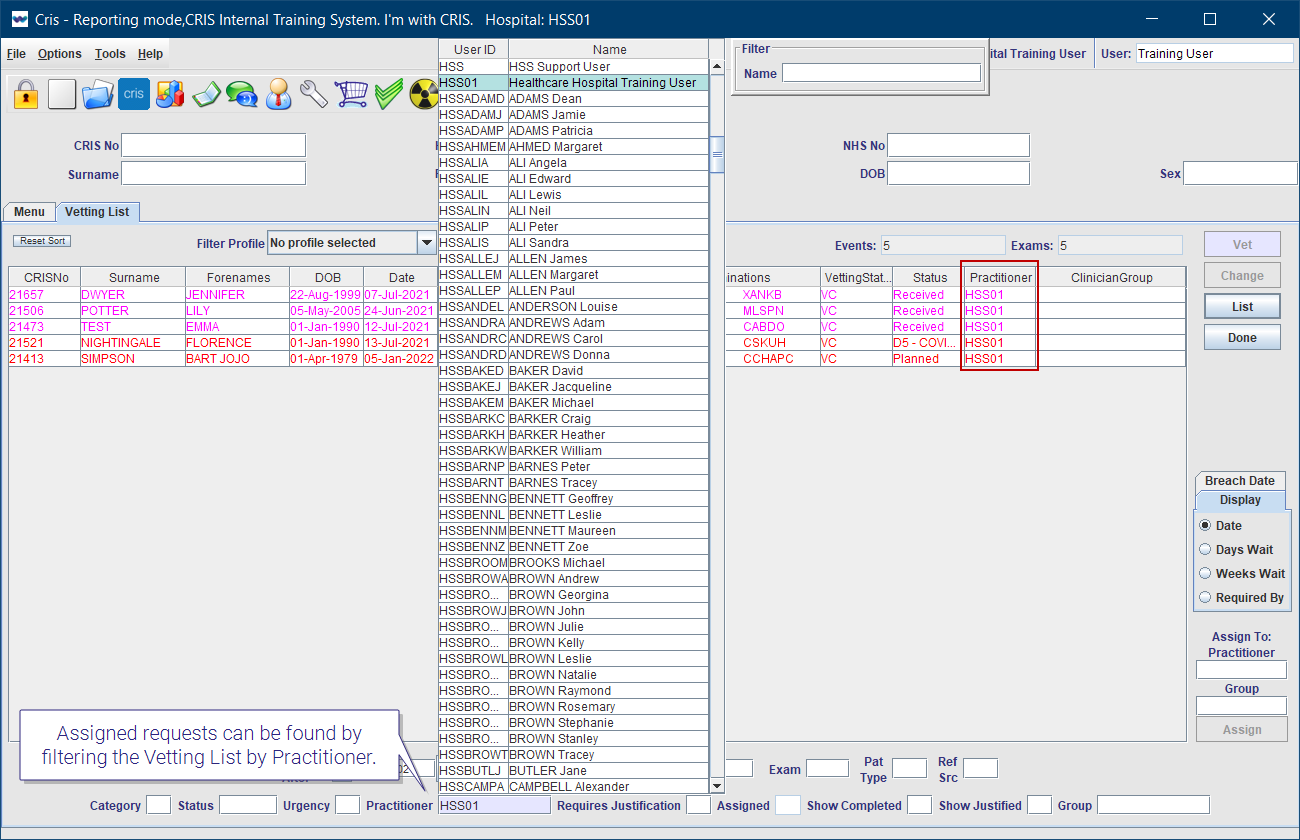
Assigned requests can be found by filtering the Vetting List by Practitioner or Group.
Tip:
Double-click in a field, or press F4 with the cursor in that field to display available values. Select one value, or leave blank to see all.
- Open the Vetting List , the Outstanding Orders List, or the patient record.
- Click to select the order.
- With the order highlighted, click the Change button.
- Enter the group code in the Group field (or press F4 to choose from the Groups table).
- If required, change the (booking) urgency in the Urgency field.
- Click the Request button.
- Select the Status Received button.
- Click the Save button.
The Event Details screen opens.
The Request Date field is auto-populated by Order Comms.

The Add Request screen opens.
The Date field is auto-populated by Order Comms.

Tip:
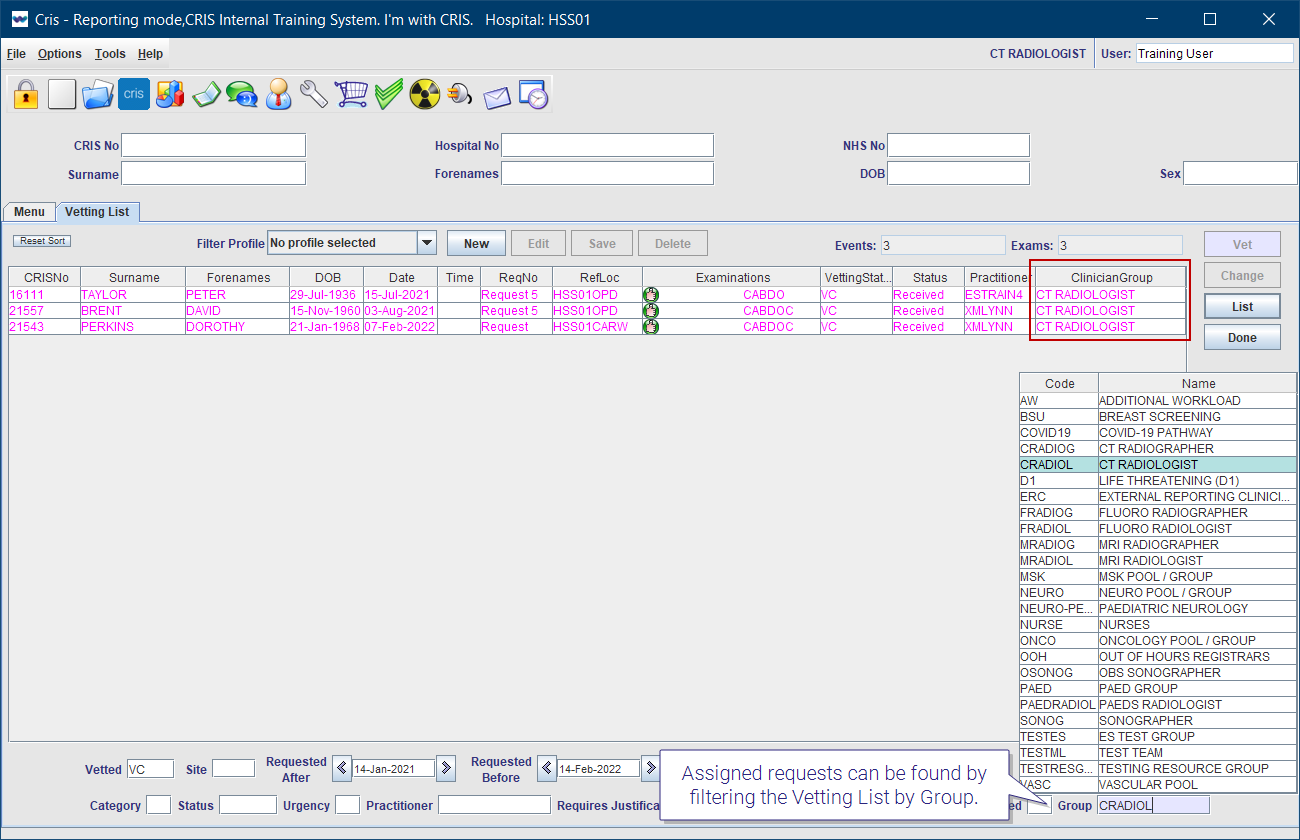
Assigned requests can be found by filtering the Vetting List by Group.
Tip:
Double-click in a field, or press F4 with the cursor in that field to display available values. Select one value, or leave blank to see all.
- Open the Vetting List.
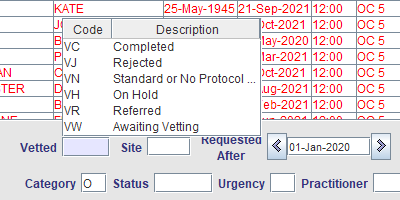
- Enter O in the Category field.
- Enter N in the Show Completed field.
- Click the List button.
- Hold Ctrl and click to select orders.
- Enter the clinician's code in the Assign To Practitioner field (or press F4 to choose from the Clinicians table).
- Click the Assign button.


The orders will be saved as requests.
Warning:
If you attempt to assign more than one order for the same patient, each one will be saved as a separate request (event). A warning will pop up asking you to confirm or cancel.

If a patient has multiple orders which should be performed / reported together, combine those orders into one request. You can then assign a Practitioner or Group via the Event Details screen.
Tip:
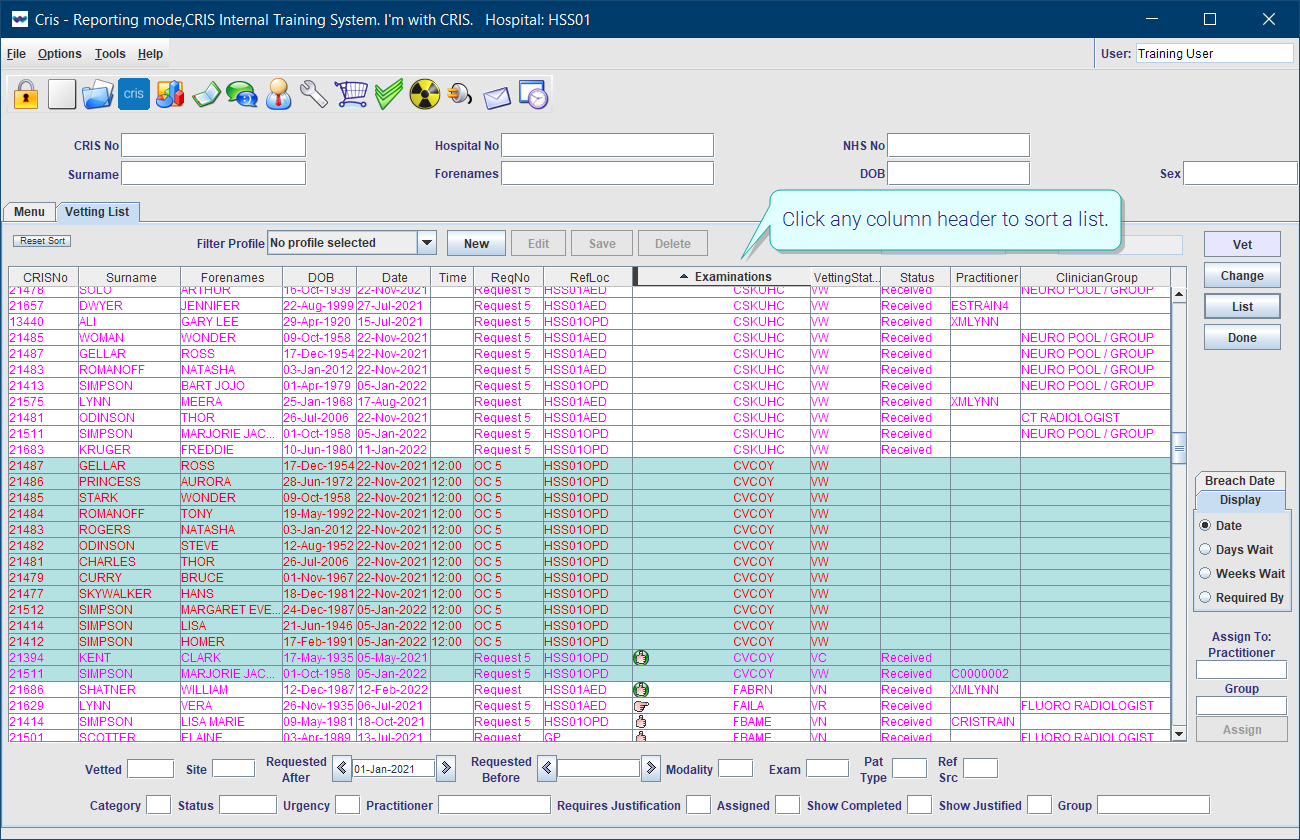
Click any column header to sort a list. For example, sort by Cris number to find all events for the same patient OR sort by Examination when applying the same action (such as assigning for vetting or reporting) to multiple events.
Tip:
Assigned requests can be found by filtering the Vetting List by Practitioner or Group.
Tip:
Double-click in a field, or press F4 with the cursor in that field to display available values. Select one value, or leave blank to see all.
- Open the Vetting List.
- Enter O in the Category field.
- Enter N in the Show Completed field.
- Click the List button.
- Hold Ctrl and click to select orders.
- Enter the clinician's code in the Assign To Group field (or press F4 to choose from the Resource Groups table).
- Click the Assign button.


The orders will be saved as requests.
Warning:
If you attempt to assign more than one order for the same patient, each one will be saved as a separate request (event). A warning will pop up asking you to confirm or cancel.
If a patient has multiple orders which should be performed / reported together, combine those orders into one request. You can then assign a Practitioner or Group via the Event Details screen.
Tip:
Click any column header to sort a list. For example, sort by Cris number to find all events for the same patient OR sort by Examination when applying the same action (such as assigning for vetting or reporting) to multiple events.
Tip:
Assigned requests can be found by filtering the Vetting List by Practitioner or Group.
Tip:
Double-click in a field, or press F4 with the cursor in that field to display available values. Select one value, or leave blank to see all.
- Open the Vetting List or the patient record.
- Click to select the request.
- With the request highlighted, click the Change button.
- Enter the clinician's code in the Practitioner field (or press F4 to choose from the Clinicians table).
- Click the Request button.
- Click the Save button.


The Event Details screen opens.


Tip:
Double-click in a field, or press F4 with the cursor in that field to display available values. Select one value, or leave blank to see all.
Tip:
Assigned requests can be found by filtering the Vetting List by Practitioner or Group.
- Open the Vetting List or the patient record.
- Click to select the request.
- With the request highlighted, click the Change button.
- Enter the group code in the Group field (or press F4 to choose from the Groups table).
- Click the Request button.
- Click the Save button.
The Event Details screen opens.


Tip:
Double-click in a field, or press F4 with the cursor in that field to display available values. Select one value, or leave blank to see all.
Tip:
Assigned requests can be found by filtering the Vetting List by Group.
- Open the Vetting List.
- Enter R in the Category field.
- Enter N in the Show Completed field.
- Click the List button.
- Hold Ctrl and click to select requests.
- Enter the clinician's code in the Assign To Practitioner field (or press F4 to choose from the Clinicians table).
- Click the Assign button.


Tip:
Click any column header to sort a list. For example, sort by Cris number to find all events for the same patient OR sort by Examination when applying the same action (such as assigning for vetting or reporting) to multiple events.
Tip:
Assigned requests can be found by filtering the Vetting List by Practitioner or Group.
Tip:
Double-click in a field, or press F4 with the cursor in that field to display available values. Select one value, or leave blank to see all.
- Open the Vetting List.
- Enter R in the Category field.
- Enter N in the Show Completed field.
- Click the List button.
- Hold Ctrl and click to select requests.
- Enter the group code in the Assign To Group field (or press F4 to choose from the Resource Groups table).
- Click the Assign button.


Tip:
Click any column header to sort a list. For example, sort by Cris number to find all events for the same patient OR sort by Examination when applying the same action (such as assigning for vetting or reporting) to multiple events.
Tip:
Assigned requests can be found by filtering the Vetting List by Practitioner or Group.
Tip:
Double-click in a field, or press F4 with the cursor in that field to display available values. Select one value, or leave blank to see all.
- Open the Vetting List.
- Enter a clinician's code in the Practitioner field.
- Enter N in the Show Completed field.
- Click the List button.

- Open the Vetting List.
- Enter N in the Show Completed field.
- Enter a group code in the Group field.
- Click the List button.

- Open the Vetting List or the patient record.
- Click to select the request.
- With the request highlighted, click the Change button.
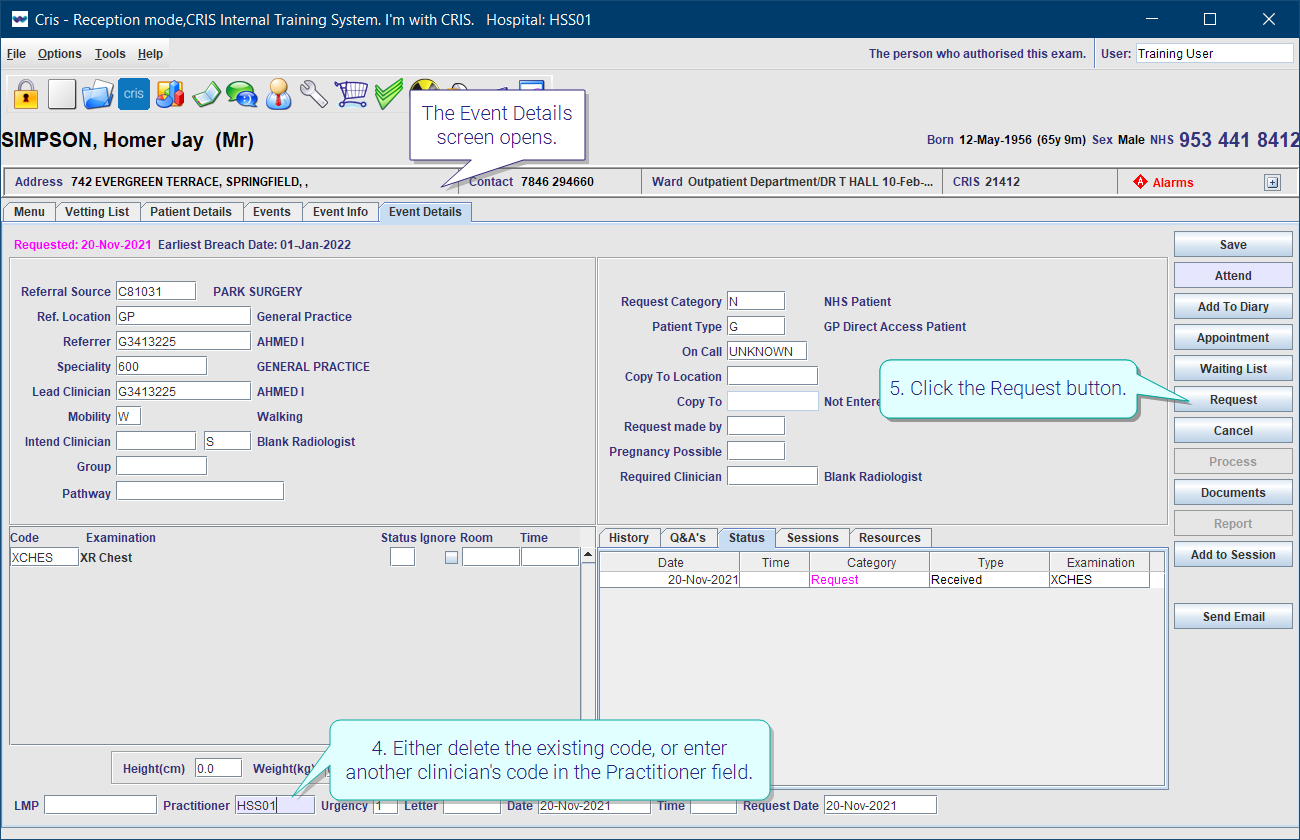
- Either delete the existing code, or enter another clinician's code in the Practitioner field (or press F4 to choose from the Clinicians table).
- Click the Request button.
- Click the Save button.
The Event Details screen opens.

This will remove the previous assignation.
Tip:
Double-click in a field, or press F4 with the cursor in that field to display available values. Select one value, or leave blank to see all.
Tip:
Assigned requests can be found by filtering the Vetting List by Group.
- Open the Vetting List or the patient record.
- Click to select the request.
- With the request highlighted, click the Change button.
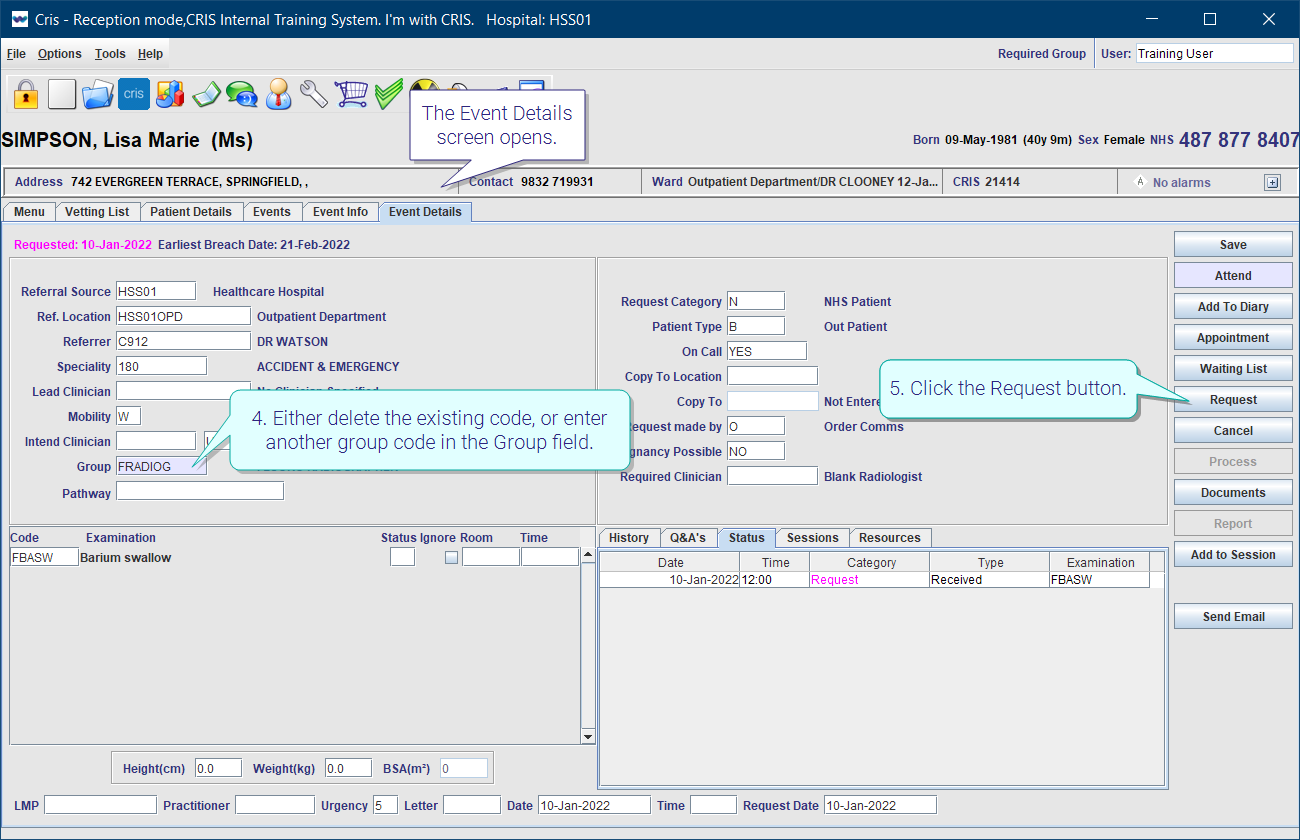
- Either delete the existing code, or enter another group code in the Group field (or press F4 to choose from the Resource Groups table).
- Click the Request button.
- Click the Save button.
The Event Details screen opens.
This will remove the previous assignation.
Tip:
Double-click in a field, or press F4 with the cursor in that field to display available values. Select one value, or leave blank to see all.
Tip:
Assigned requests can be found by filtering the Vetting List by Group.
Note:
You can also assign for vetting using the new Cris vetting app.