Staff (Cris users)
The Staff table contains all Cris users.
It populates staff lists (Existing User Codes) and makes a user available for selection throughout Cris.
Create user accounts, apply permissions, and assign a user to a resource group.
Entering text in the filter field will search the Login ID, User ID, and Name columns.
To return to the full staff list, click the Show All button.
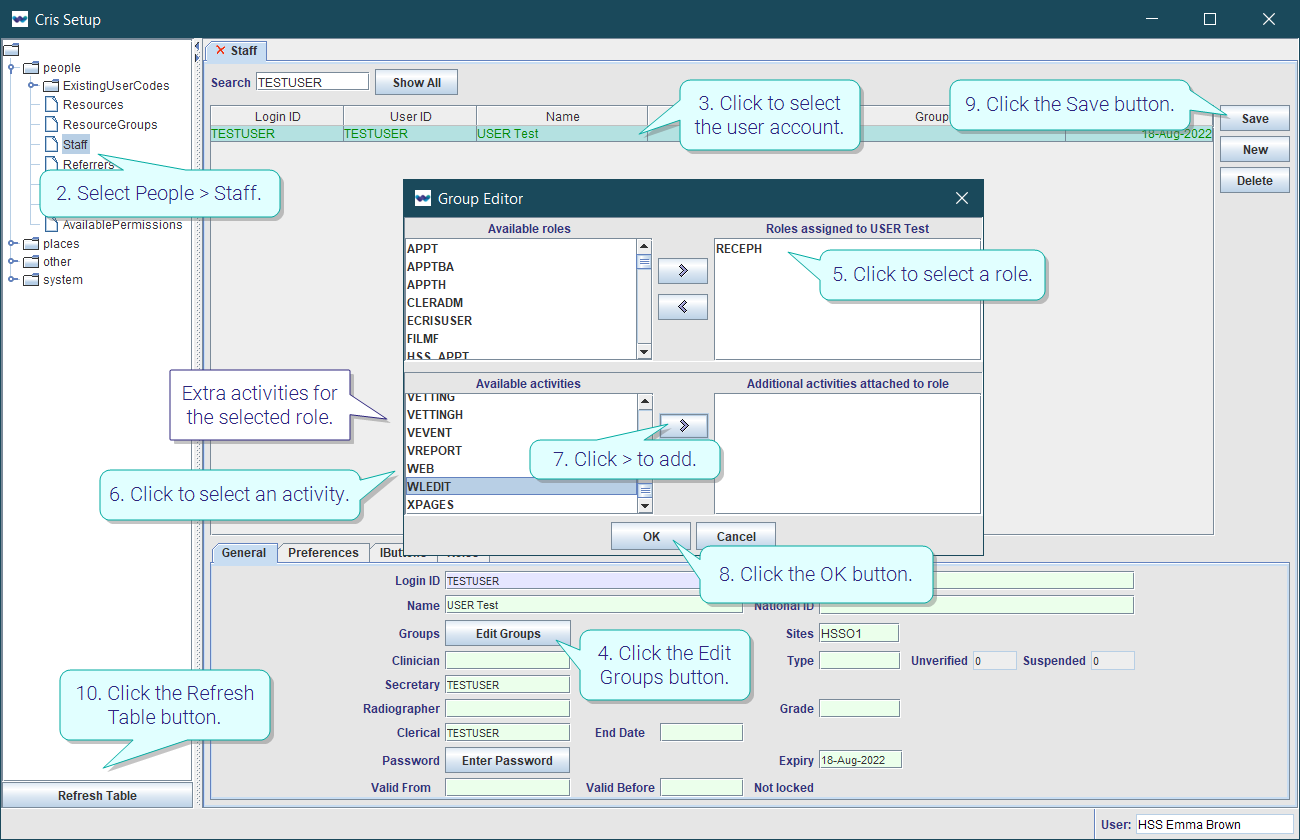
Enter user details
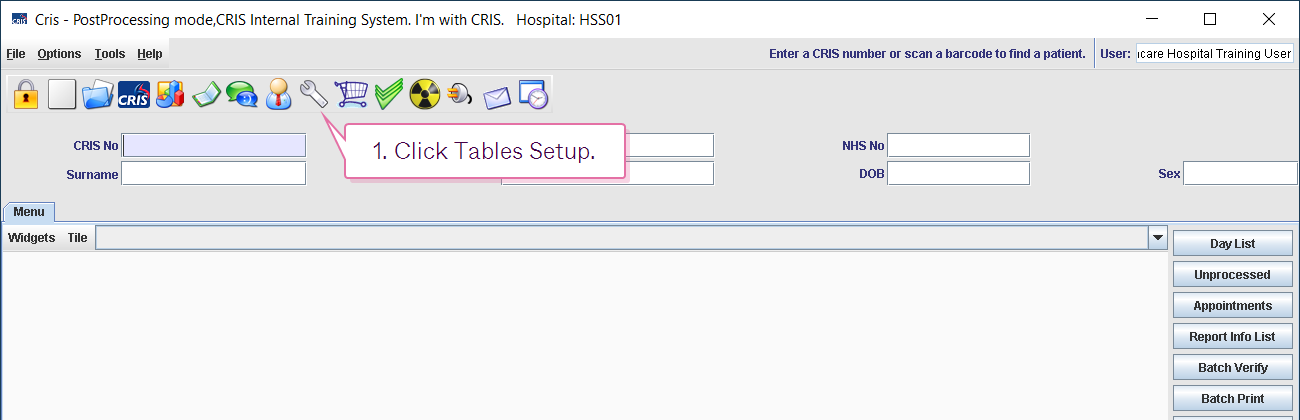
- Click Tables Setup.

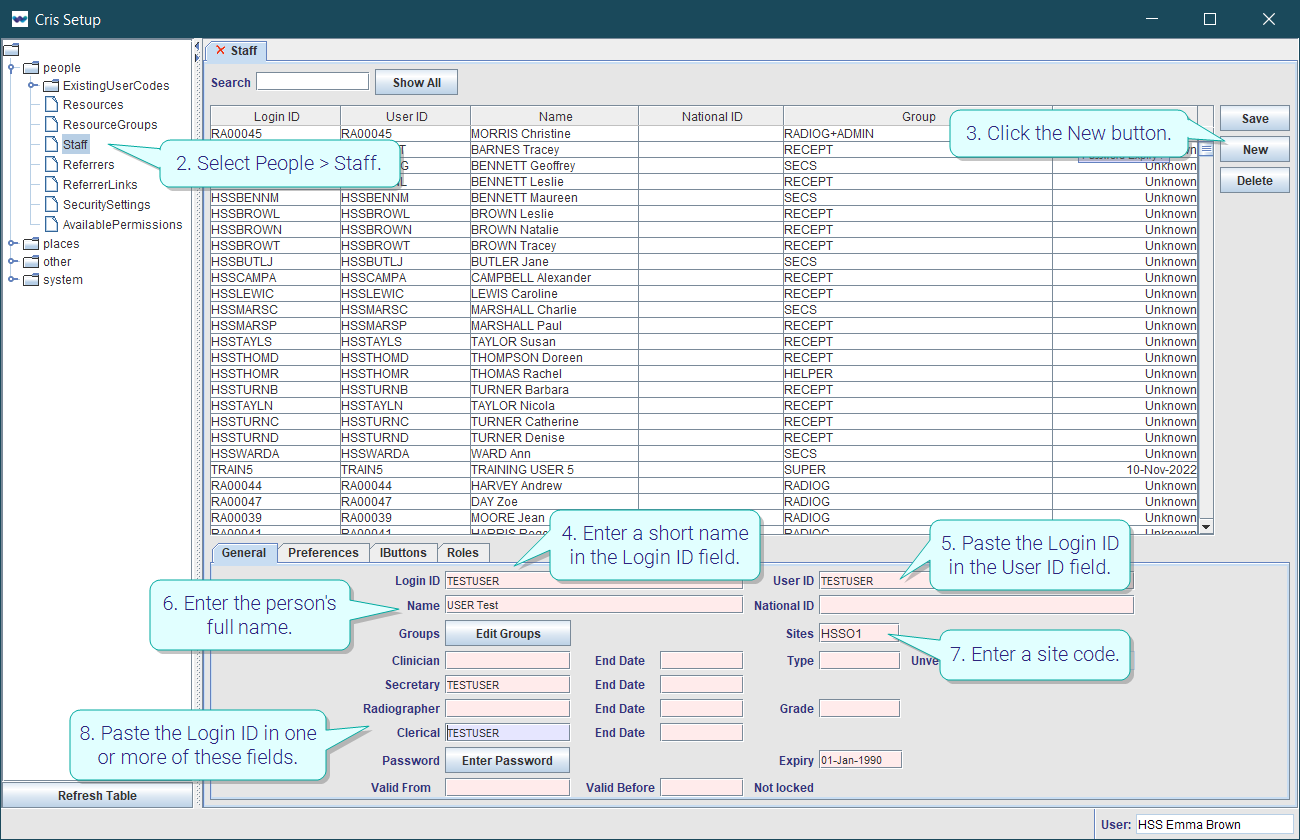
- Select People > Staff.
- Click the New button.
- Enter a short name in the Login ID field and copy the Login ID.
- Paste the Login ID in the User ID field.
- Enter the person's full name (in the standard format, for example SURNAME, First name) in the Name field.
- Enter a site code (or comma-separated list) in the Sites field.
- Paste the Login ID in one or more of the following fields:
-
Clinician Allow reporting and injecting contrast.
-
Secretary Allow access to the Report screen to type reports.
-
Radiographer User can be recorded as the operator in Post Processing.
-
Clerical Allow use of the Sessions module.
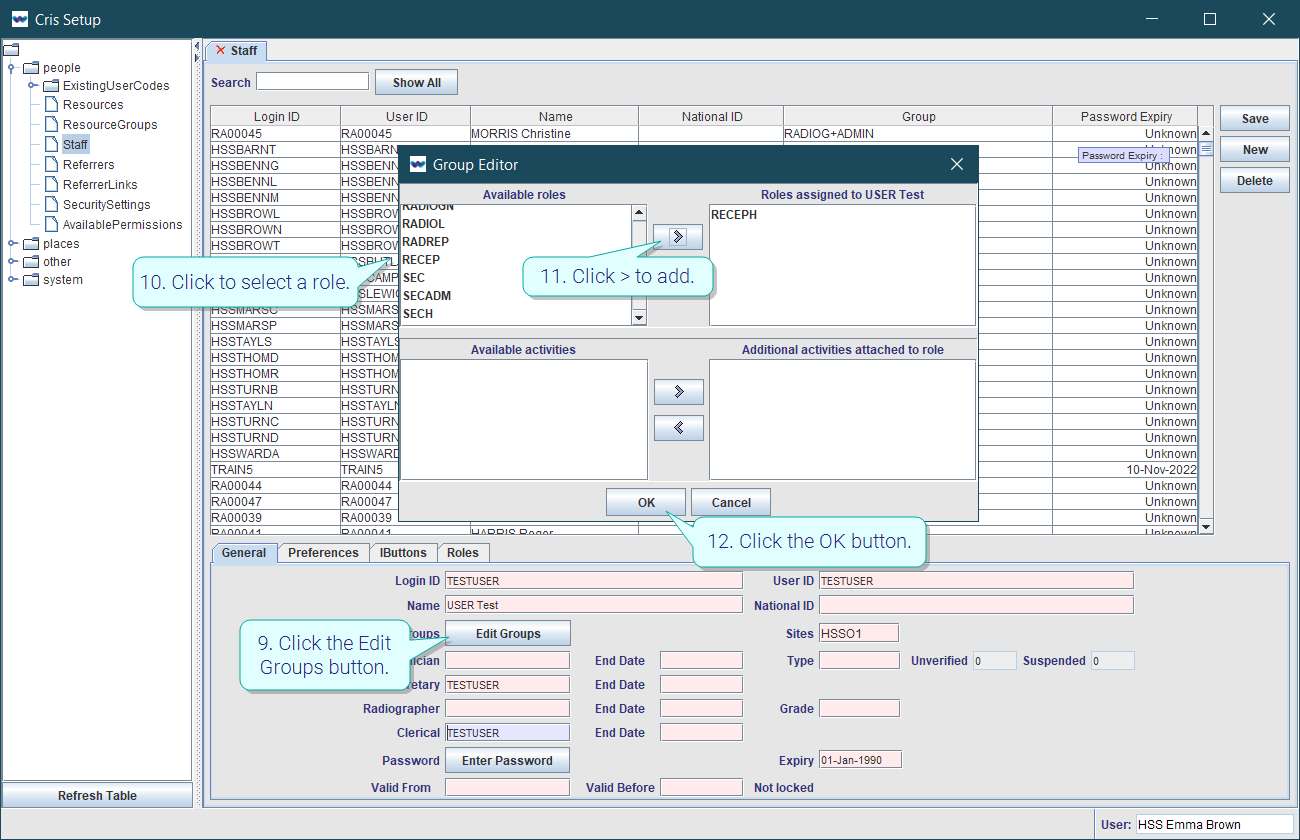
- Click the Edit Groups button.
- Click to select a role from the Available roles panel.
- Click > to add to the Roles assigned panel.
- Click the OK button.
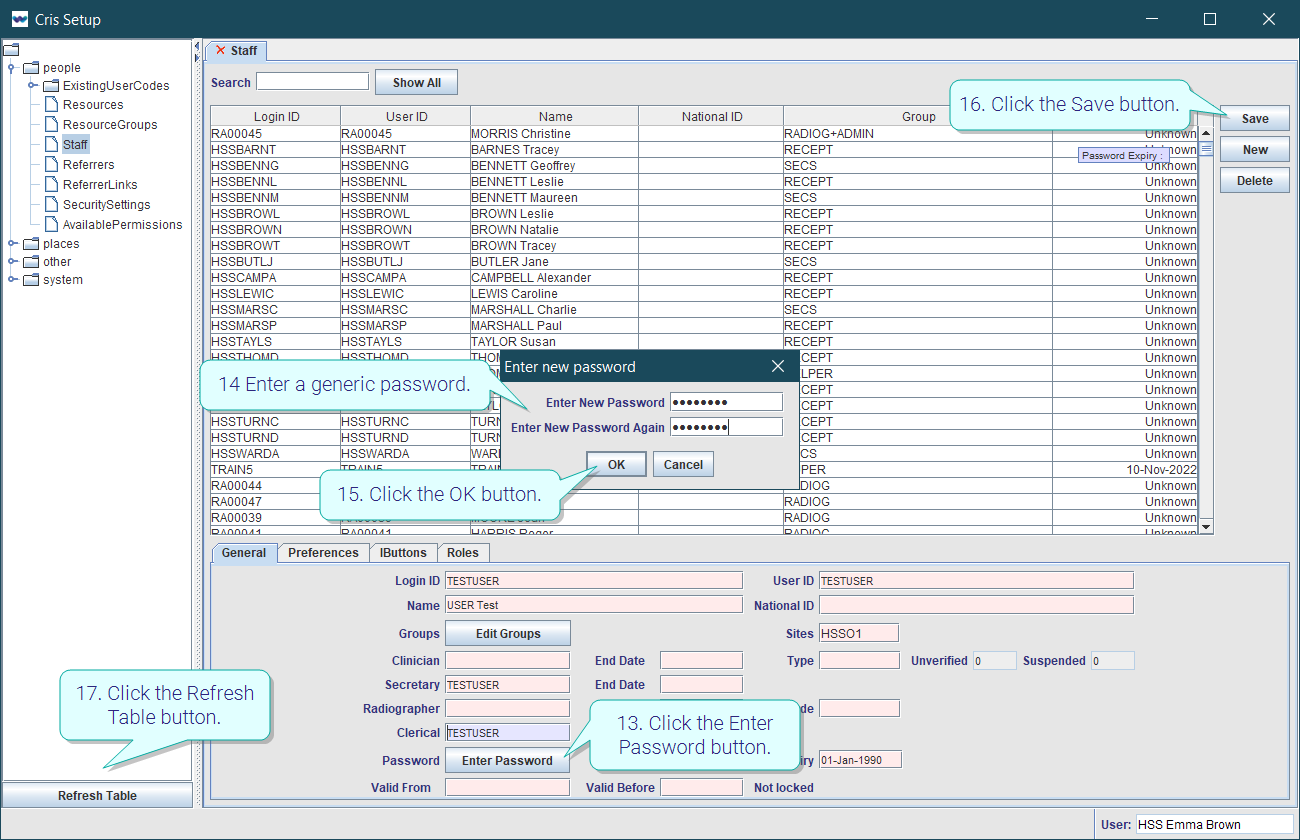
- Click the Enter Password button.
- Enter a generic password - the user will be prompted to change it when they first log in.
- Click the OK button.
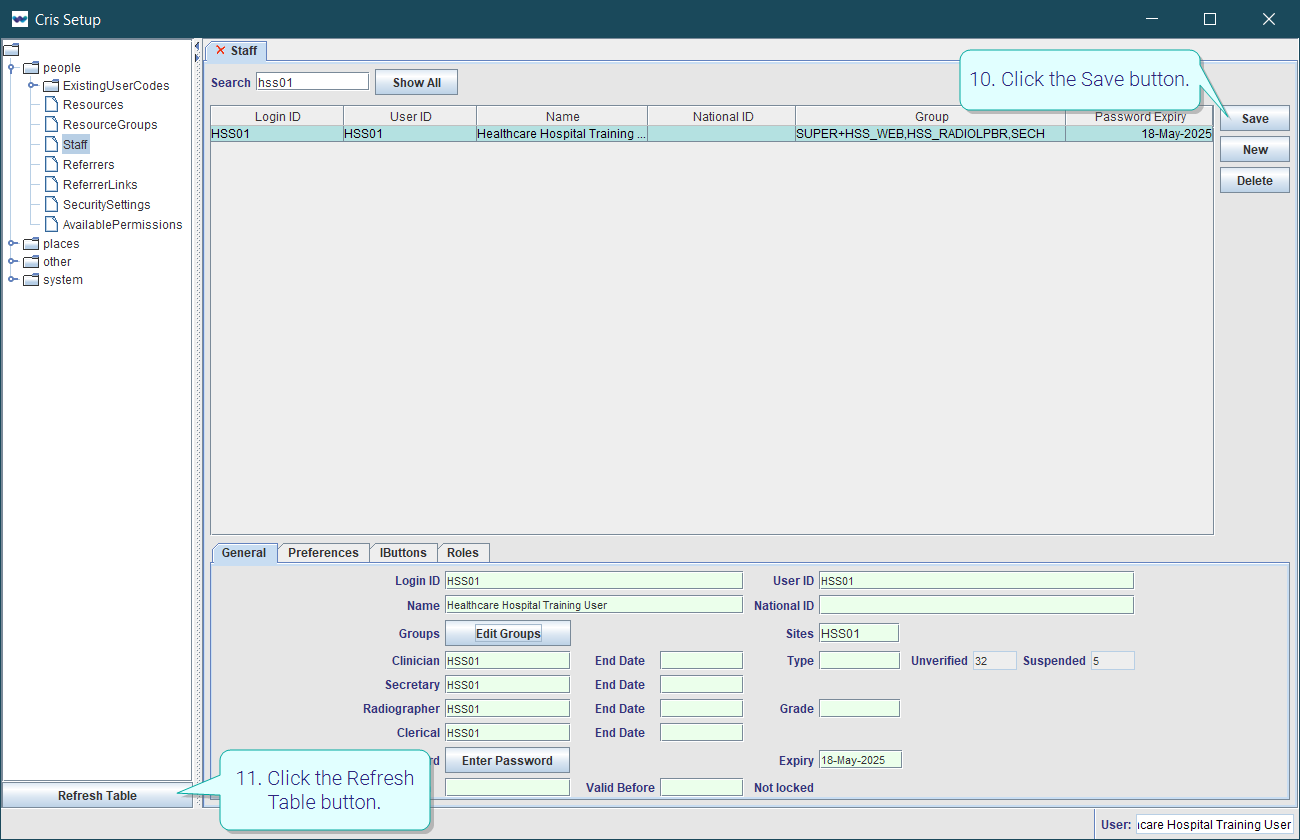
- Click the Save button.
- Click the Refresh Table button.
Enter a date in the corresponding End Date field to remove access to these features.
Add permissions to a user account
- Click Tables Setup.
- Select People > Staff.
- Click to select the user account.
- Click the Edit Groups button.
- Click to select a role from the Roles assigned panel.
- Click to select an activity.
- Click > to add.
- Click the OK button.
- Click the Save button.
- Click the Refresh Table button.
Extra activities for the selected role appear in the Available activities panel.
Note:
Login ID - What the user will enter when they log in to Cris. It should be in a standard format across your organisation.
Login ID - Can be changed but will always be associated with the original User ID.
User ID - A unique identifier which is typically the same as Login ID, but doesn't have to be. User ID cannot be changed once you save.
Note:
Entering text in the filter field will search the Login ID, User ID, and Name columns. To return to the full staff list, click the Show All button.
-
Login ID can be changed in future (for example, for single sign-on), User ID cannot.
-
National ID is for Smartcards, which is not implemented.
-
Edit Groups Give extra activities to a user (for example, MOD_VET).
-
Site codes are essential to make the user appear in the system (for example, [F4] lists, messages, contacts).
-
Copy and paste Login ID into each of these fields:
-
Clinician Allow reporting and injecting contrast.
-
Secretary Allow access to the Report screen to type reports.
-
Radiographer User can be selected in the Operator field in Post Processing and the Administered By and Checked By fields of the Stock pane.
-
Clerical Allow use of the Sessions module.
Enter a date in the corresponding End Date field to remove access to these features.
-
-
User ID allows someone to be a vetting Practitioner.
-
Type Used in Stats to categorise reporting by different types of people. Blank = Consultant Radiologist.
-
Grade Optional field to enter grade for reference purposes only.
-
Password Use generic password, for example, crisuser which users can change later.
-
Expiry Auto-fills to yesterday forcing a password change on first log in.
-
Valid From Enter the user’s start date.
-
Valid Before Enter the day after the user is due to leave.
| Level | Setting | Value | Description | |
|---|---|---|---|---|
 | XR, XRTR, XRS | GENERAL.PasswordAlphanumericCheck | Yes, No, Default (No). | Must passwords contain both letters and numbers? |
| GENERAL.PasswordDictionaryCheck | Yes, No, Default (No). | May passwords contain dictionary words? | ||
| GENERAL.PasswordExpiryDays | Enter a number. No default value. | Number of days before you must change your password. | ||
| GENERAL.PasswordReuseDays | Enter a number. Default = 0 | Number of days before a password can be reused. | ||
| GENERAL.LoginAttempts | Enter a number. No default value. | Number of log in attempts before a user is prevented from trying again. |
Tip:
Use clinician's registration numbers as their Login / User IDs for easy identification of users. For example C123456, RA00001.
Tip:
Add the activity [SITE CODE]_WEB to allow a user access to new Cris web applications (such as Vetting and Reporting).
Tip:
Press the Esc key to exit a field without making a selection from an options list.
Tip:
We recommend clicking Tools > Refresh Tables after editing system settings / tables to ensure that all changes are applied.
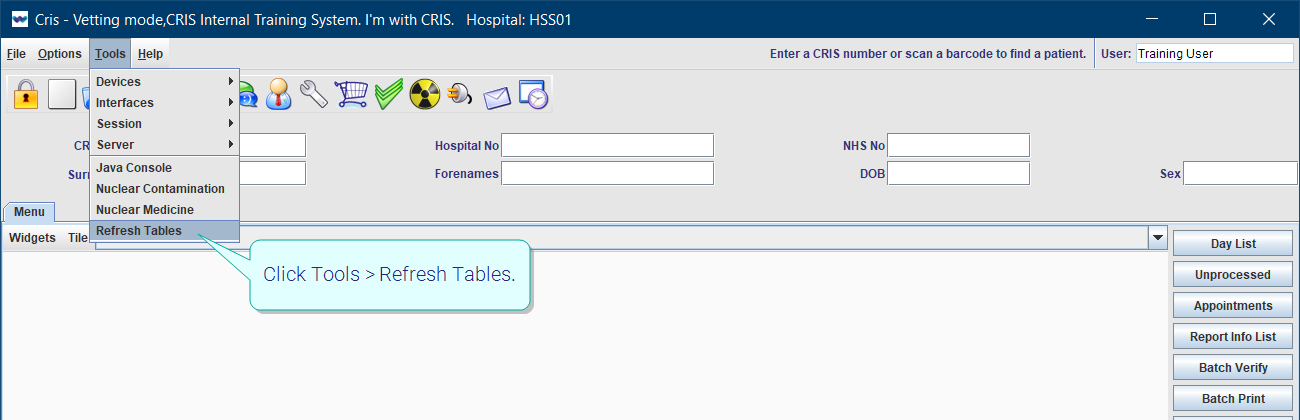 .
.
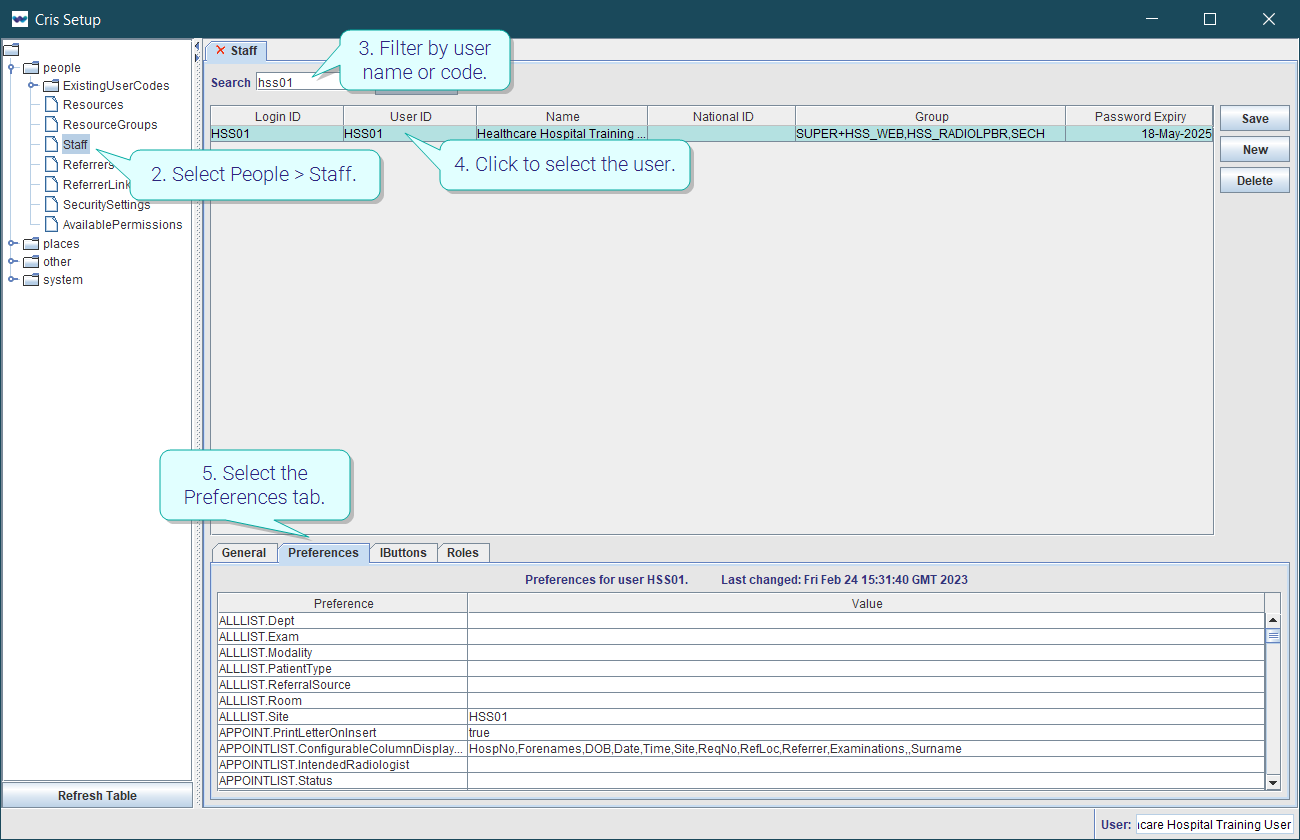
- Click Tables Setup.
- Select People > Staff.
- Filter by user name or code.
- Click to select the user.
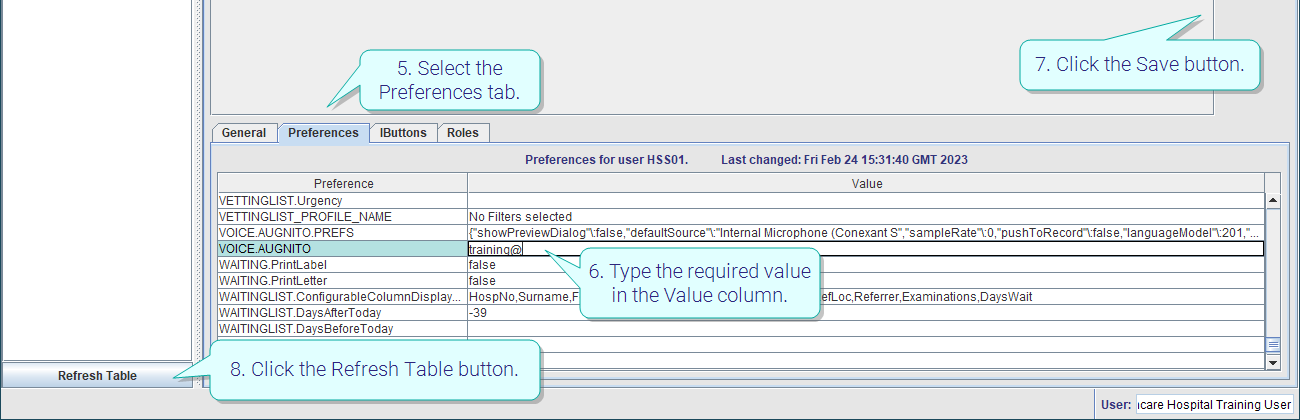
- Select the Preferences tab.
- Type the required value in the Value column. You can overwrite existing values.
- Click the Save button.
- Click the Refresh Table button.
Tip:
We recommend clicking Tools > Refresh Tables after editing system settings / tables to ensure that all changes are applied.
.
- Click Tables Setup.
- Select People > Staff.
- Filter by user name or code.
- Click to select the user.
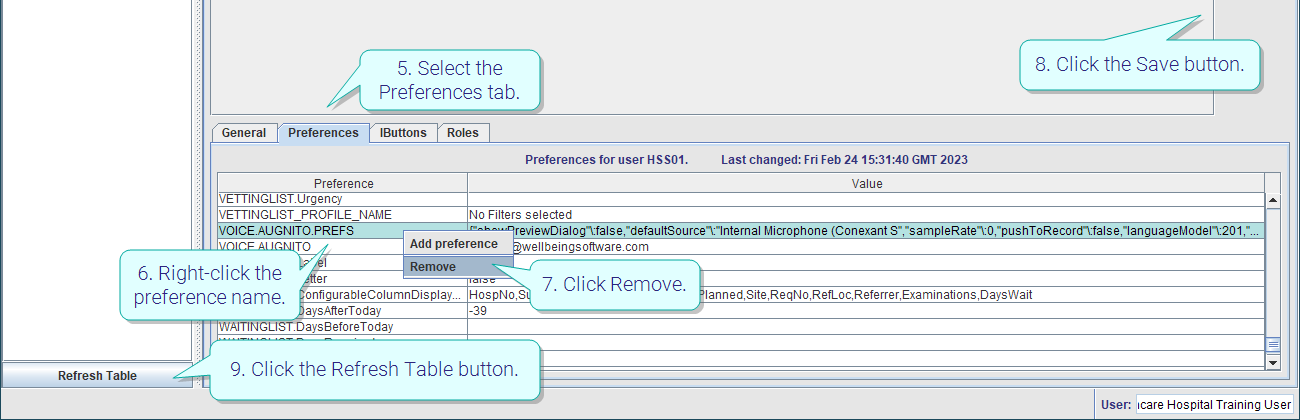
- Select the Preferences tab.
- Right-click the preference name.
- Click Remove.
- Click the Save button.
- Click the Refresh Table button.
Tip:
We recommend clicking Tools > Refresh Tables after editing system settings / tables to ensure that all changes are applied.
.
Use this method to assign a role (as defined in People > Security Settings).
- Click Tables Setup.
- Select People > Staff.
- Select the user's name in the list.
- Click the Edit Groups button.
- Click to highlight a role at the top left.
- Click the arrow
 to attach the activity to this person's role.
 - Click the OK button.
- Click the Save button.
- Click the Refresh Table button.
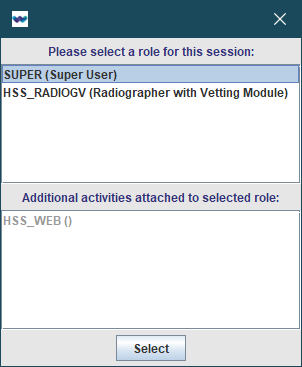
Note:
A user can have more than one role assigned via the Staff table, however, each time they log in they will be prompted to select a role.
Tip:
We recommend clicking Tools > Refresh Tables after editing system settings / tables to ensure that all changes are applied.
.
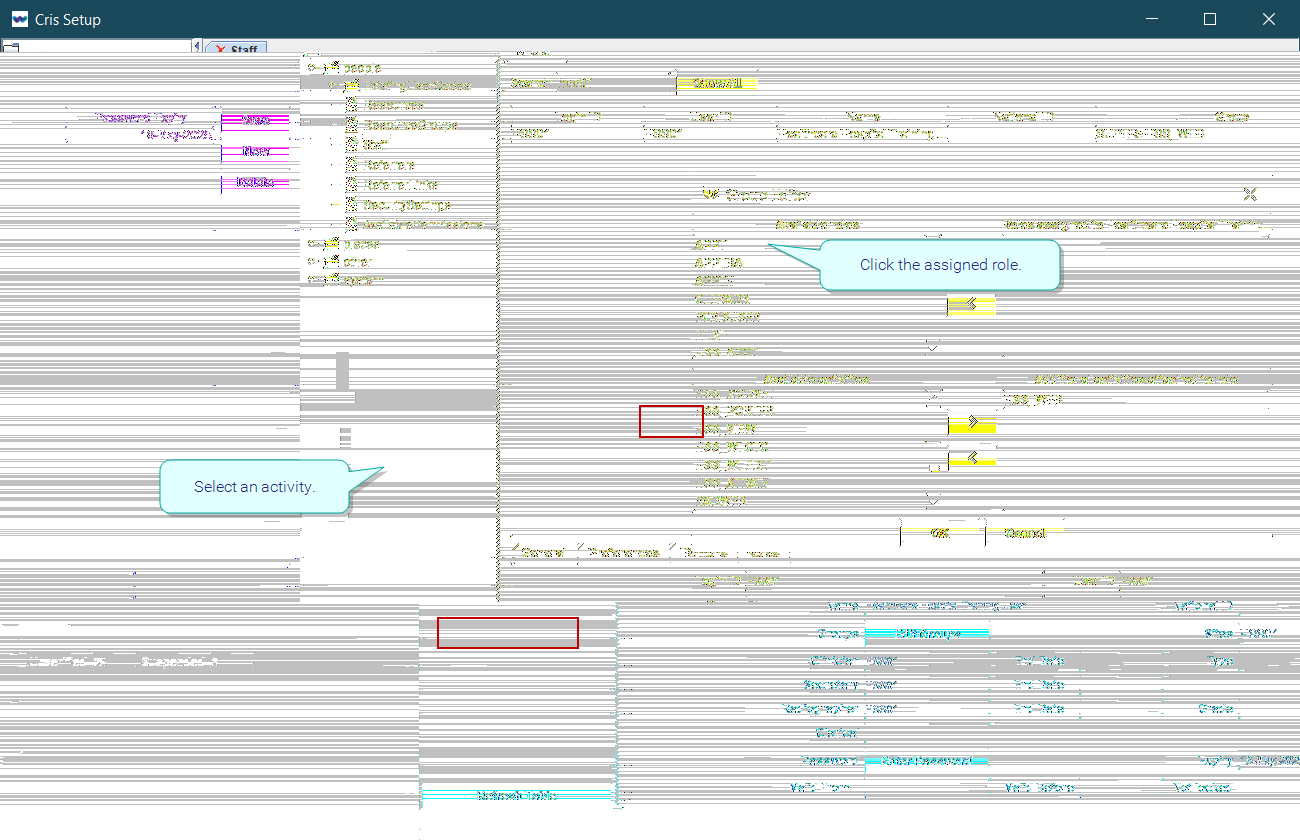
Use this method to assign extra activities, outside of the already-assigned role.
- Click Tables Setup.
- Select People > Staff.
-
Filter by user name or code.
-
Click to select the user.
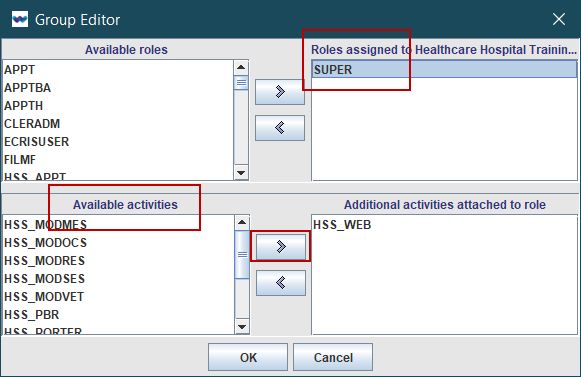
- Click the Edit Groups button.
- Click to highlight the role at the top right.
- Select an activity.
- Click the arrow to attach the activity to this person's role.
- Click the OK button.
- Click the Save button.
- Click the Refresh Table button.
Available activities are shown at the bottom left.
Tip:
Add the activity [SITE CODE]_WEB to allow a user access to new Cris web applications (such as Vetting and Reporting).
The Roles tab is used to give extra functionality to Nuclear Medicine and Portering staff. They must also have a role assigned via Groups.
-
Click Tables Setup.
-
Select People > Staff.
-
Filter by user name or code.
-
Click to select the user.
-
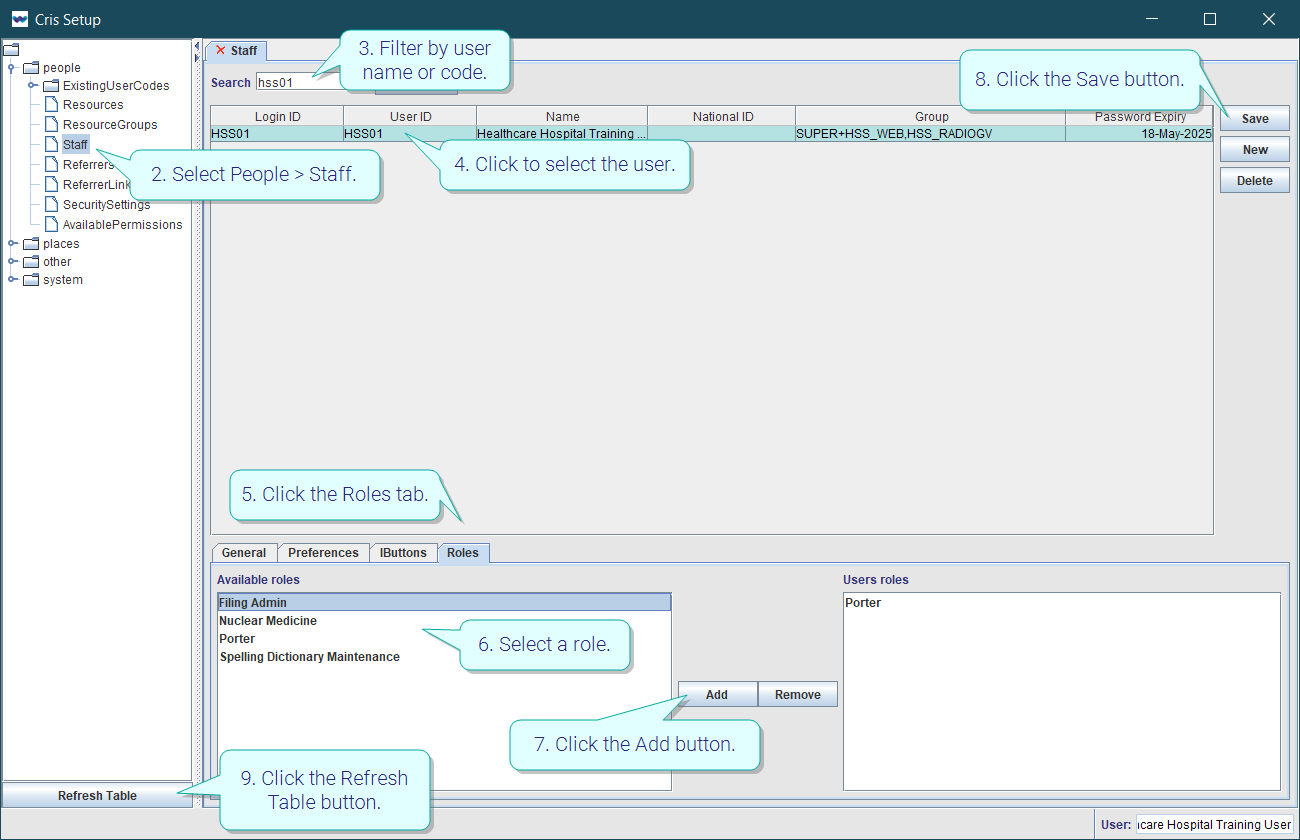
Click the Roles tab.
Available roles are shown at the bottom left.
Nuclear Medicine
Give a user access to the Nuclear Medicine module and include the user in the Nuclear Medicine Injectors table.
6. Select a role.
7. Click the Add button.
8. Click the Save button.
9. Click the Refresh Table button.
Portering
Include the user in the Porters selection list to enable Portering managers to allocate porters to patients.
Note:
Filing Admin and Spelling Dictionary Maintenance roles are legacy functionality and no longer active.
Configuration of single sign-on entails:
- Activating via an XR setting.
- Changing user Login IDs to the format DOMAIN/FirstName.Surname.
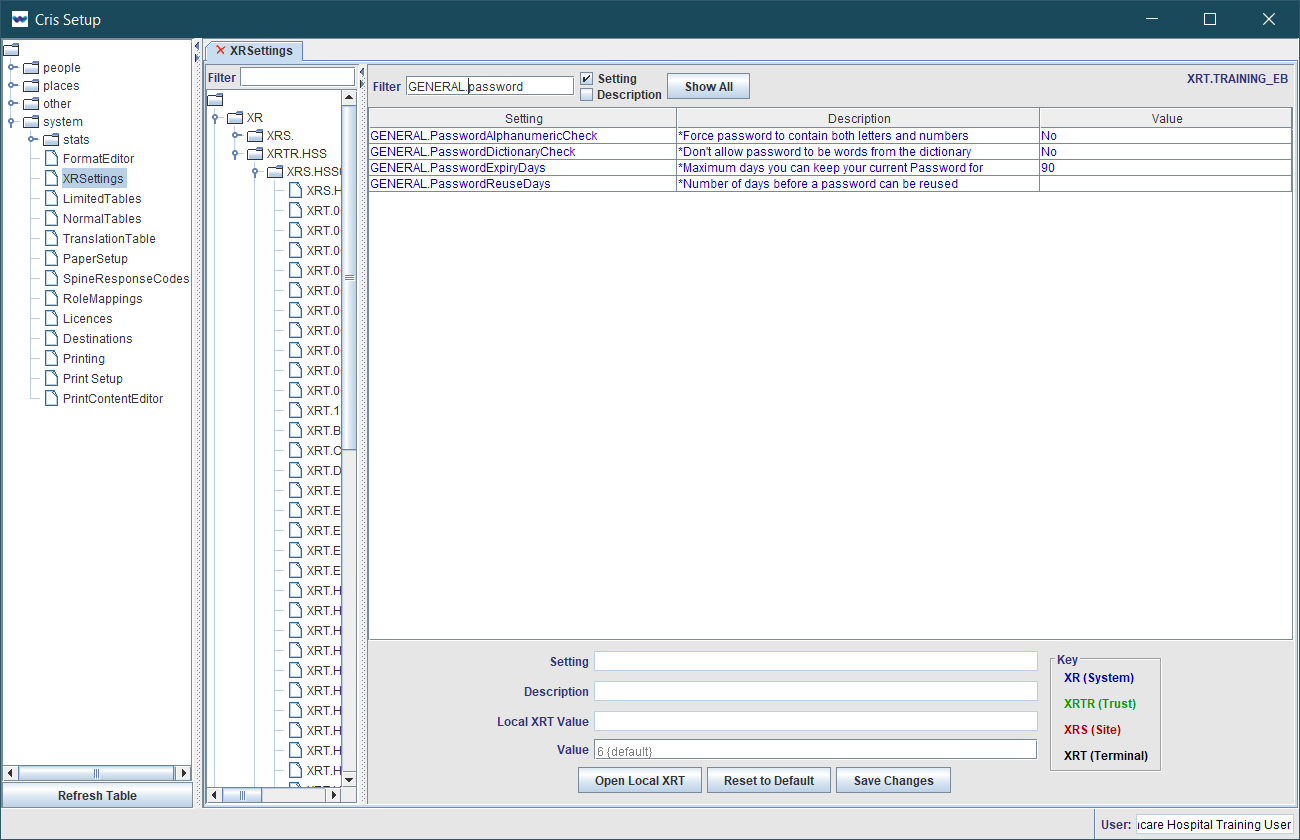
Edit XR settings for single sign-on
- Click Tables Setup.
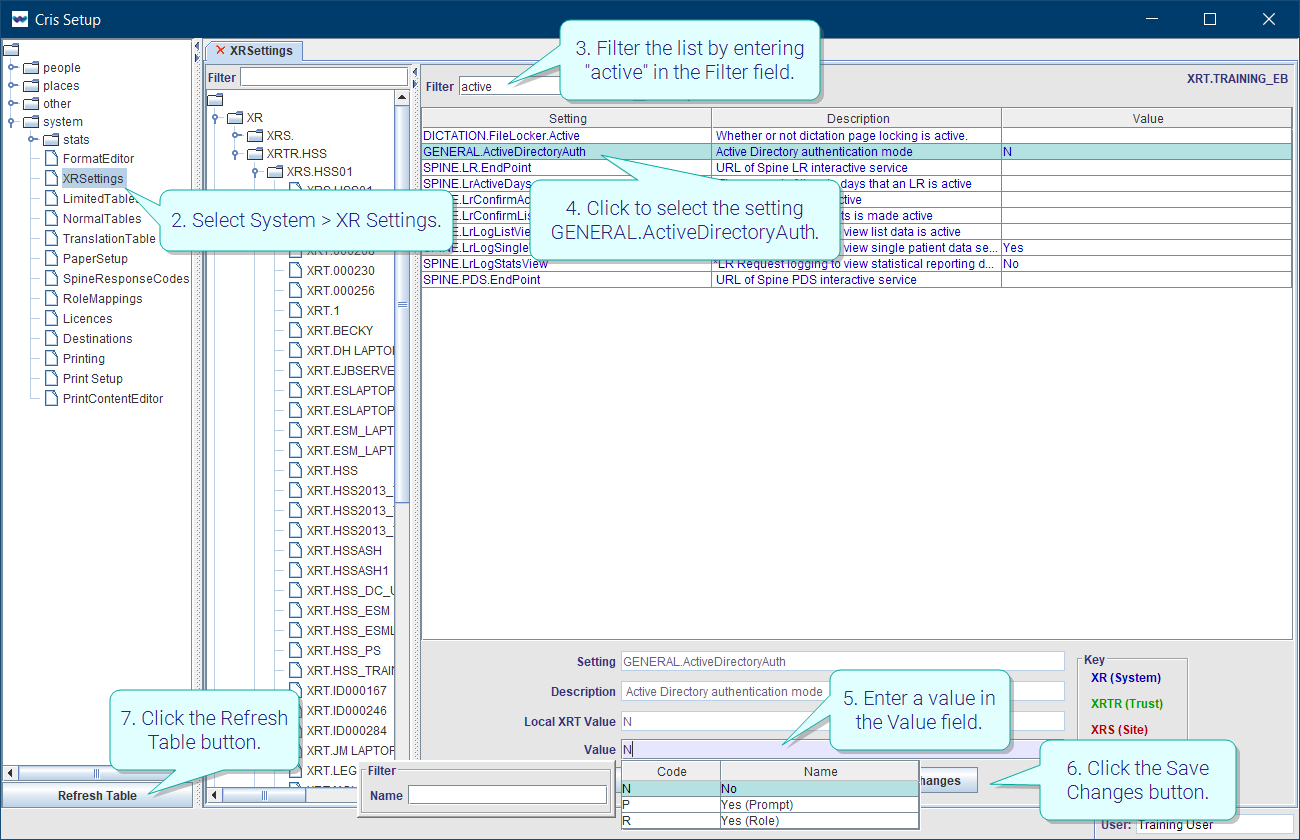
- Select System > XR Settings.
- Filter the list by entering "active" in the Filter field.
- Click to select the setting GENERAL.ActiveDirectoryAuth.
- Enter a value in the Value field.
- Click the Save Changes button.
- Click the Refresh Table button.
OR
Double-click the Value field then double-click to select a value from the options.
Edit user settings for single sign-on
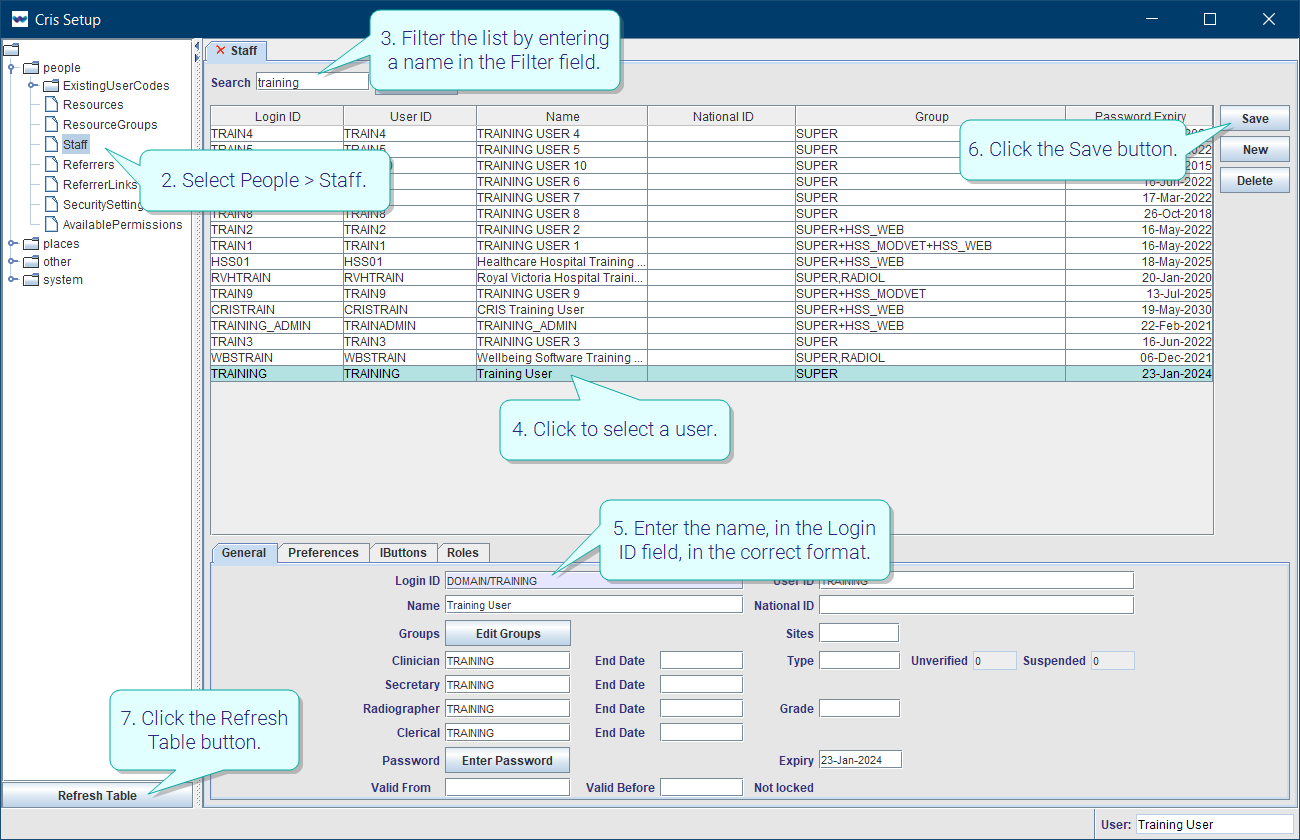
- Click Tables Setup.
- Select People > Staff.
- Filter the list by entering a name in the Filter field.
- Click to select a user.
- Enter the name, in the Login ID field, in the correct format: DOMAIN/FirstName.Surname.
- Click the Save button.
- Click the Refresh Table button.
Note:
XR setting for Active Directory single sign-on.
| Level | Setting | Value | Name | Description | |
|---|---|---|---|---|---|

|
XR |
GENERAL.ActiveDirectoryAuth |
N |
No |
Active Directory is not installed. |
| P | Yes (Prompt) |
Cris will log in automatically if the (Windows) user is in the People > Staff table. If this fails, the Login window will appear. |
|||
| R | Yes (Role) |
The Login window will appear. The user should enter their Cris username (Login ID), password, and domain. |
Tip:
Your Client Manager or our service desk can provide your domain name and assist you with activating single sign-on.
Tip:
We recommend clicking Tools > Refresh Tables after editing system settings / tables to ensure that all changes are applied.
.
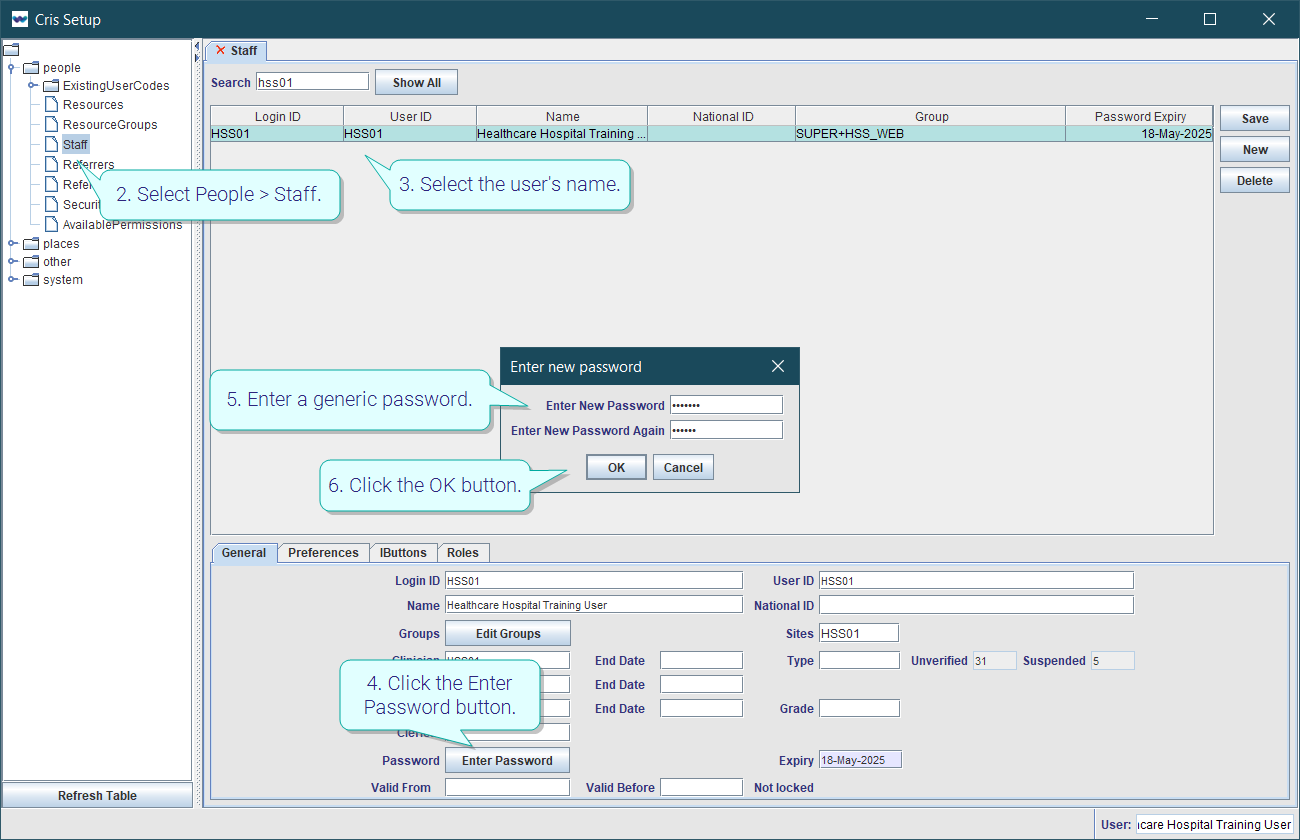
- Click Tables Setup.
- Select People > Staff.
- Select the user's name in the list.
- Click the Enter Password button.
- Enter a generic password.
- Click the OK button.
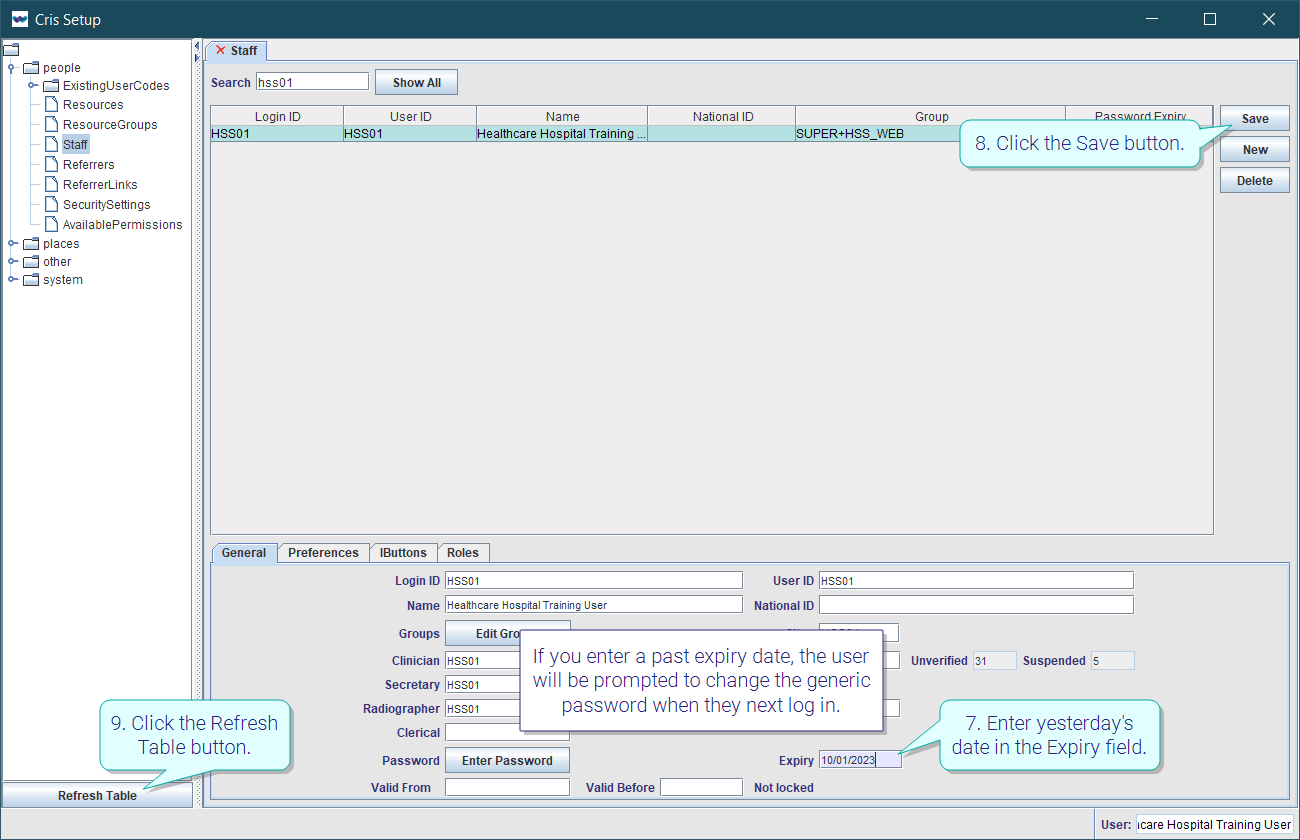
- Enter yesterday's date in the Expiry field.
- Click the Save button.
- Click the Refresh Table button.
If you enter a past expiry date, the user will be prompted to change the generic password when they next log in.
See also Passwords.
| Level | Setting | Value | Description | |
|---|---|---|---|---|
| XR, XRTR, XRS | GENERAL.PasswordAlphanumericCheck | Yes, No, Default (No). | Must passwords contain both letters and numbers? |
| GENERAL.PasswordDictionaryCheck | Yes, No, Default (No). | May passwords contain dictionary words? | ||
| GENERAL.PasswordExpiryDays | Enter a number. No default value. | Number of days before you must change your password. | ||
| GENERAL.PasswordReuseDays | Enter a number. Default = 0 | Number of days before a password can be reused. | ||
| GENERAL.LoginAttempts | Enter a number. No default value. | Number of log in attempts before a user is prevented from trying again. |
Tip:
We recommend clicking Tools > Refresh Tables after editing system settings / tables to ensure that all changes are applied.
.
Warning:
We do not recommend deleting staff records from the database. Cris will prevent you from deleting records with data attached to them. Use the Valid Before field instead.
System Administration: Staff (Cris users)
Post process examinations.
Add users to people tables - Clerical, Clinicians, Radiographers, and Secretaries - so they appear for selection in Cris fields.