Basics
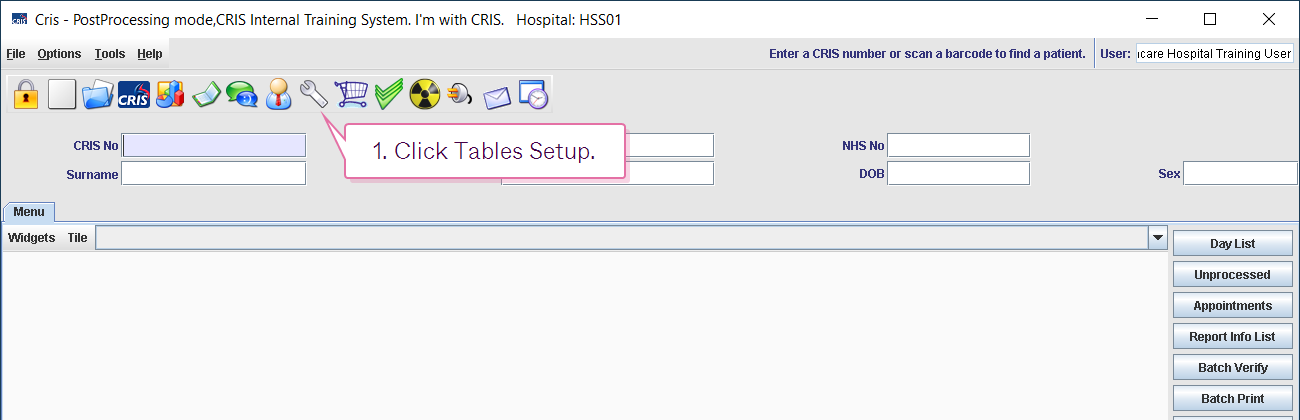
- Click Tables Setup.

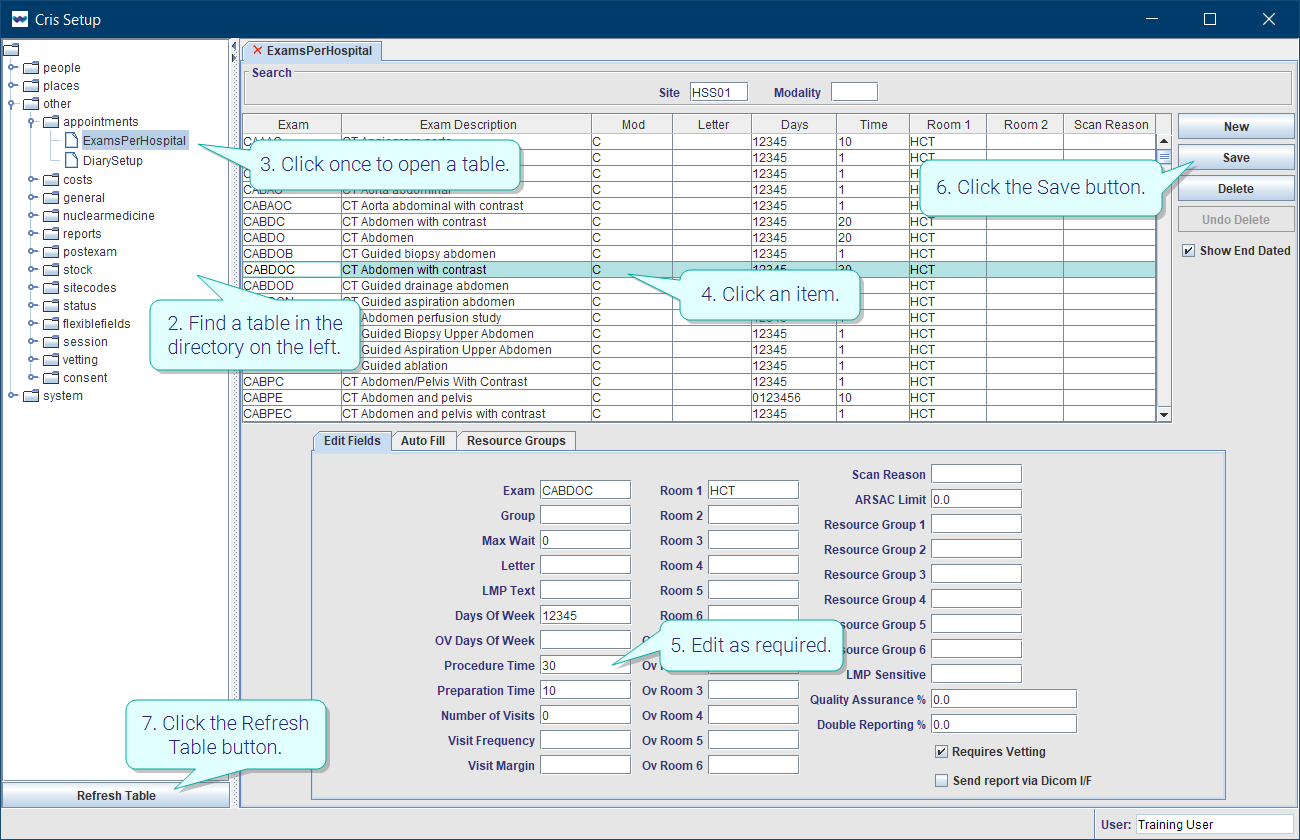
- Find a table in the directory on the left.
- Click once to open a table.
- Click an item. This will highlight it and display its settings.
- Edit as required.
- Click the Save button.
- Click the Refresh Table button.
Warning:
You should contact your Trust IT Help desk, or Prime Contractor Help desk, before making any changes to shared tables. Customers with support contracts can contact us directly.
Note:
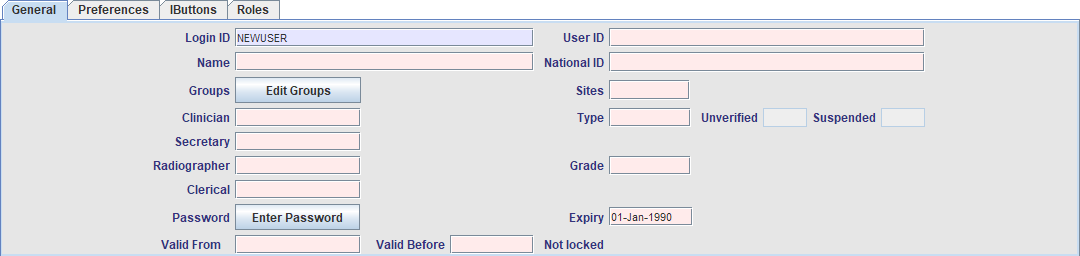
When you create a new item, the fields will be pink until you click the Save button.
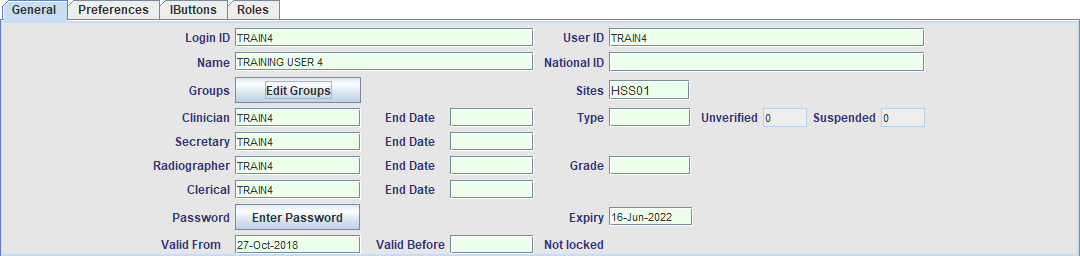
When you edit an item, the fields will be green until you click the Save button.
In most tables you will be reminded to save if you attempt to clear a table or close the window without saving.
Tip:
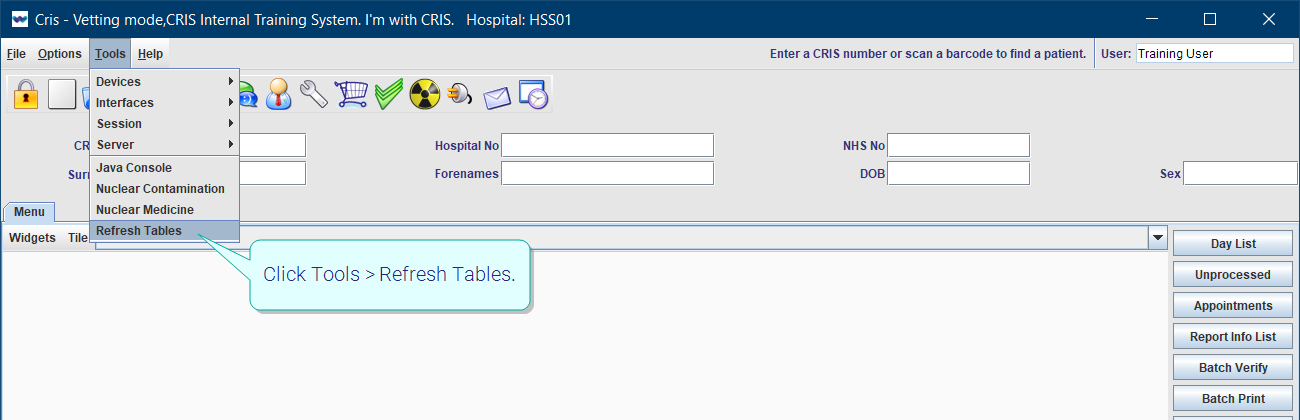
We recommend clicking Tools > Refresh Tables after editing system settings / tables to ensure that all changes are applied.
 .
.
Tip:
Press the Esc key to exit a field without making a selection from an options list.
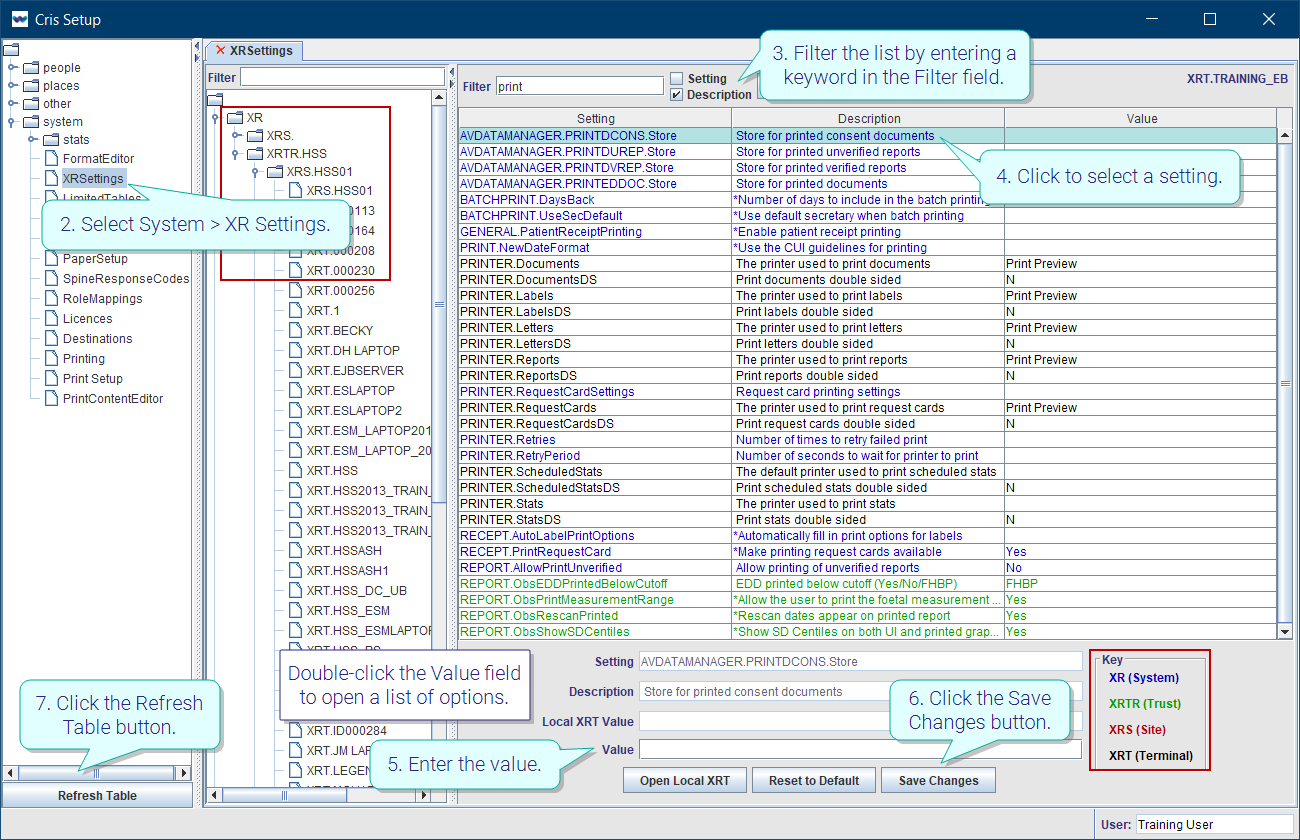
- Click Tables Setup.
- Select System > XR Settings.
- Filter the list by entering a keyword in the Filter field.
- Click to select a setting.
- Enter a value in the Value field.
- Click the Save Changes button.
- Click the Refresh Table button.
OR
Double-click the Value field then double-click to select a value from the options.
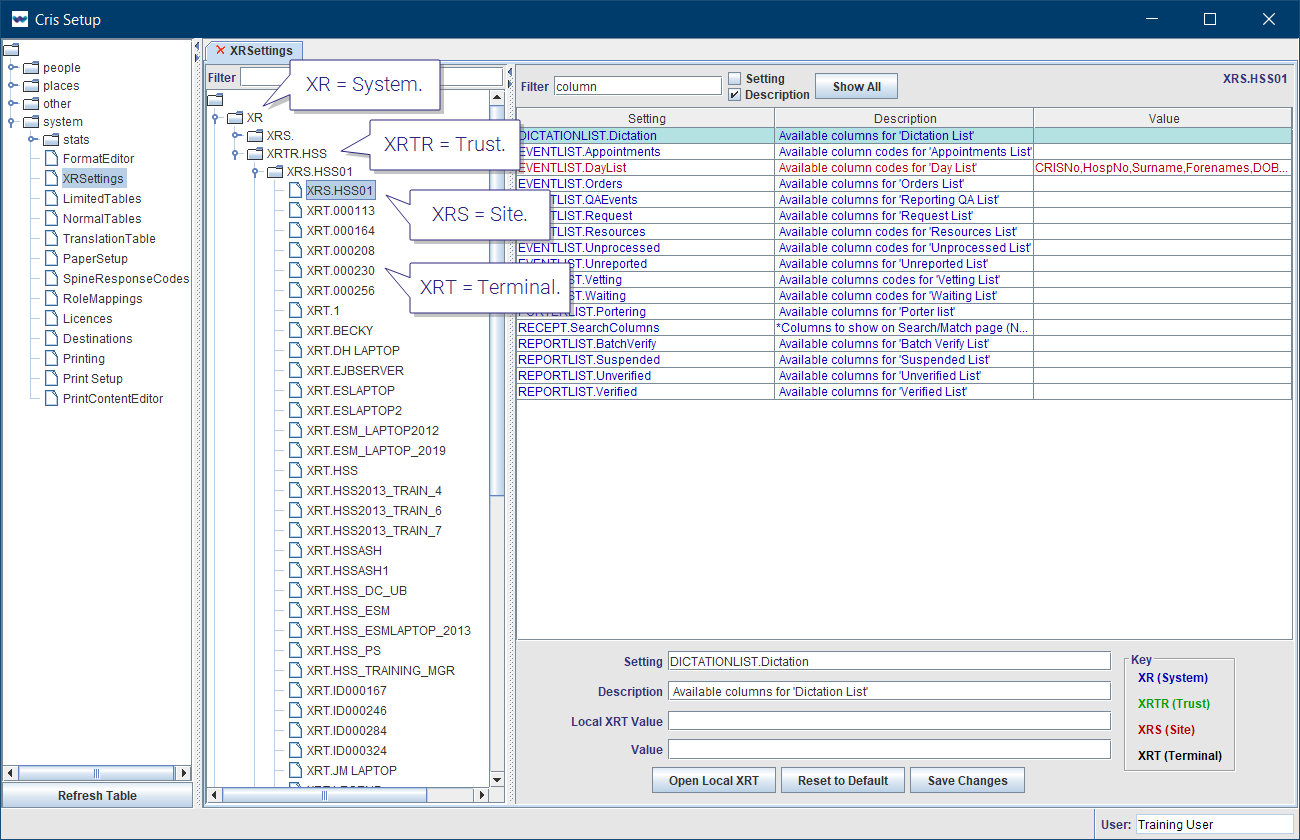
It is essential to consider the level of an XR setting when making changes. System and Trust should not be altered without agreement from all stakeholders.
| Level | Description |
|---|---|
| XR (System) | Changes made here will affect the entire Cris system across all connected trusts. |
| XRTR (Trust) | Changes made here will override XR and affect the whole trust. |
| XRS (Site) | Changes made here will override XRTR and affect the entire hospital / site. |
| XRT (Terminal) | Changes made here will override XRS Setting and only apply to that terminal / workstation. |
Note:
When you open the Cris Setup window, you will see that your terminal is highlighted in the directory tree. Therefore, if you change XR settings, they will be applied at Terminal level. If you want XR settings to apply across your Site, Trust, or System, select a higher level folder before making changes.
Tip:
-
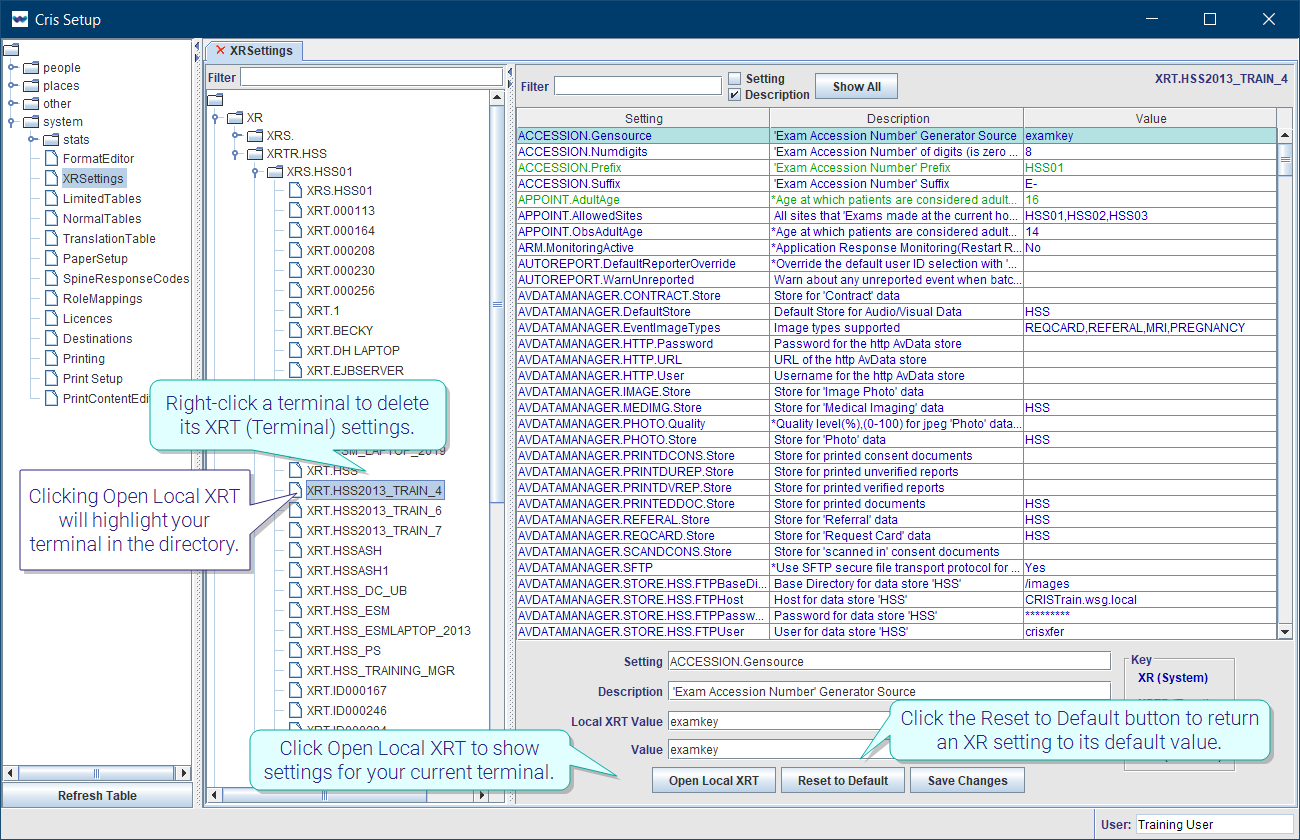
Click Open Local XRT to show settings for your current terminal. Clicking Open Local XRT will highlight your terminal in the directory.
-
Click the Reset to Default button to return an XR setting to its default value.
-
Right-click a terminal to delete its XRT (Terminal) settings.
Tip:
Press the Esc key to exit a field without making a selection from an options list.
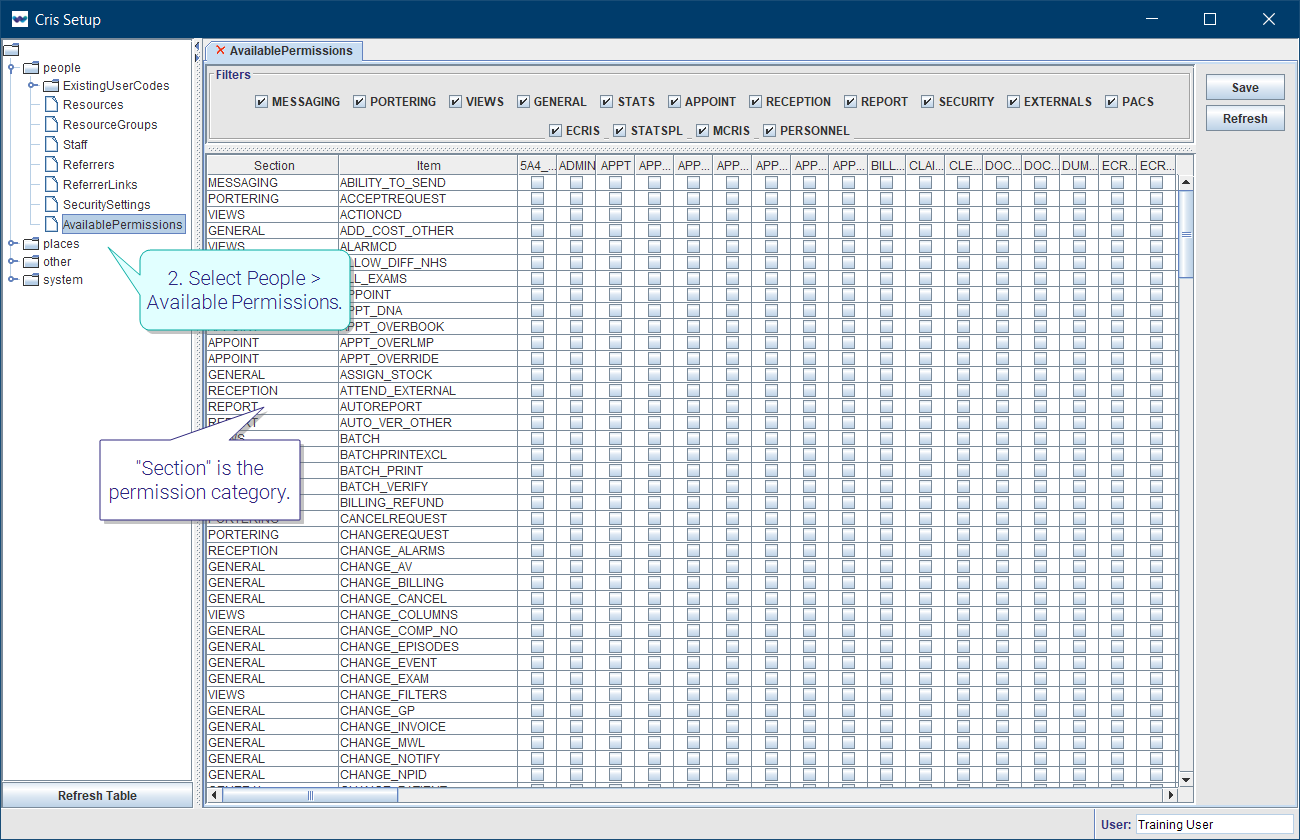
View permissions
- Click Tables Setup.
- Select People > Available Permissions.
"Section" is the permission category, which is used for organisation.
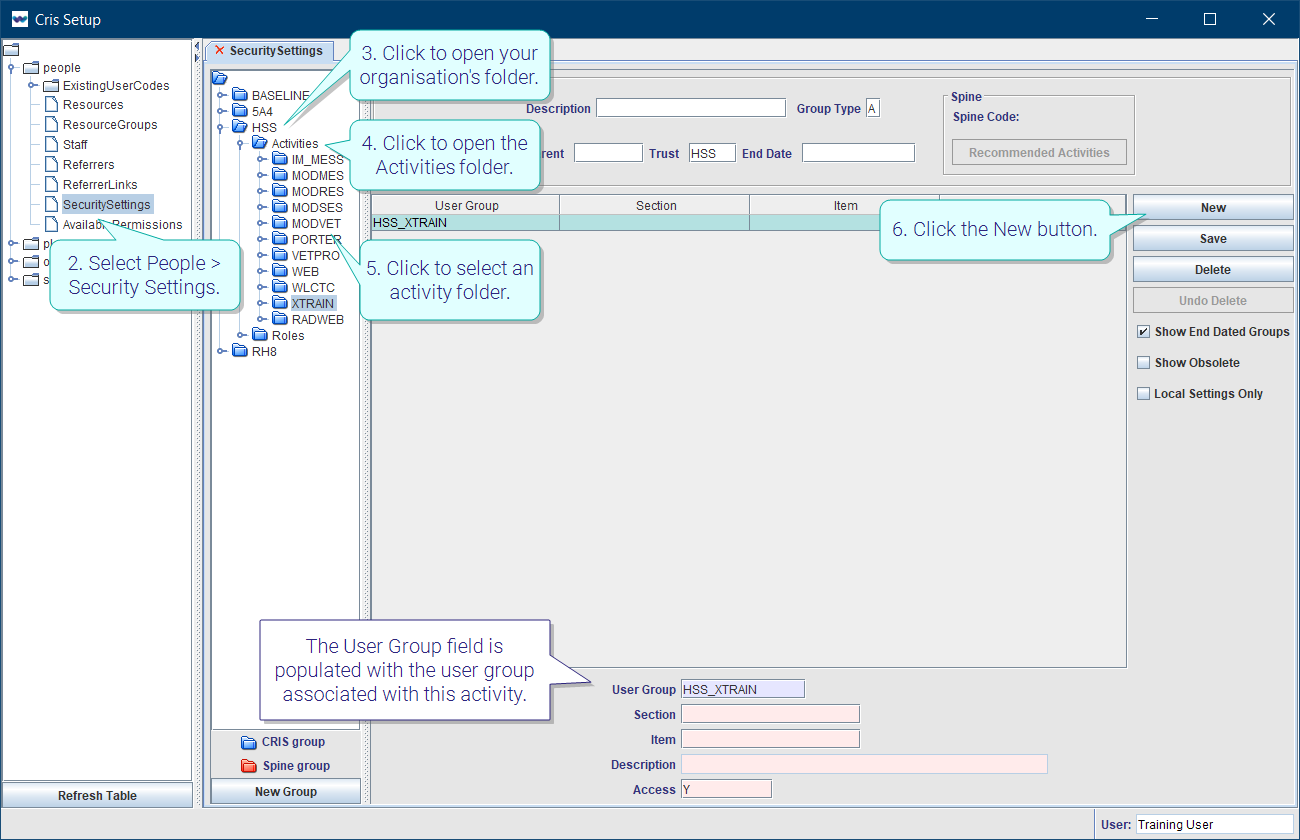
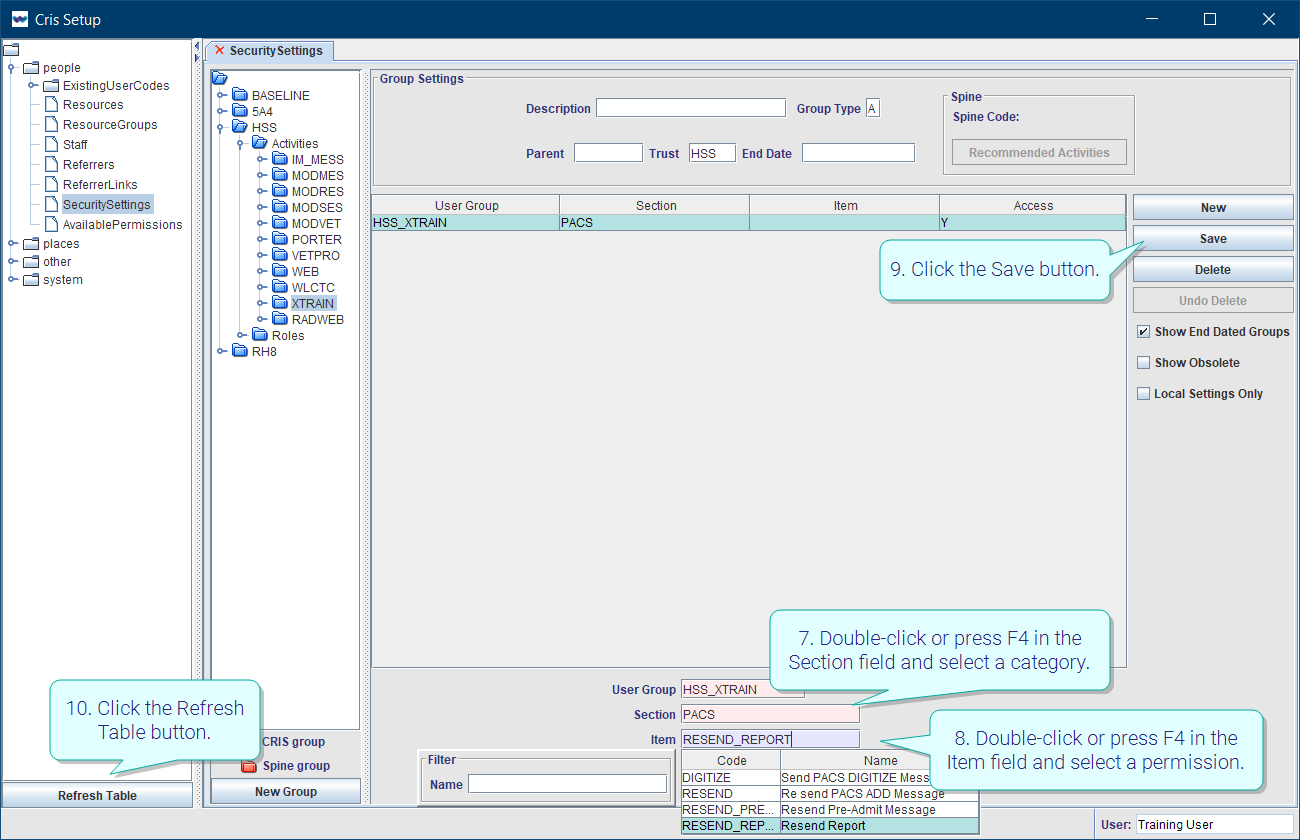
Add permissions
- Click Tables Setup.
- Select People > Security Settings.
- Click
 to open your organisation's folder.
 - Click to open the Activities folder.
- Click to select an activity folder.
- Click the New button.
- Double-click or press F4 in the Section field and select a category.
- Double-click or press F4 in the Item field and select a permission.
- Click the Save button.
- Click the Refresh Table button.
The User Group field is populated with the user group associated with this activity.
View activity
- Click Tables Setup.
- Select People > Security Settings.
- Click to open your organisation's folder.
- Click to open the Activities folder.
- Click to select an activity.
Permissions associated with this activity are displayed.
View role
- Click Tables Setup.
- Select People > Security Settings.
- Click to open your organisation's folder.
- Click to open the Roles folder.
- Click to select a role.
Permissions associated with this role are displayed.
Activities and roles
This is a typical set of activities:
| Clerical activities | Radiographer activities | Radiologist activities | Other activities |
|---|---|---|---|
| APPOINTMENTS | POST EXAM ADMIN | RADIOLOGIST | ICRIS R or ICRIS V |
| APPOINTMENTS H | RADIOGRAPHER | SESSION | PORTER |
| CLERICAL ADMIN | RADIOGRAPHER NUC MED | VETTING | STATISTICS |
| RAD HELP | RAD REP | VETTING H | SUPER |
| RECEPTION | SONOGRAPHER | SYS ADMIN | |
| RECEPTION H | STUDENT | VIEW | |
| SECRETARY | WEB (for new Cris modules) |
This is a typical set of roles:
| Clerical roles | Radiographer roles | Radiologist roles | Other roles |
|---|---|---|---|
| APPOINTMENTS | POST EXAM ADMIN | RADIOLOGIST | SONOGRAPHER |
| CLERICAL ADMIN | RADIOGRAPHER | SESSION | STATISTICS |
| RAD HELP | RADIOGRAPHER NUC MED | STUDENT RADIOLOGIST | SUPER USER |
| RECEPTION | REPORTING RADIOGRAPHER | VETTING RADIOLOGIST | SYSTEM ADMIN |
| SECRETARY | STUDENT RADIOGRAPHER | PORTER | |
| VETTING RADIOGRAPHER | VIEW ONLY |
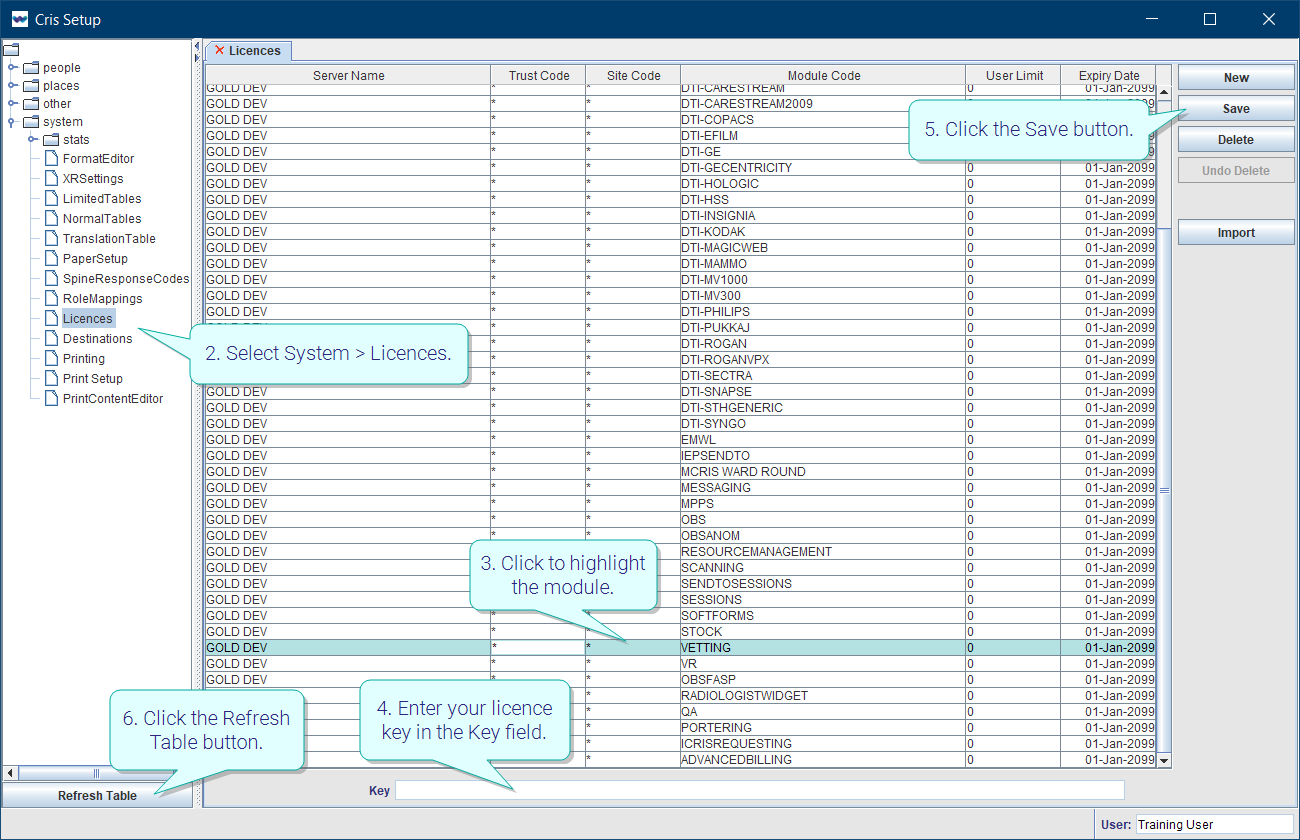
- Click Tables Setup.
- Select System > Licences.
- Click to highlight the module.
- Enter your licence key in the Key field.
- Click the Save button.
- Click the Refresh Table button.
Configuration of single sign-on entails:
- Activating via an XR setting.
- Changing user Login IDs to the format DOMAIN/FirstName.Surname.
Edit XR settings for single sign-on
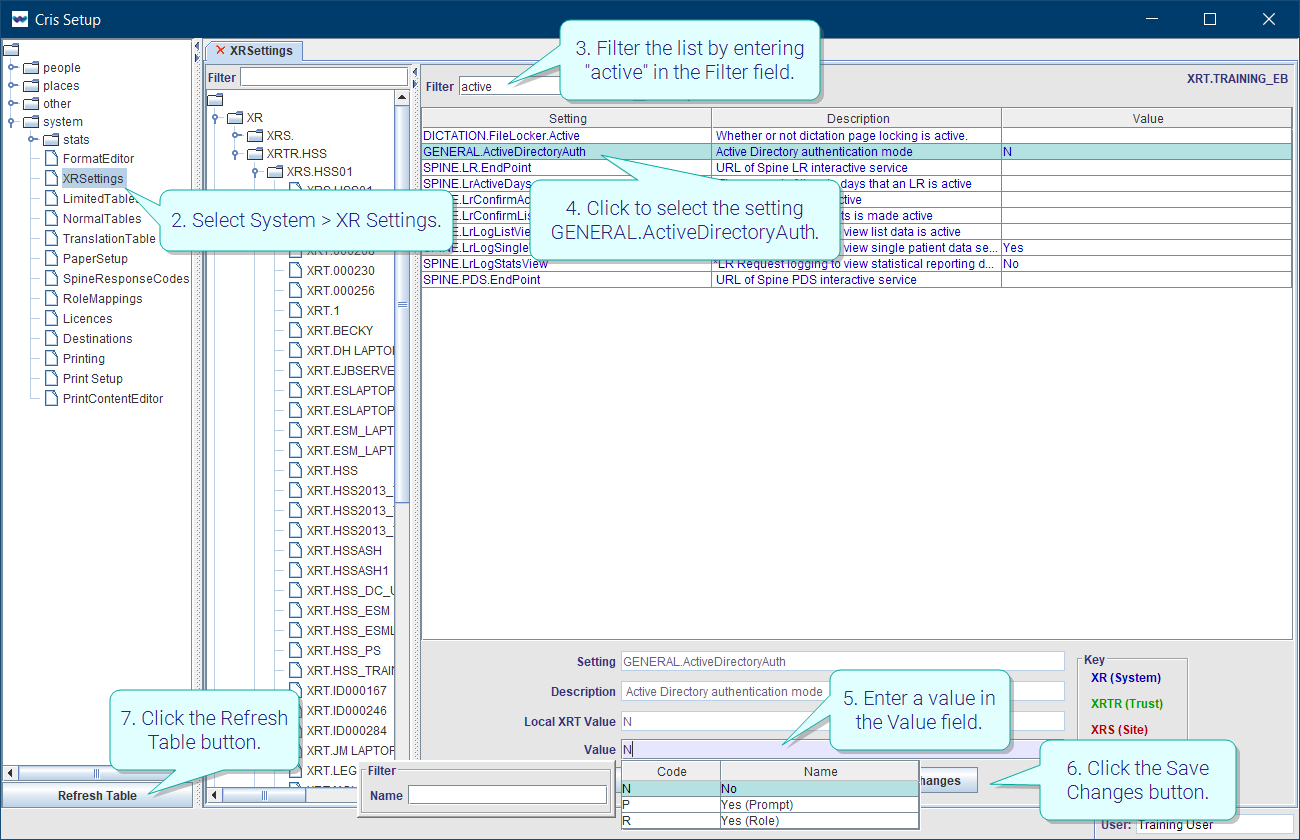
- Click Tables Setup.
- Select System > XR Settings.
- Filter the list by entering "active" in the Filter field.
- Click to select the setting GENERAL.ActiveDirectoryAuth.
- Enter a value in the Value field.
- Click the Save Changes button.
- Click the Refresh Table button.
OR
Double-click the Value field then double-click to select a value from the options.
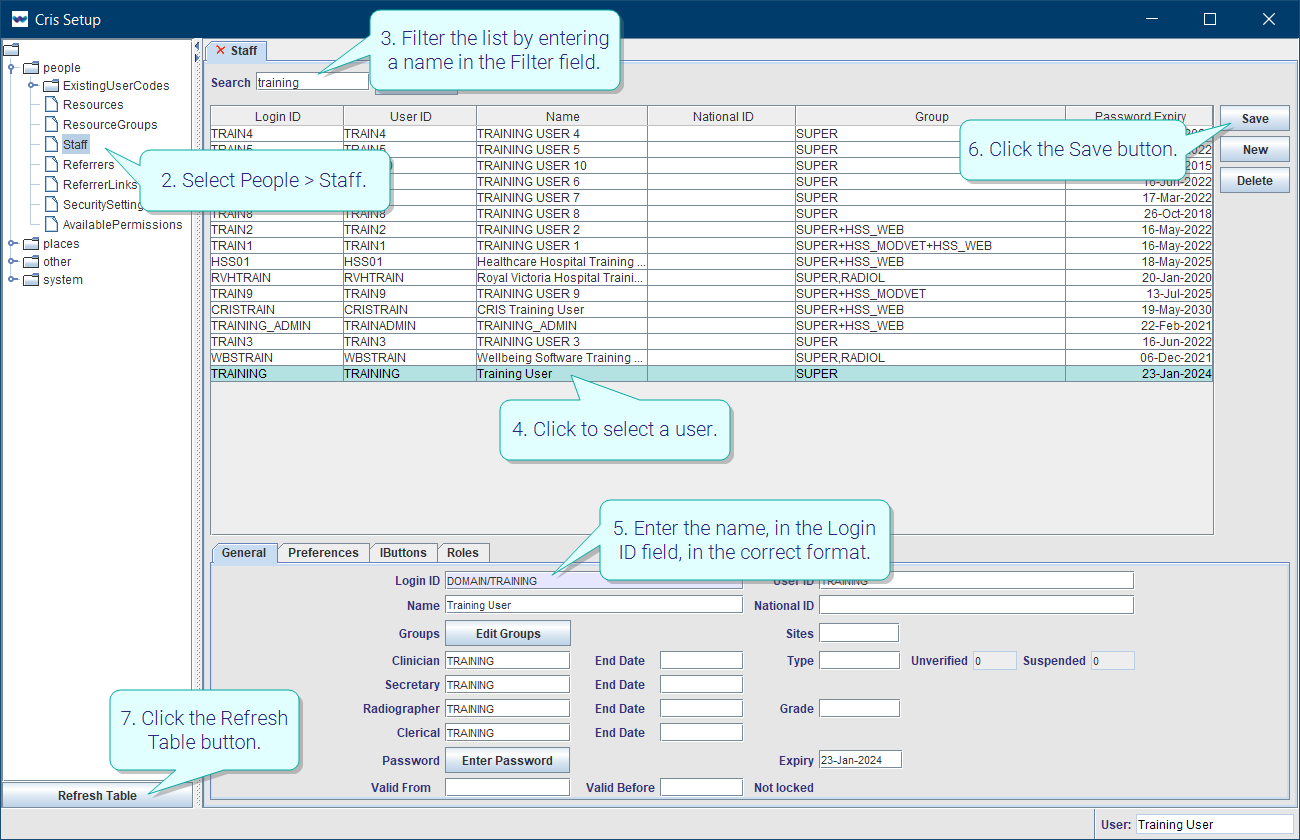
Edit user settings for single sign-on
- Click Tables Setup.
- Select People > Staff.
- Filter the list by entering a name in the Filter field.
- Click to select a user.
- Enter the name, in the Login ID field, in the correct format: DOMAIN/FirstName.Surname.
- Click the Save button.
- Click the Refresh Table button.
Note:
XR setting for Active Directory single sign-on.
| Level | Setting | Value | Name | Description | |
|---|---|---|---|---|---|

|
XR |
GENERAL.ActiveDirectoryAuth |
N |
No |
Active Directory is not installed. |
| P | Yes (Prompt) |
Cris will log in automatically if the (Windows) user is in the People > Staff table. If this fails, the Login window will appear. |
|||
| R | Yes (Role) |
The Login window will appear. The user should enter their Cris username (Login ID), password, and domain. |
Tip:
Your Client Manager or our service desk can provide your domain name and assist you with activating single sign-on.
Tip:
We recommend clicking Tools > Refresh Tables after editing system settings / tables to ensure that all changes are applied.
.
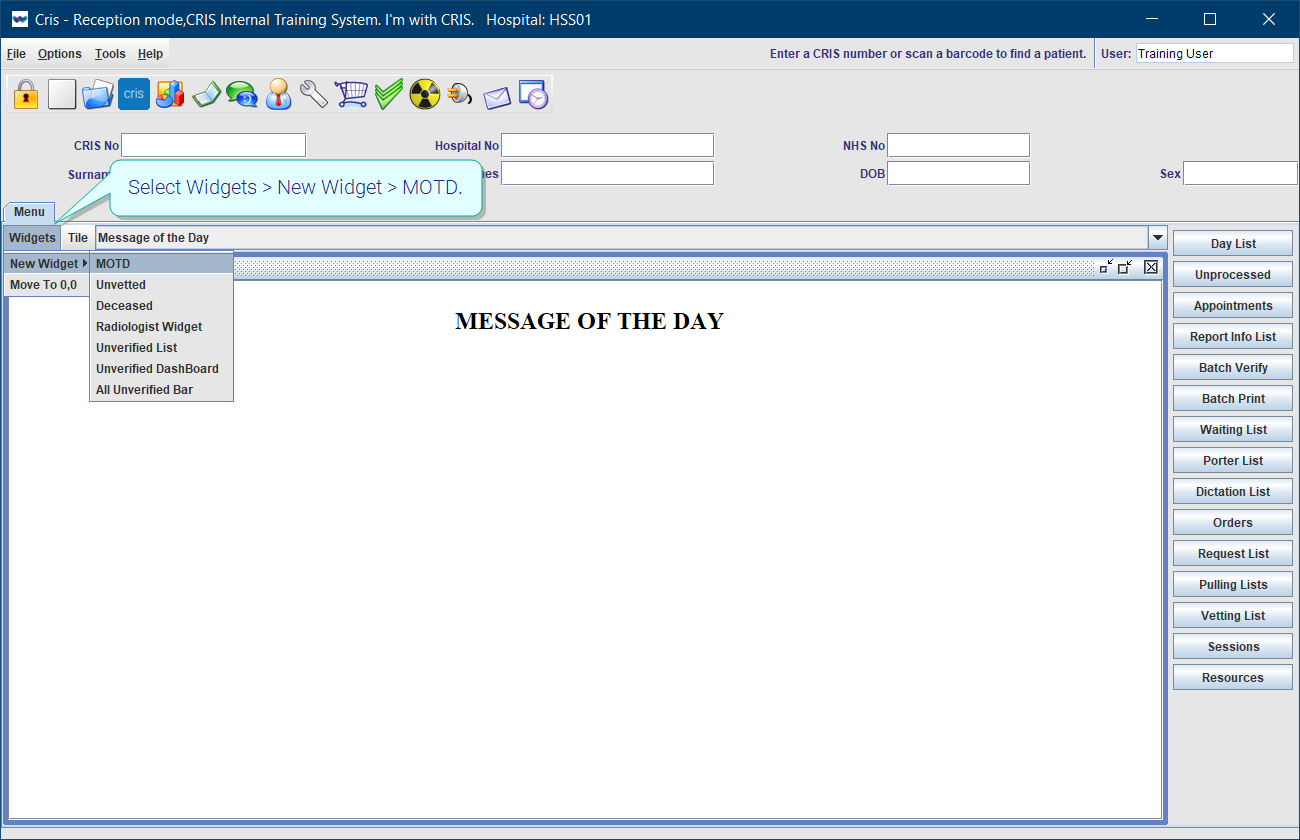
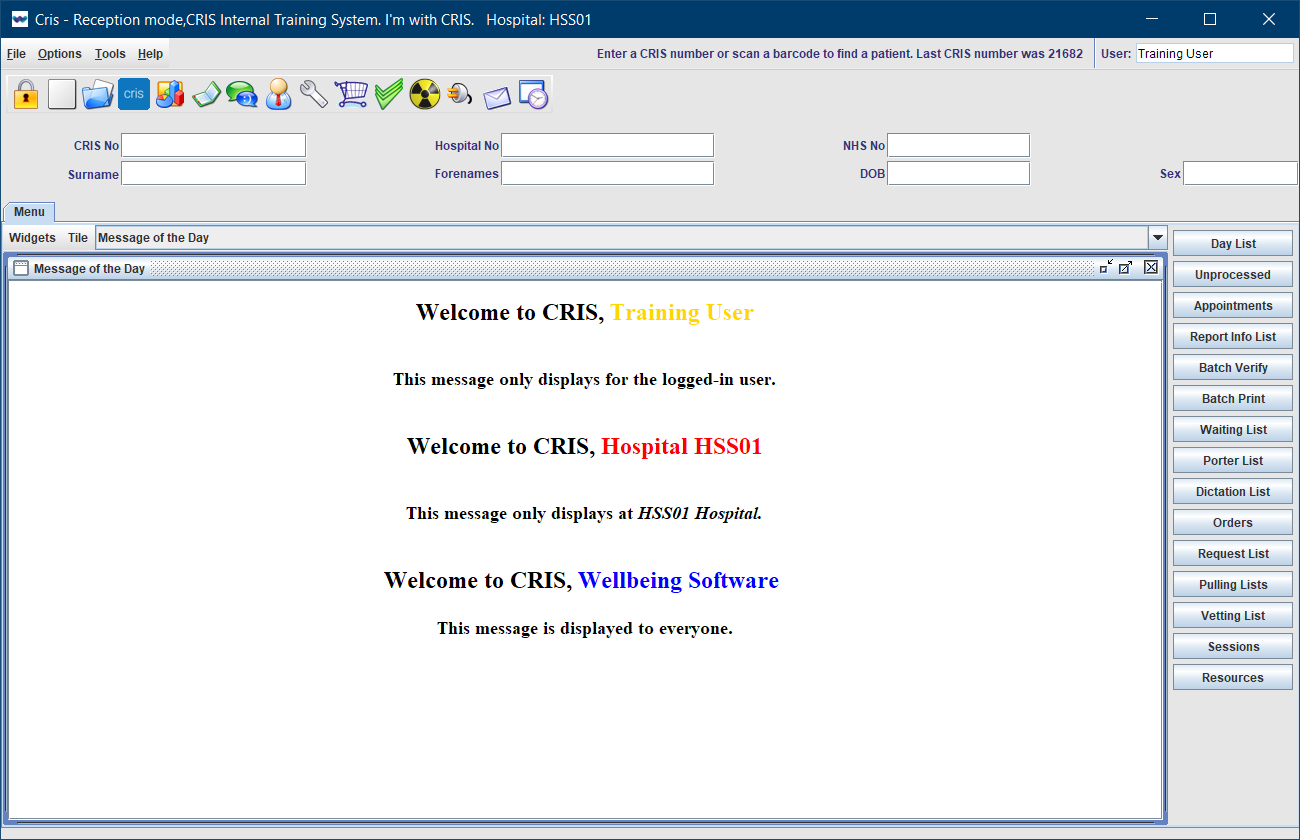
A Message of the Day (MOTD) can be displayed on the front page of Cris. Select Widgets > New Widget > MOTD.
Create a system message
This message will be displayed to the entire Cris system across all connected trusts.
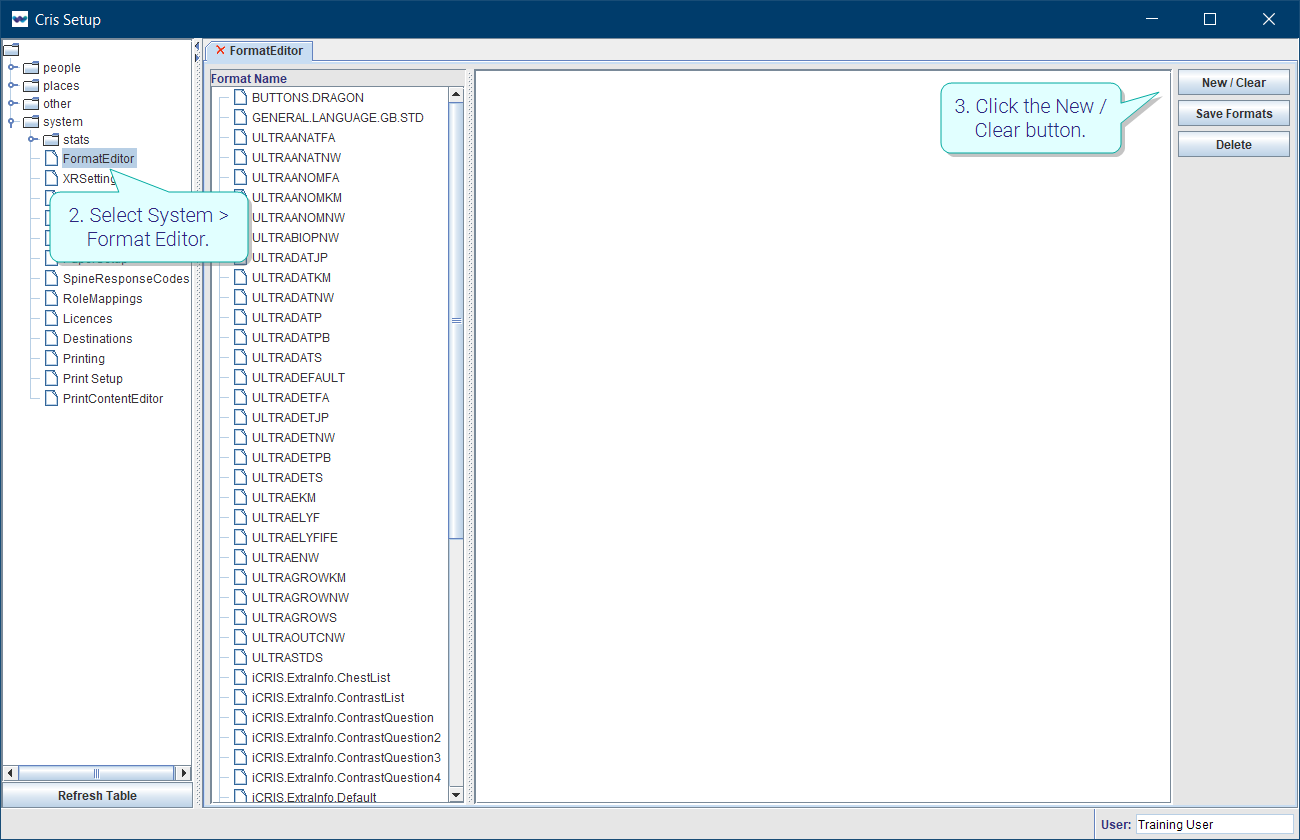
- Click Tables Setup.
- Select System > Format Editor.
- Click the New / Clear button.
- Enter the name MOD_JAVA.
- Enter the text below in the centre panel, adding your own message title and body.
- Click the Save New Format button.
- Click the Refresh Table button.
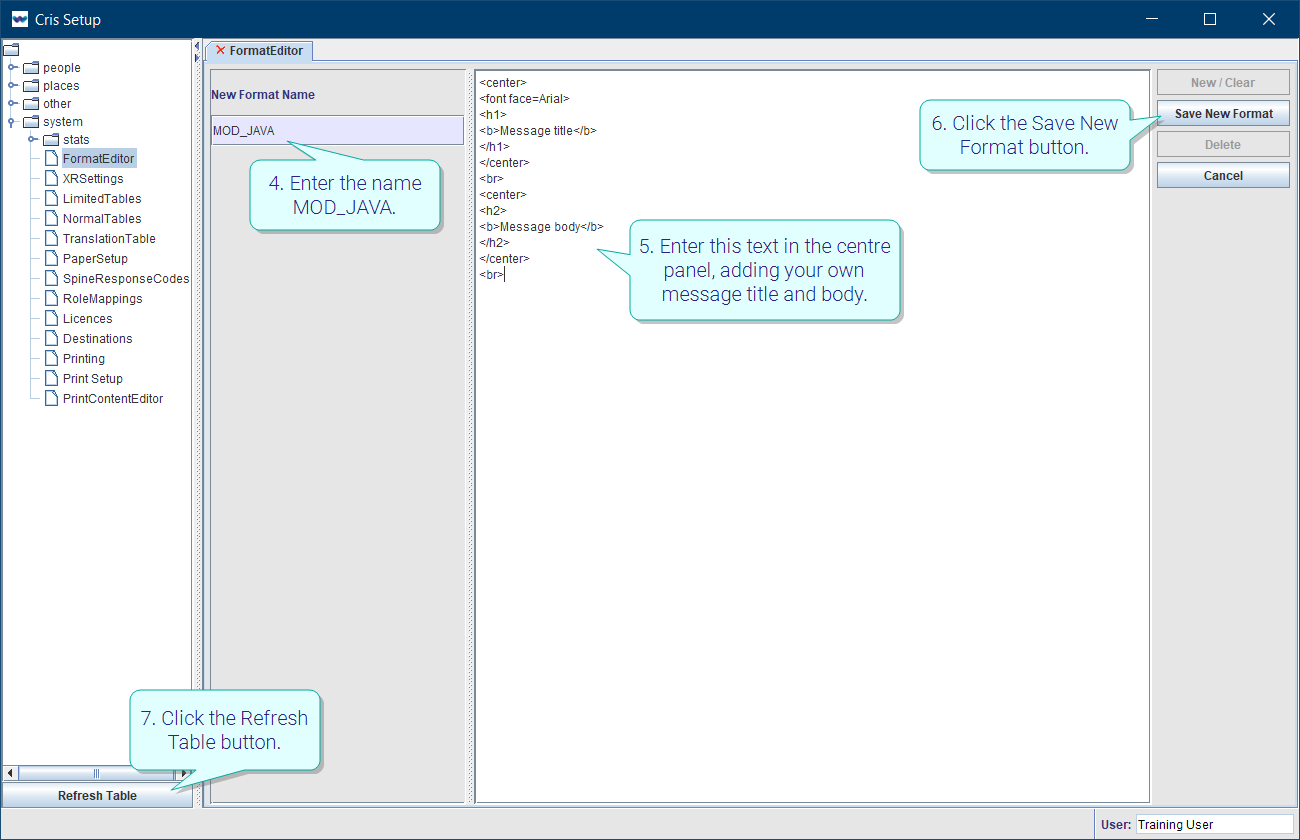
<center>
<font face=Arial>
<h1>
<b>Message title</b>
</h1>
</center>
<br>
<center>
<h2>
<b>Message body</b>
</h2>
</center>
<br>
Create a bespoke message
You can create messages that will be shown to the whole system, one site, or an individual user.
Create formats with these names, substituting [SITECODE] and [LOGINID] with the actual values (no brackets).
| Format name | Description | |
|---|---|---|
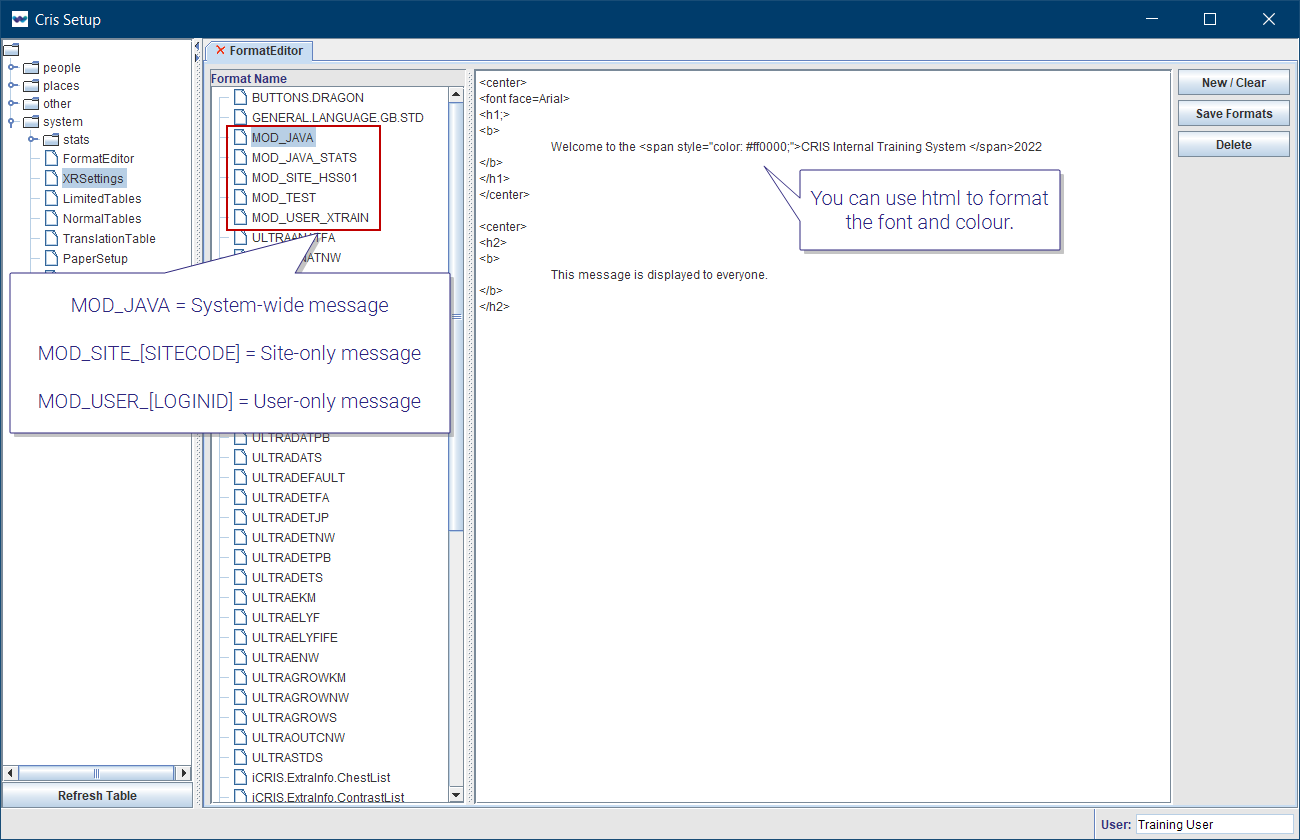
|
MOD_USER_[LOGINID] | Displays a message to the specified user. |
| MOD_TERMINAL_[TERMINALID] | Displays a message to the specified terminal / workstation. | |
| MOD_SITE_[SITECODE] | Displays a message to the specified hospital / site. | |
| MOD_JAVA | Displays a message to the entire Cris system across all connected trusts. |
Note:
A Message of the Day can be created for a user, site, and system. Messages will appear in that order.
Tip:
You can use html to format your message, for example change font and colour.
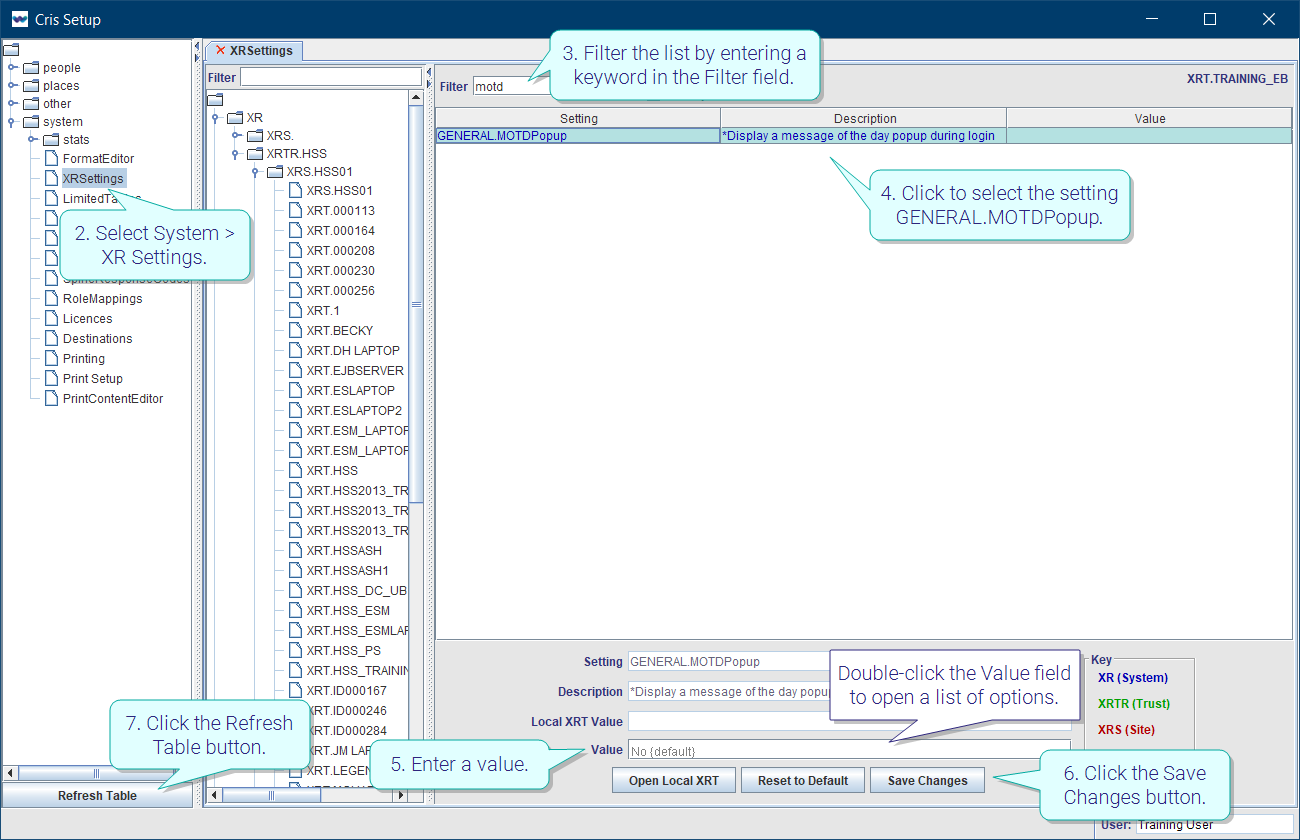
Edit XR settings for a pop-up message
This is the option to have the MOTD open in a pop-up window when you log in to Cris.
- Click Tables Setup.
- Select System > XR Settings.
- Filter the list by entering a keyword in the Filter field.
- Click to select the setting GENERAL.MOTDPopup.
- Enter a value in the Value field.
- Click the Save Changes button.
- Click the Refresh Table button.
OR
Double-click the Value field then double-click to select a value from the options (Yes or No).
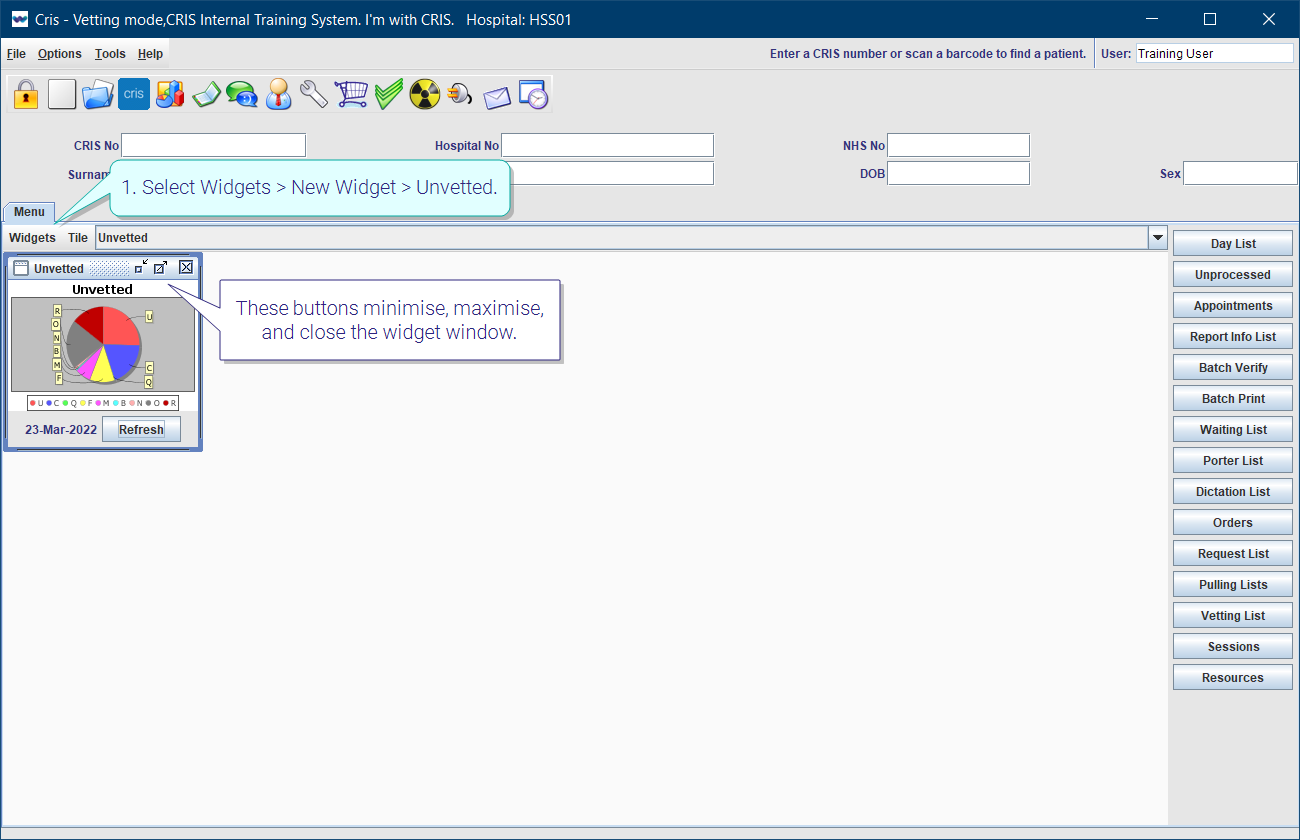
- Select Widgets > New Widget > [Widget Name].
- Drag the window edge to resize.
Standard window buttons minimise, maximise, and close the widget window.

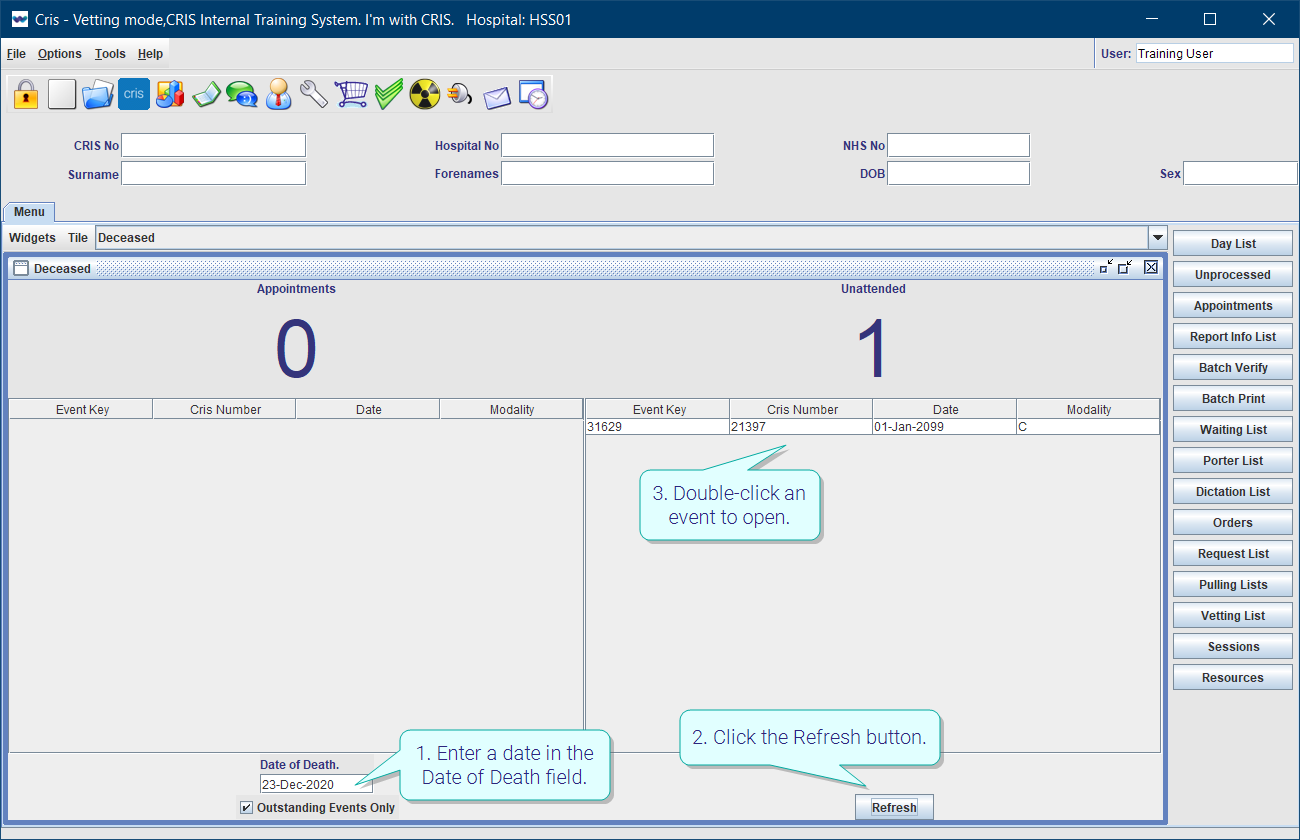
Deceased
This widget is a useful tool to monitor outstanding events for patients who are now deceased.
-
Enter a date in the Date of Death field.
-
Click the Refresh button.
-
Double-click an event to open the patient record at the Event Details screen.
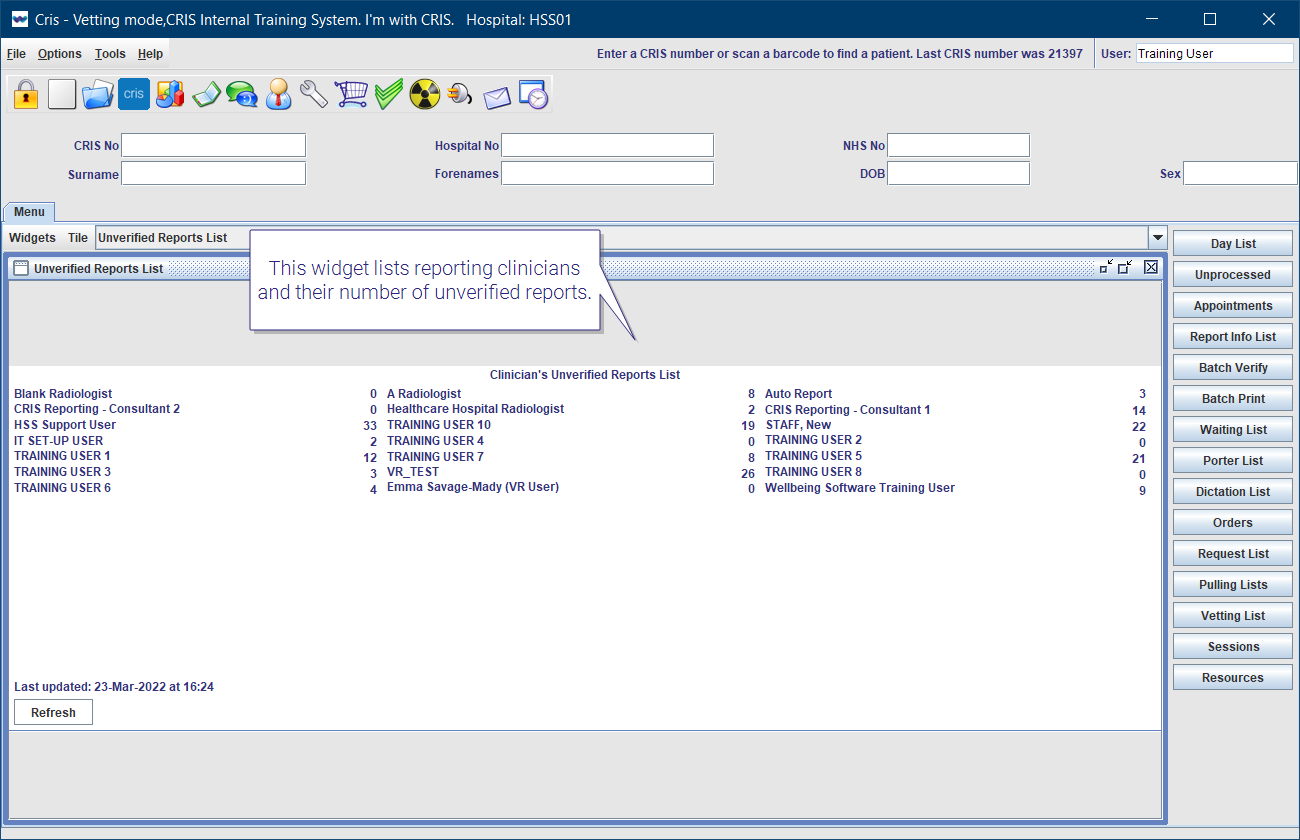
Unverified
This widget lists reporting clinicians and their current number of unverified reports.
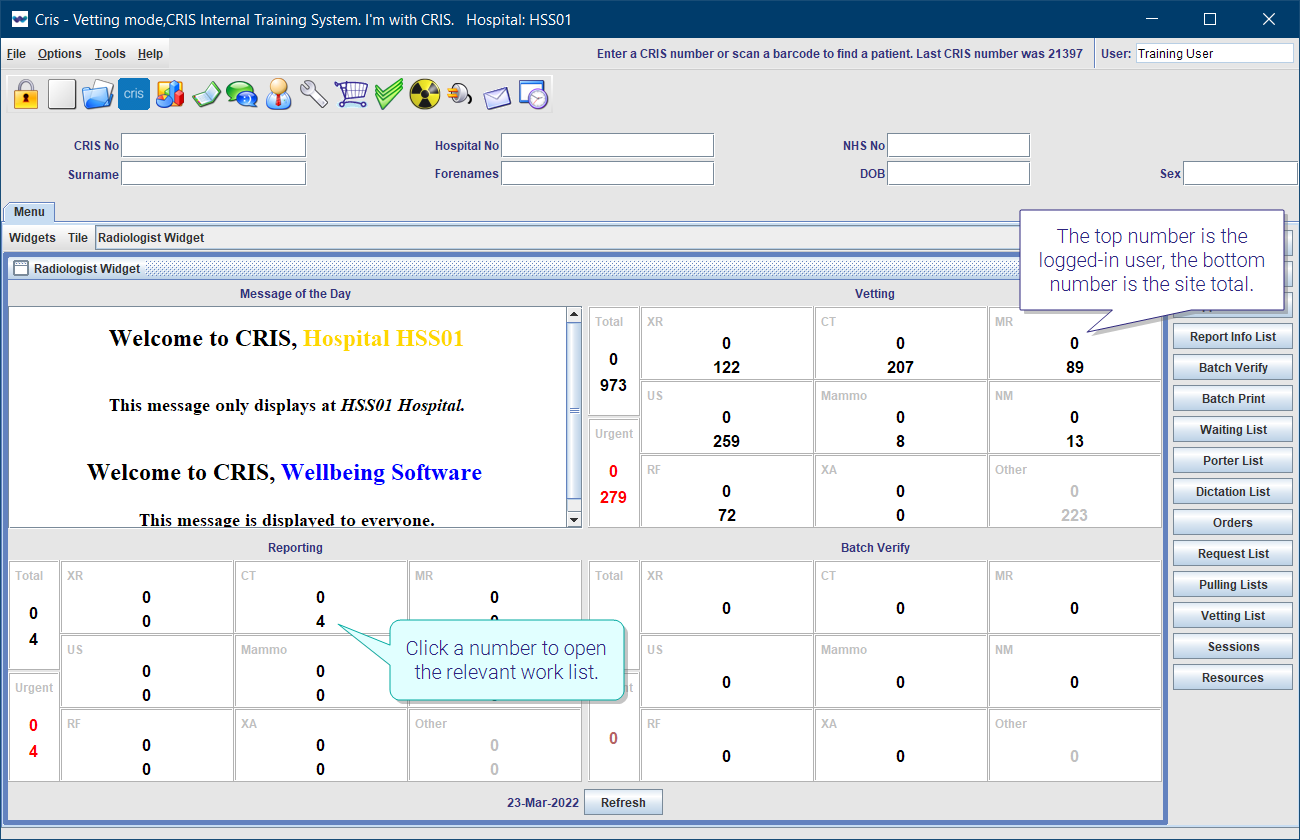
Radiologist
This widget shows events which need to be vetted, reported, and verified.
It groups events by modality and urgency.
The top number is the logged-in user, the bottom number is the site total.
-
Click a number in Vetting to open the Vetting List.
-
Click a number in Reporting to open the Unreported List.
-
Click a number in Batch Verify to open the Batch Verify List.
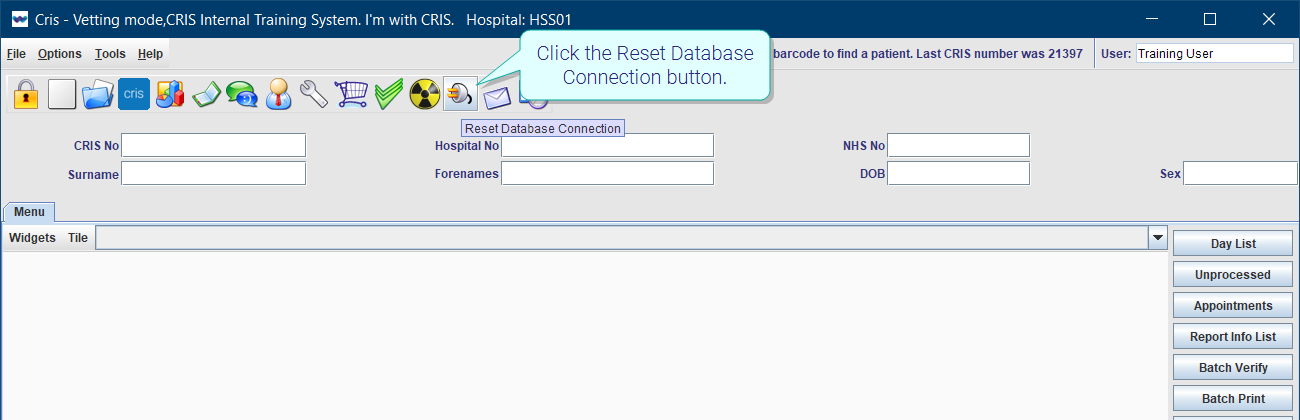
Click the Reset Database Connection button.
- If a patient is not in the PAS mirror, register the patient in Cris.
-
Enter the order in Cris and process as normal.
If a patient is in the PAS mirror, the record will be accessible even if PAS is down.
-
When PAS is back up, register the patient in PAS.
-
Enter the order in OCS.
-
Search for the patient in Cris.
-
Link the two records. See Link patient records.
-
Right-click the order.
-
Link the event with the order.
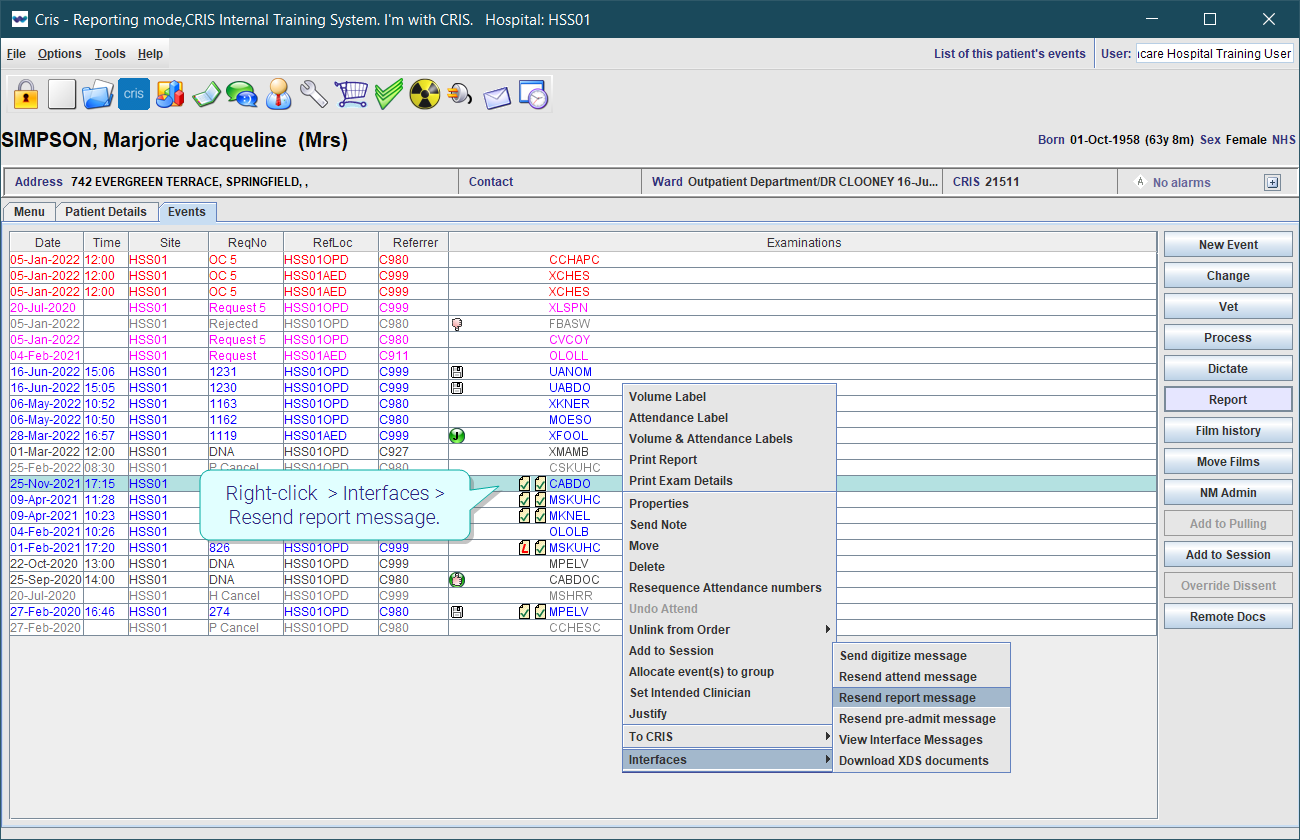
-
If the event has already been reported, right-click > Interfaces > Resend report message.
You will be offered the new PAS record to link with the Cris record.
Cris will offer any similar events which are not linked to orders.
When the event is reported, the report will be sent to OCS.
-
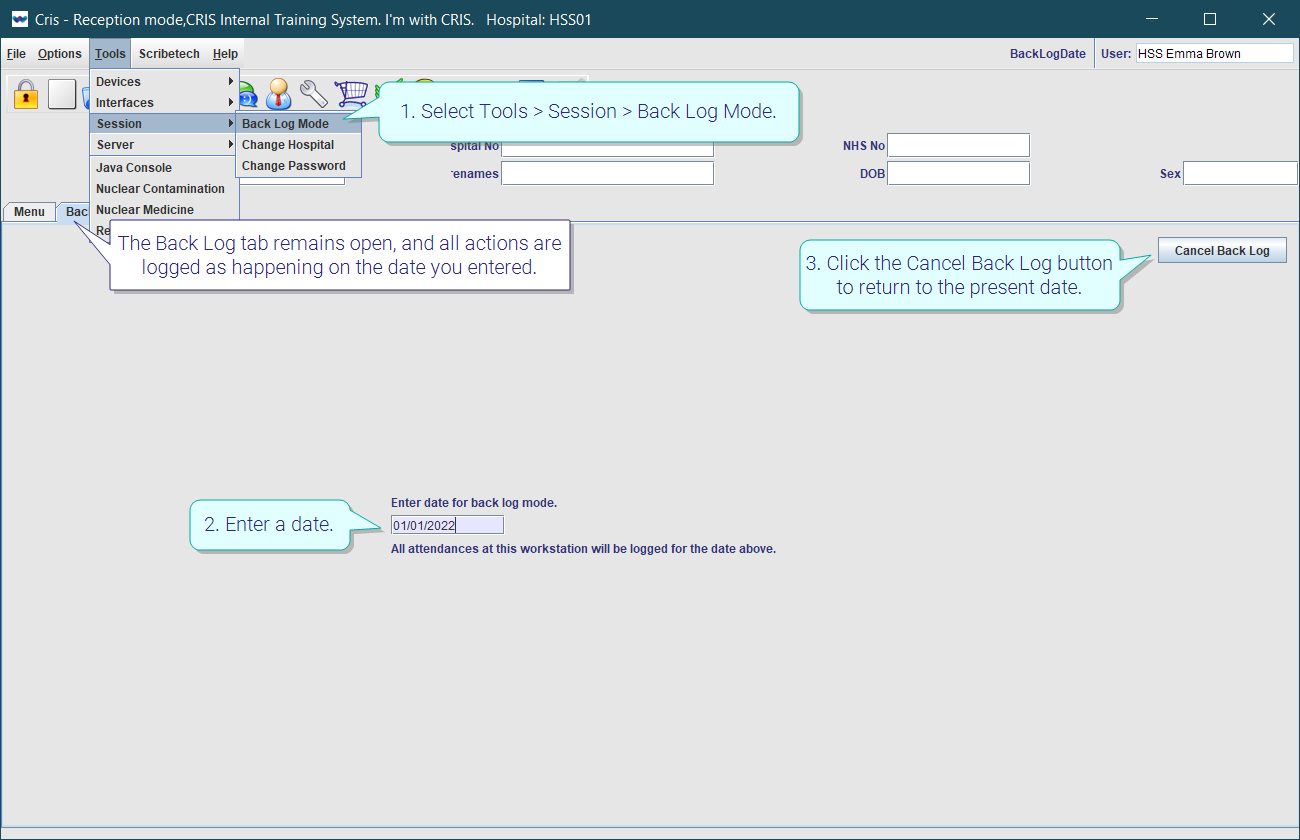
Select Tools > Session > Back Log Mode.
-
Enter a date.
-
Enter the required information.
-
Click the Cancel Back Log button to return to the present date.
The Back Log tab remains open, and all actions are logged as happening on the date you entered, until you cancel.
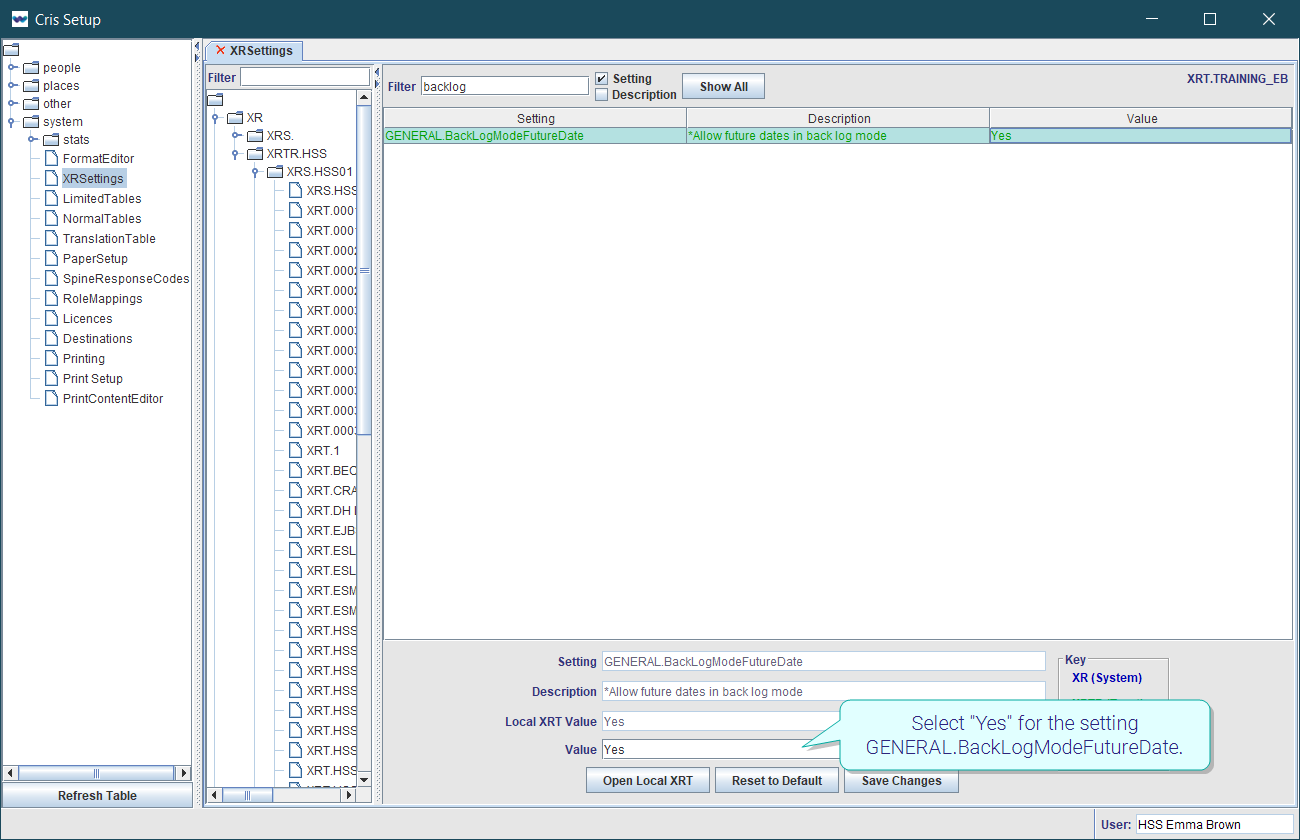
Future data entry (using Back Log Mode) is turned off by default but can be enabled via XR settings. Select "Yes" for the setting GENERAL.BackLogModeFutureDate.
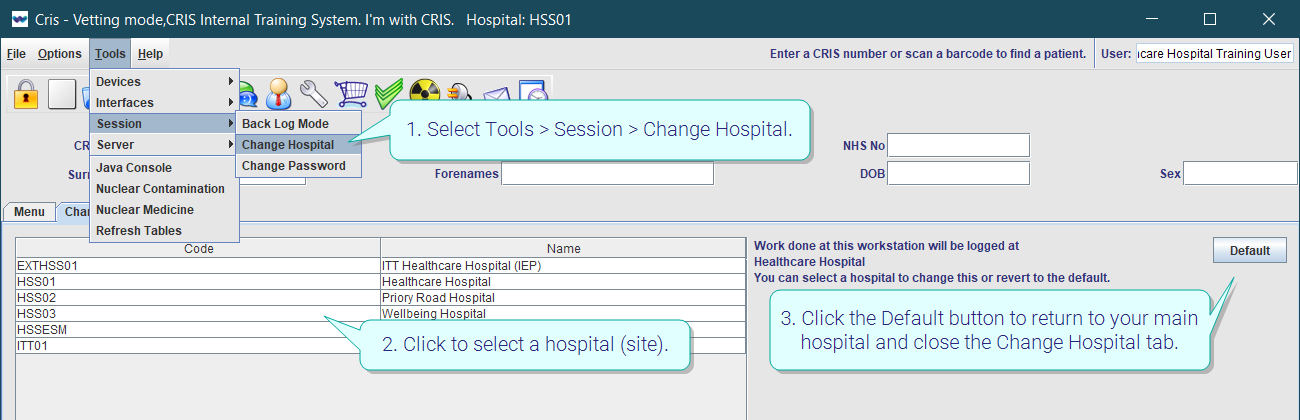
- Select Tools > Session > Change Hospital.
- Click to select a hospital (site).
- Click the Default button to return to your main hospital and close the Change Hospital tab.
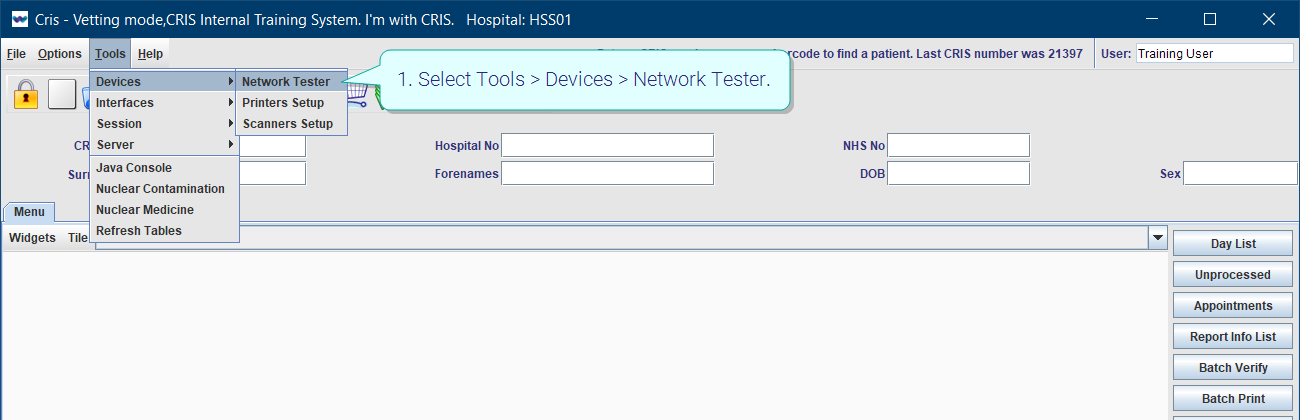
-
Select Tools > Devices > Network Tester.
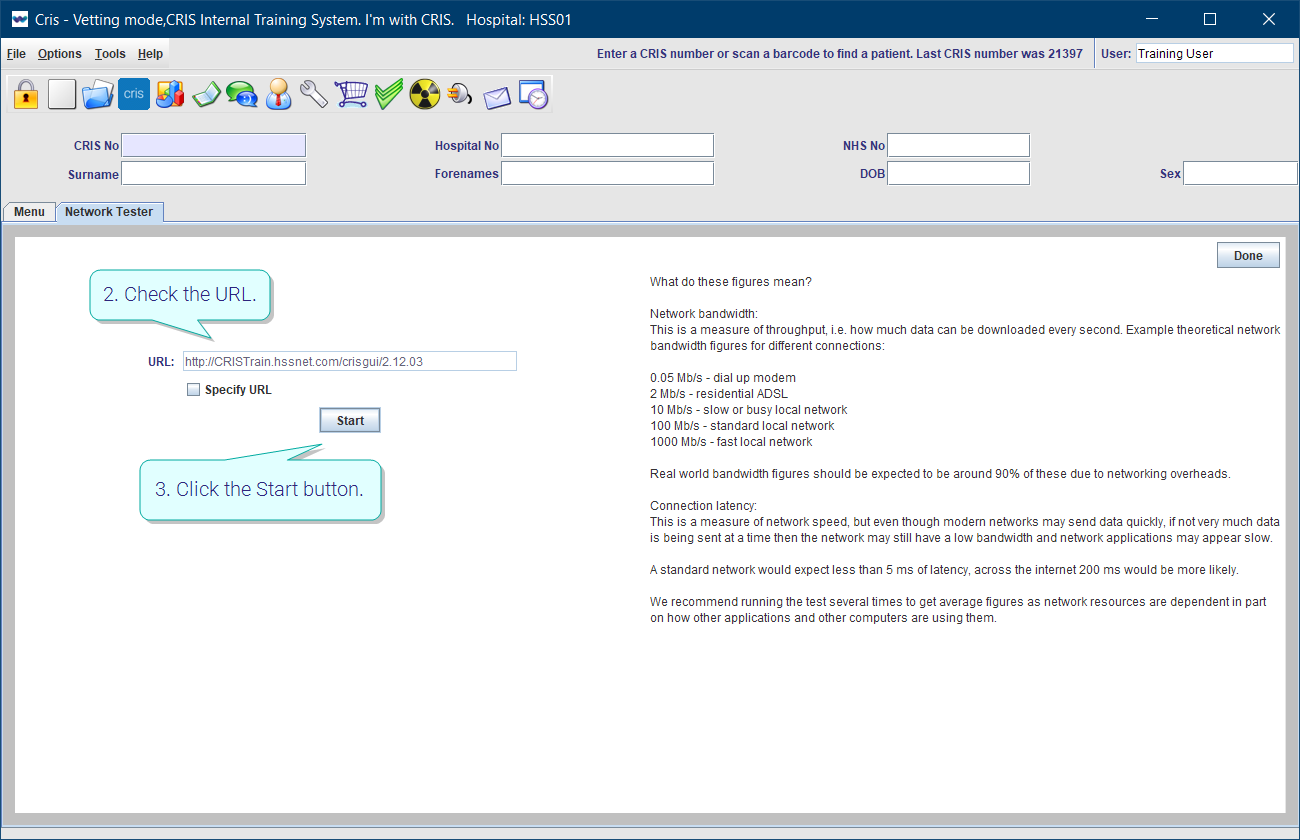
-
Check the URL.
-
Click the Start button.
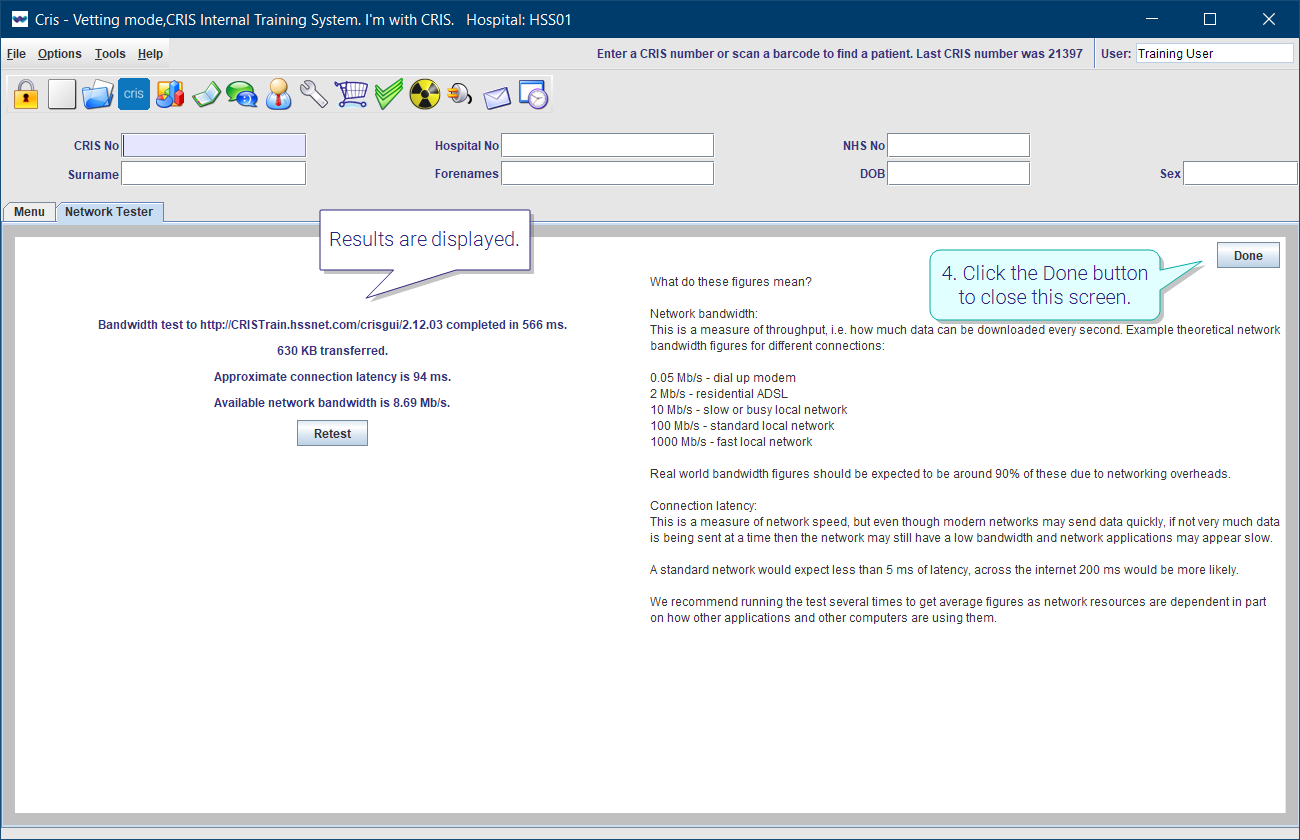
-
Click the Done button to close this screen.
Results are displayed.
- Open the Java Console, recreate the issue, and save the log file.
- Send an email with the log file and a description of the issue to Magentus Service
Tip:
If you need help with Cris installation or configuration, you should contact your Trust IT Help desk, or Prime Contractor Help desk, in the first instance. Customers with support contracts can contact us directly.
If you encounter an error or unexpected behaviour in Cris, please attempt to recreate and record the issue for Magentus Service.
-
Select Tools > Java Console.
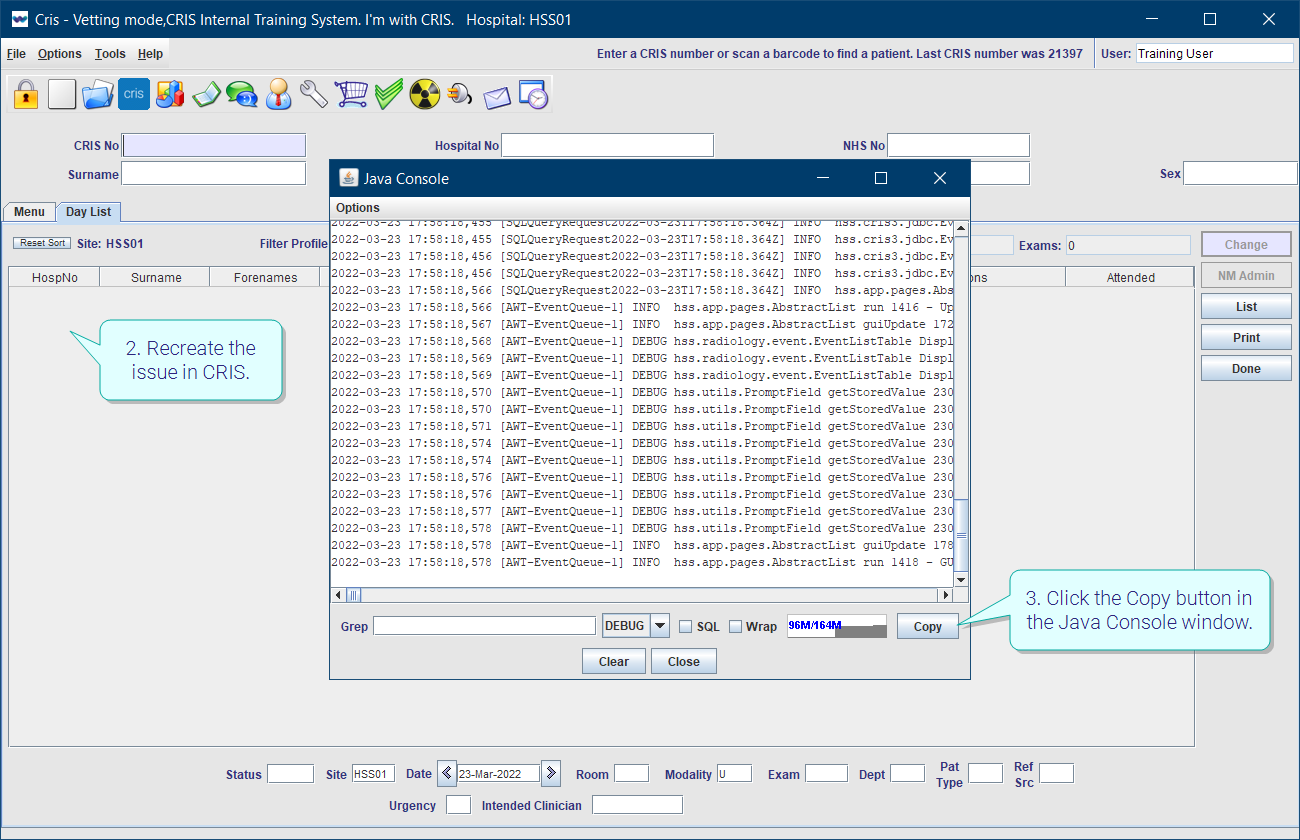
-
Recreate the issue in Cris.
-
Click the Copy button in the Java Console window.
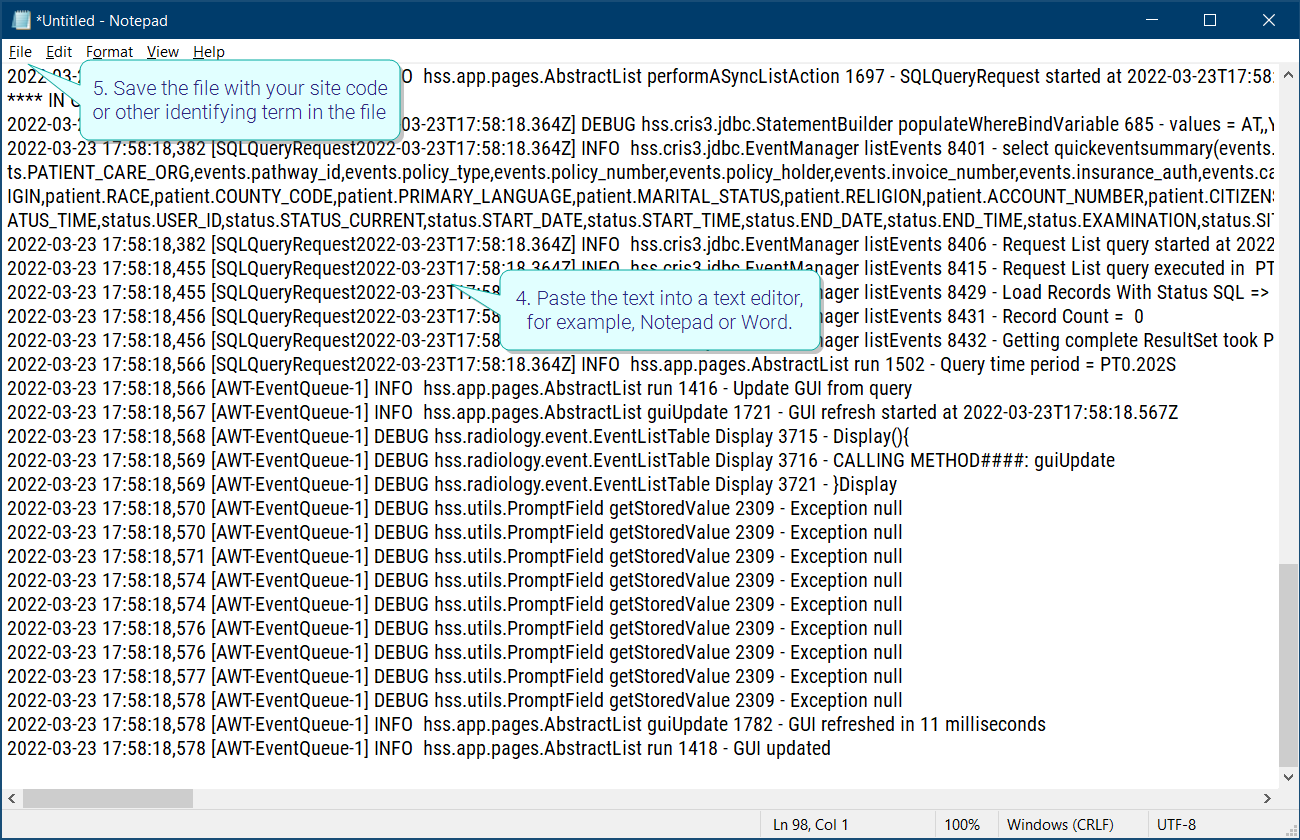
-
Paste the text into a text editor, for example, Notepad or Word.
-
Save the file with your site code or other identifying term in the file name.
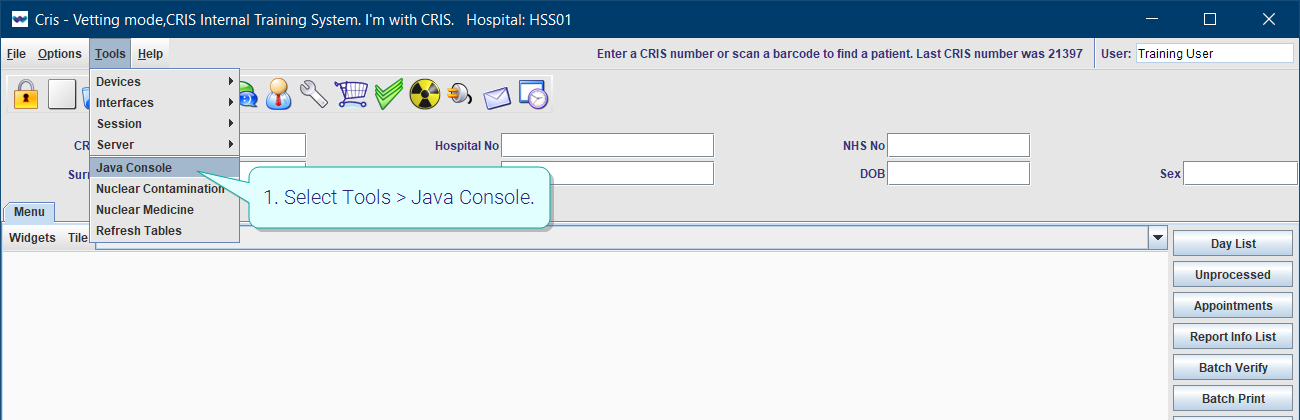
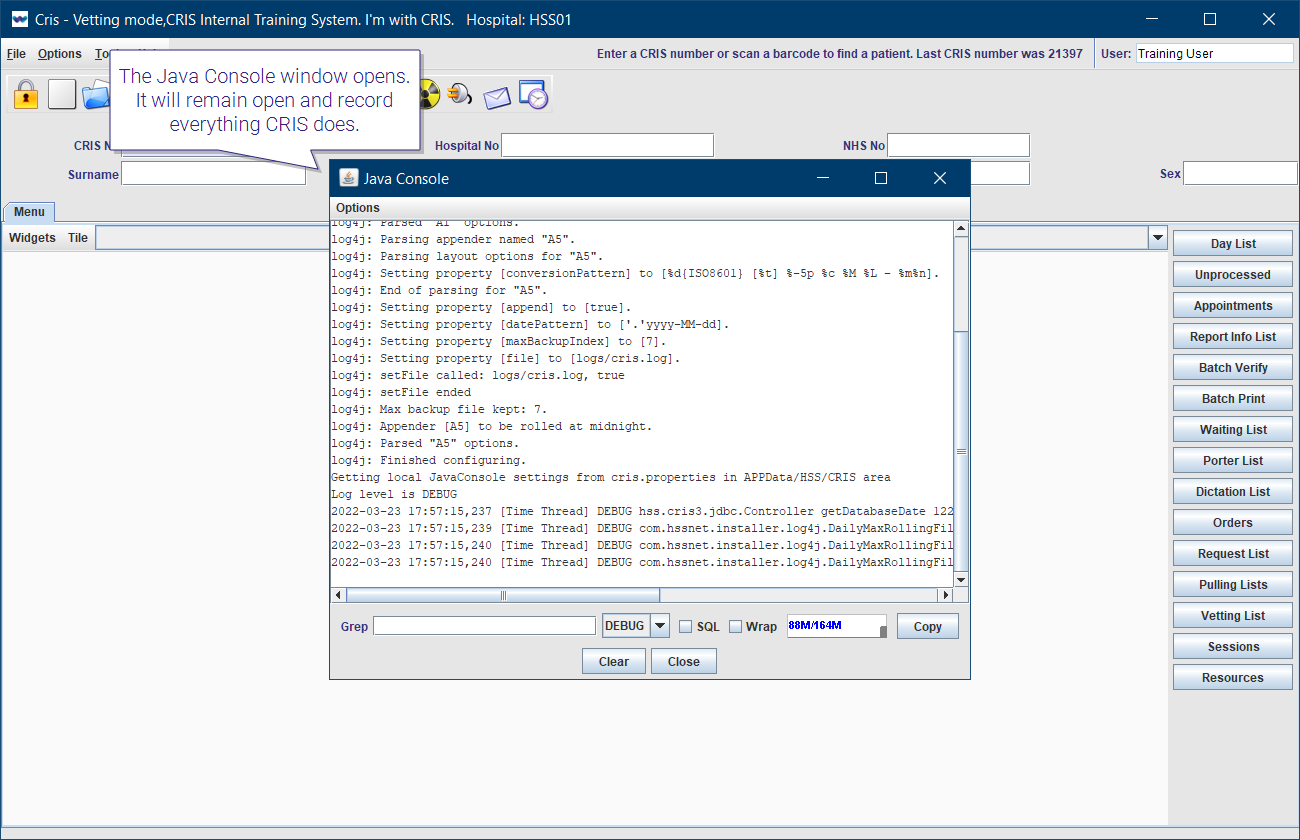
The Java Console window opens. It will remain open and record everything Cris does.
Tip:
If you need help with Cris installation or configuration, you should contact your Trust IT Help desk, or Prime Contractor Help desk, in the first instance. Customers with support contracts can contact us directly.
Open the log
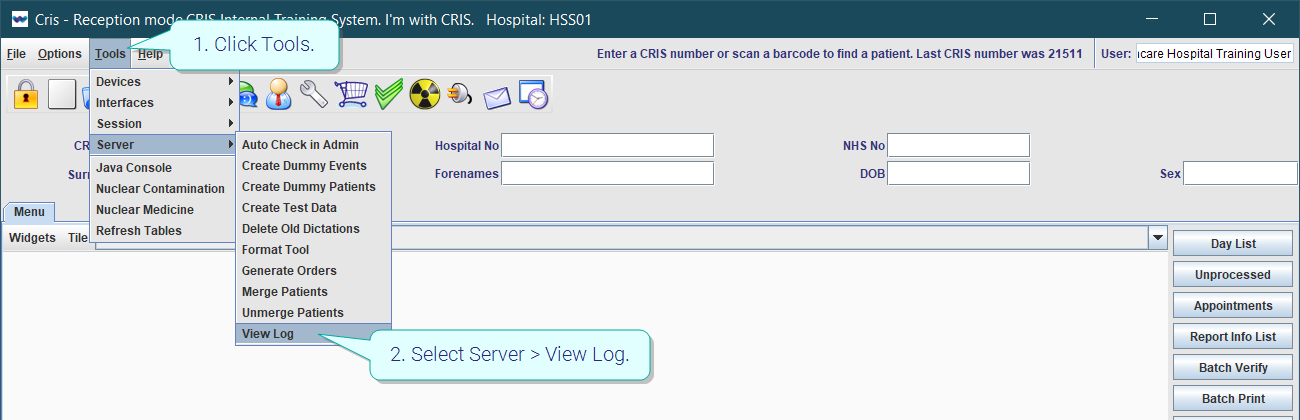
- On the menu bar, click Tools.
- Select Server > View Log.
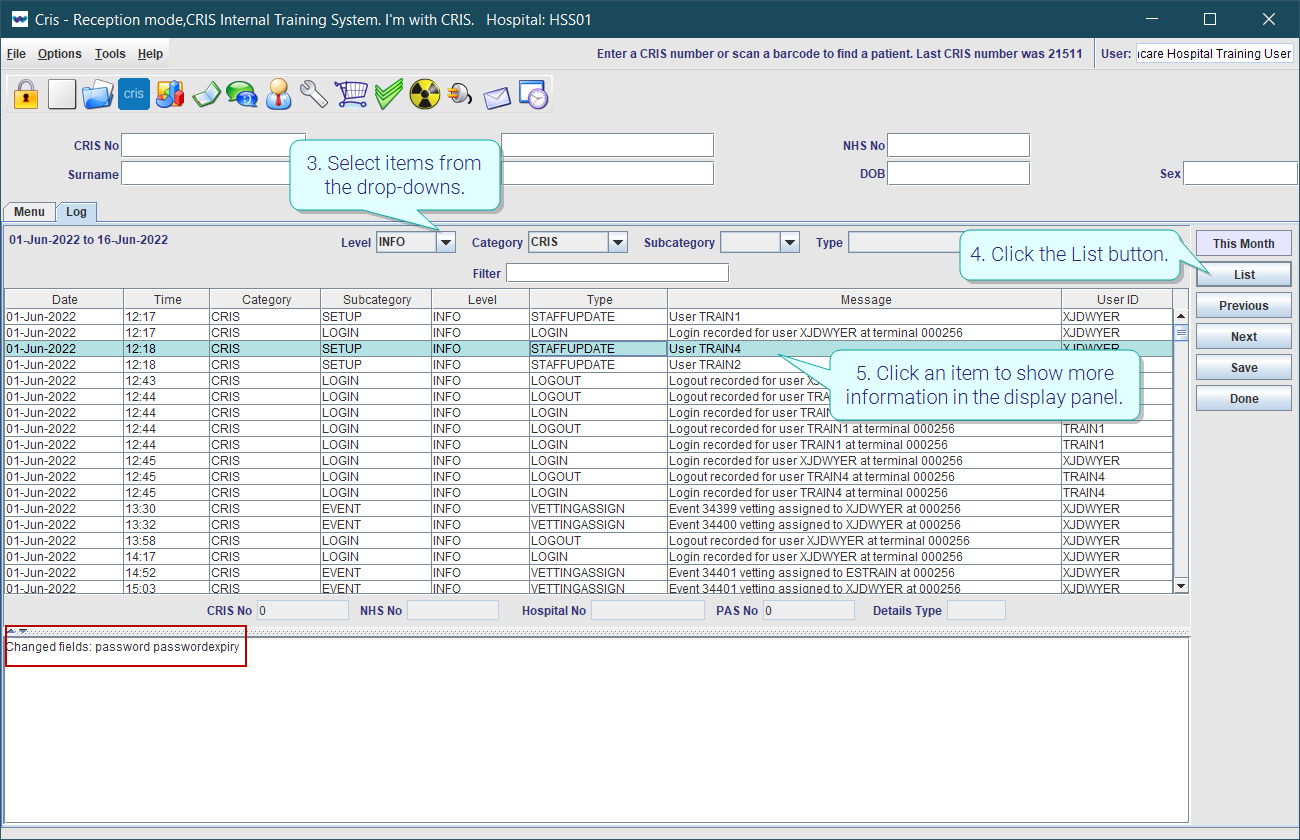
- Select items from the drop-downs to filter results.
- Click the List button.
- Click an item to show more information in the display panel.
| Field | Description |
|---|---|
| Date range |
Displays the date range or selected month. |
| Level |
When left blank, all messages are shown. If one of the three options is selected from the drop-down, messages from that level and above are shown. In order of high to low: Error, Warn, Info. |
| Category |
When left blank, messages from all categories are shown. If one of the three options is selected from the drop-down, only messages from that category are shown. |
| Subcategory |
Subcategory can only be selected once a Category has been selected. |
| Type |
Type depends on the selected Category, and also on your interfaces. Your list may vary from what is shown here. The table below gives details of the most common types. |
| Identifier fields |
If a patient record is selected, the patient identifiers are displayed in this row. The Details Type field indicates what the information shown in the display panel at the bottom of the screen refers to, for example, HL7, TRIGGER (For Cris). Patient identifiers are not always available; whether they are available depends on when the message was generated. |
| Display |
This panel will show details about messages. |
| Button | Description |
|---|---|
| This Month |
Show data for the current month, or up to the current date for this month. |
| List |
Click to refresh the data after making any selections. |
| Previous |
Show data from the month before the current display. |
| Next |
Show data from the month after the current display. |
| Save |
Save the displayed data as a CSV file. |
| Done |
Close the View Log screen. |
Note:
-
EJBSERVER is the Cris interface engine.
-
EJBSERVER is the ID for system-generated messages.
-
Anything with unknown data will be flagged as EJBSERVER (for example, unknown referrers or referral sources).
Users logged in
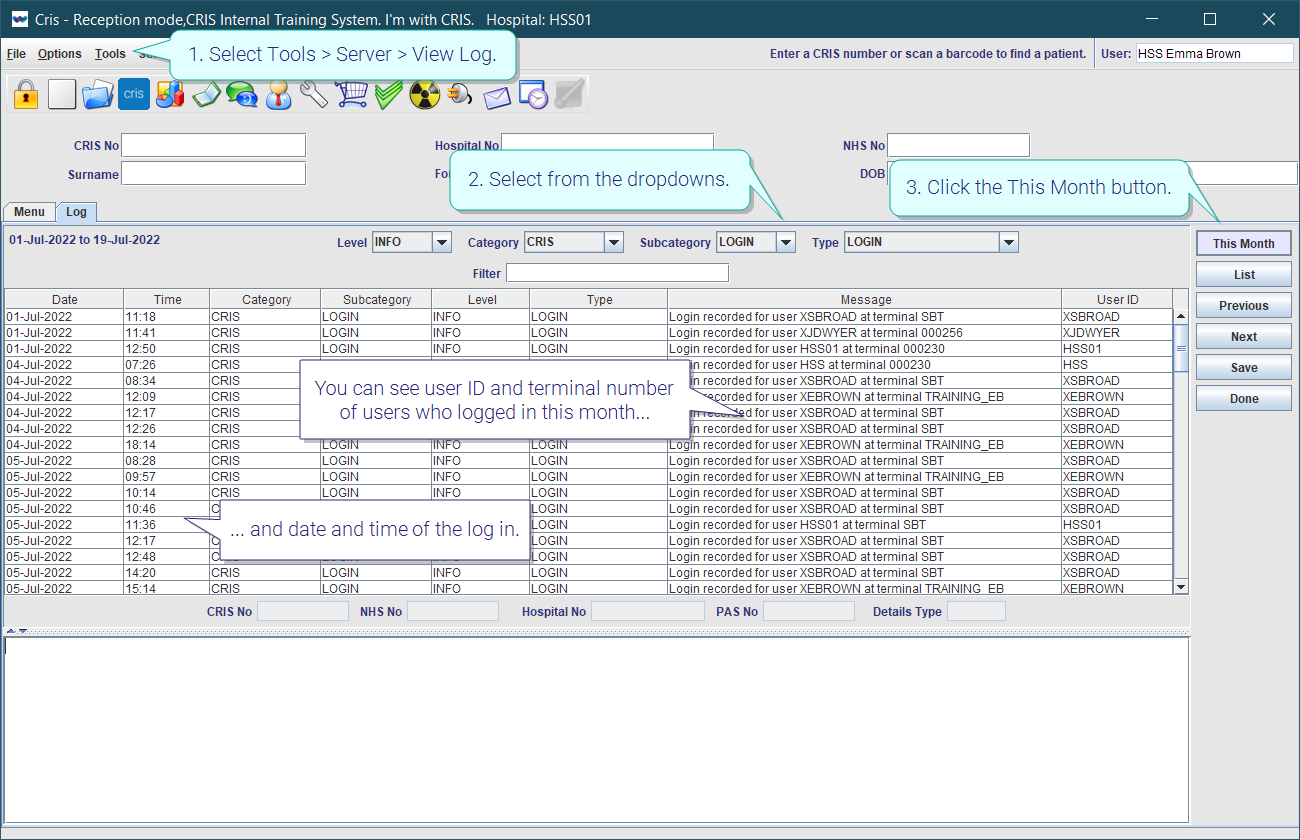
-
Select Tools > Server > View Log.
-
Select from the dropdowns:
-
Level = INFO
-
Category = Cris
-
Subcategory = LOGIN
-
Type = LOGIN
-
Click the This Month button.
- User ID and terminal number of users who logged in this month.
- Date and time of this action.
You can see:
Click the Previous button to show events from last month.
Click the Next button to move forward one month.
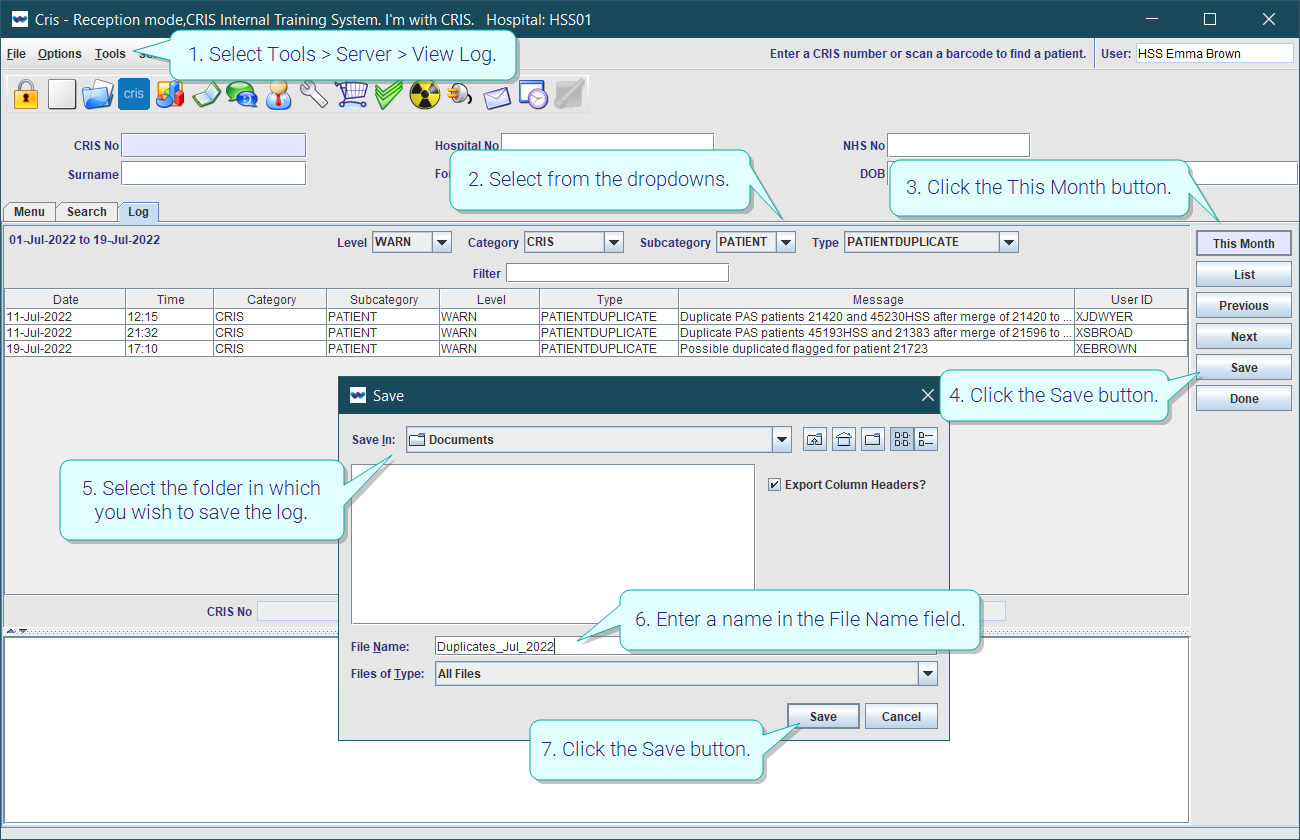
Export log
-
Select Tools > Server > View Log.
-
Select from the dropdowns (for example):
-
Level = INFO
-
Category = Cris
-
Subcategory = LOGIN
-
Type = LOGIN
-
Click the This Month button.
-
Click the Save button.
-
Select the folder in which you wish to save the log.
-
Enter a name in the File Name field.
-
Click the Save button.
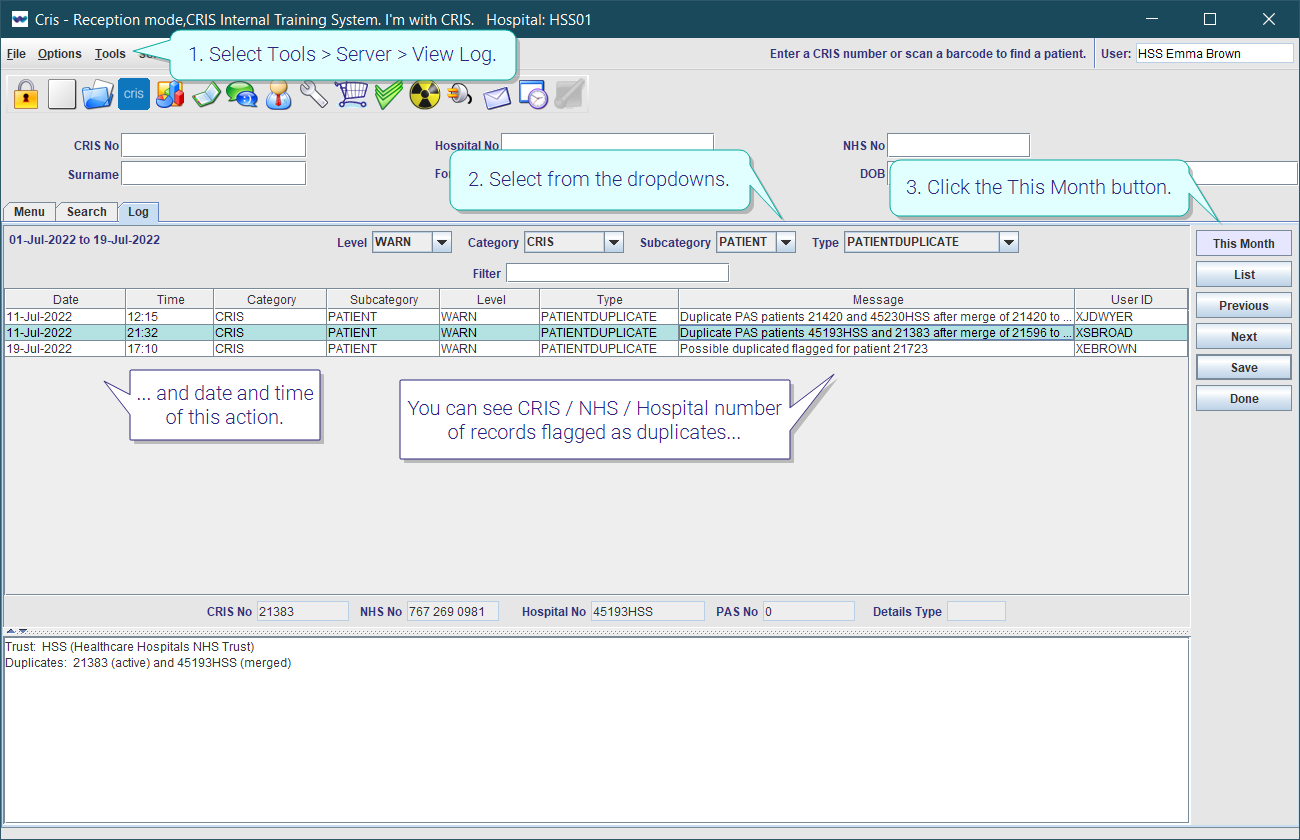
Duplicate patient records
-
Select Tools > Server > View Log.
-
Select from the dropdowns:
-
Level = WARN
-
Category = Cris
-
Subcategory = PATIENT
-
Type = PATIENT DUPLICATE
-
Click the This Month button.
-
Cris / NHS / Hospital number of records flagged as duplicates.
-
Date and time of this action.
You can see:
Click the Previous button to show events from last month.
Click the Next button to move forward one month.
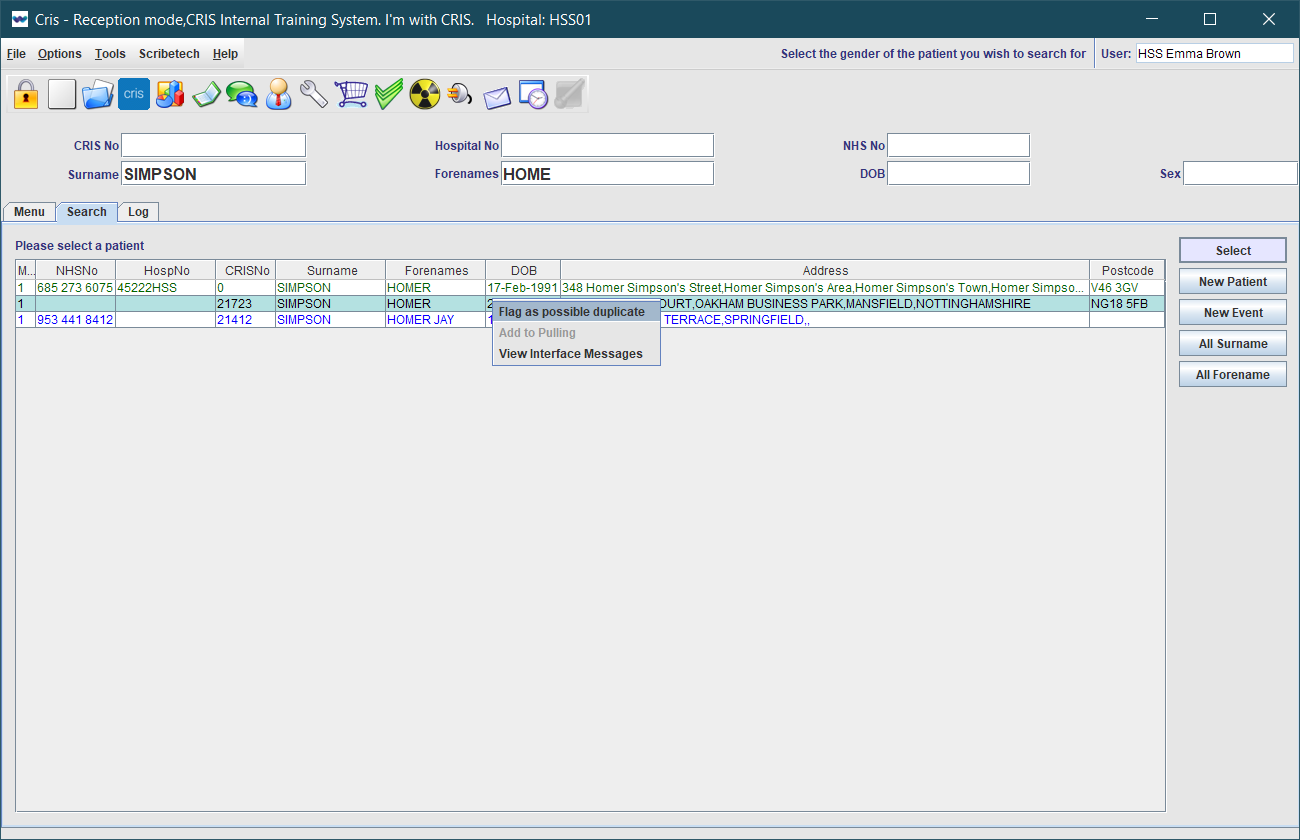
Note:
If you spot any duplicate patient records, you can apply a flag so that an administrator is alerted to the issue. They will investigate and, if appropriate, merge the records. See Patient Correction. Right-click a duplicate patient record and select Flag as possible duplicate.
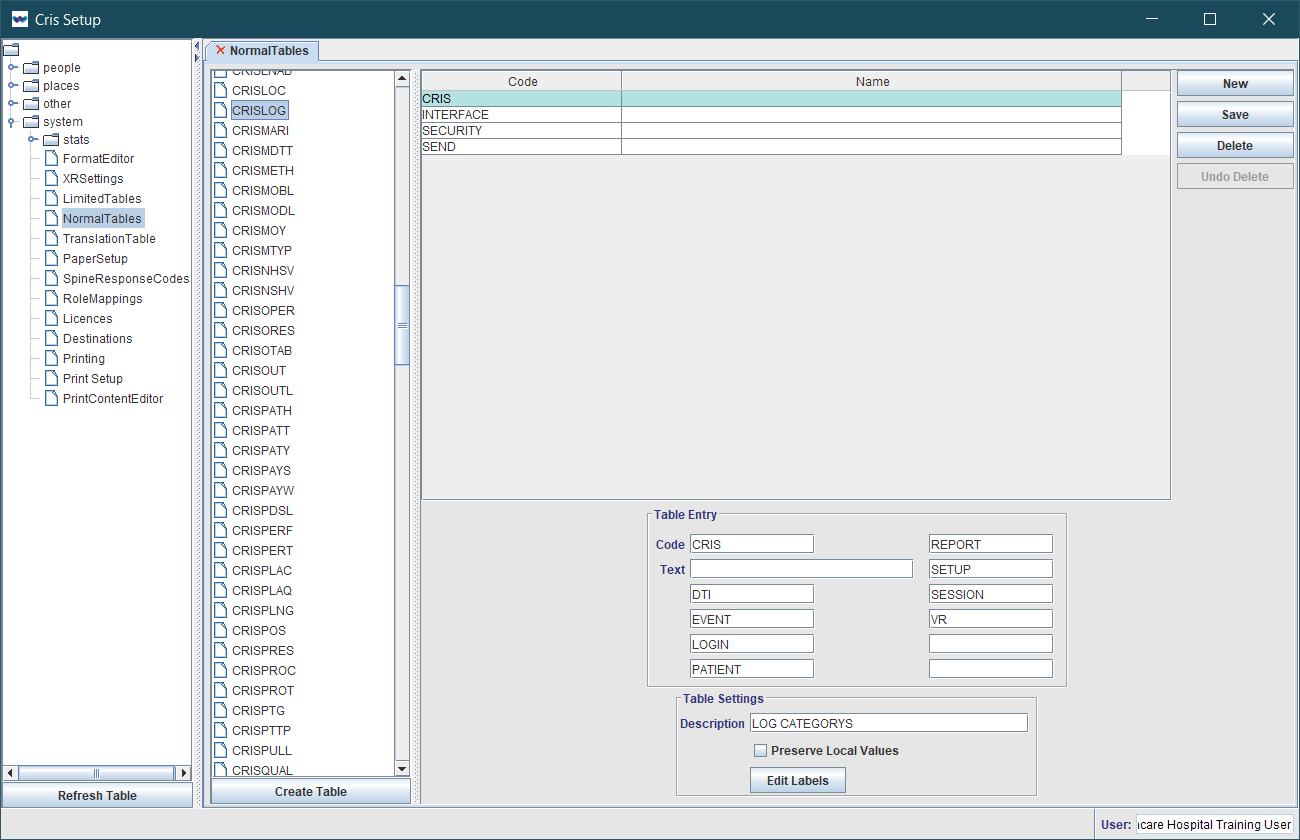
Tip:
-
To add a CATEGORY or SUB-CATEGORY go to System > Normal Tables > CRISLOG.
-
To add a LEVEL go to System > Normal Tables > CRISLGLV.
-
To add an ITEM go to System > Normal Tables > CRISLGTP.
Example:
Common examples of Types. See Reference - Log for a full list of items.
System Administration: Basics
Enter a licence key for new modules.
Configure front page messages for users, sites, or the whole system.
Use Back Log Mode to enter data as if it was a different day.
Use Change Hospital to view and enter information as if you were at another site.